Want to connect Facebook with Wix? We can help with that. Wix is one of the most popular website builders, with over 7 million sites to date. And Facebook, despite all the new kids on the block, still has the highest number of daily active users of any social media platform in the world.
All that to say that you probably have good reason to add your Facebook content to your Wix website. Maybe it's where your brand posts the most content. Maybe it's where you post memes or your creative work.
By adding your Facebook feed to your website, you can keep your website fresh and interesting.
Here's how to do it in 7 easy steps. And if you'd like to add your Instagram content to Wix, be sure to check out this tutorial.
Step 1. Sign up for a social media aggregator
A social media aggregator will allow you to automatically post content from your social media accounts onto your website. This will save you time by not having to individually post each update.

Once you have selected a social media aggregator tool, setting up the feed is a relatively straightforward process. Most tools will provide step-by-step instructions on how to generate the code necessary to embed the feed onto your website.
Social media aggregators are free to use for most small websites. There are affordable alternatives for larger businesses with more sophisticated requirements.
Curation style
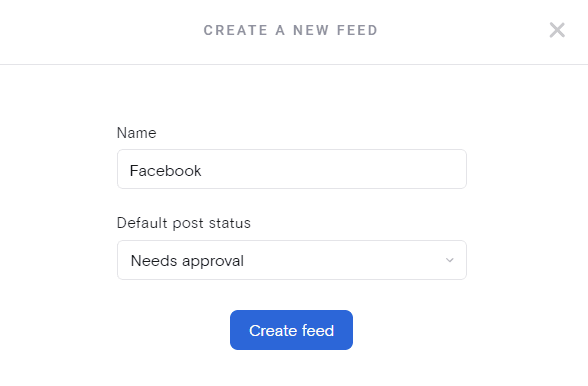
Once you sign up, you can create a new feed. You'll be able to choose from two curation options:
Approved - new content will automatically synch to your website, you can delete anything you don't want at any time)
Needs approval - new content will not get added to your Wix website until you login and approve it.
For this tutorial, I've selected "needs approval."
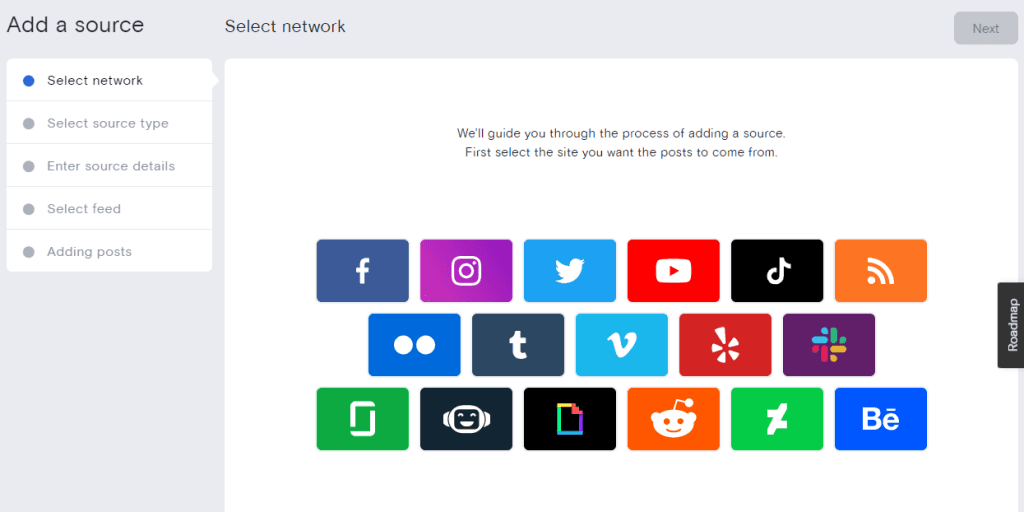
Step 2. Select Facebook as the content source
The next step is to choose Facebook as the content source. You can also aggregate content from Instagram, Twitter, YouTube, TikTok, Slack, Behance, Giphy, and other popular platforms. You can even add content from different social media accounts into one feed if you want to.
Curator.io is an easy-to-customize aggregator that lets you pull from over a dozen sources. If you'd like to give Curator.io's free forever plan a spin sign up today.
Step 3. Choose what type of Facebook content to aggregate
Next, you'll need to choose the type of Facebook content to pull in. With Facebook, there are two types of content you can add to your Wix website: Facebook page posts and page visitor posts. If you want to curate your own content, select Facebook page posts. If you want to showcase the reviews and testimonials that visitors post to your page, then select that option.
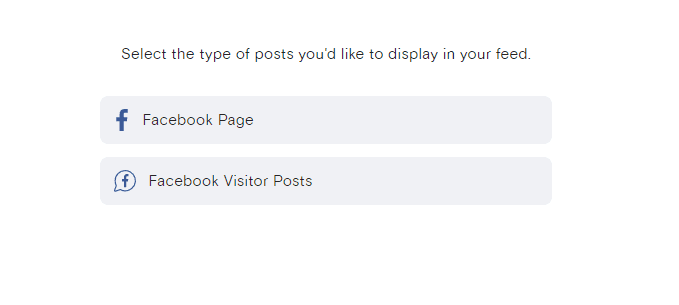
Most businesses will want to aggregate their own posts.
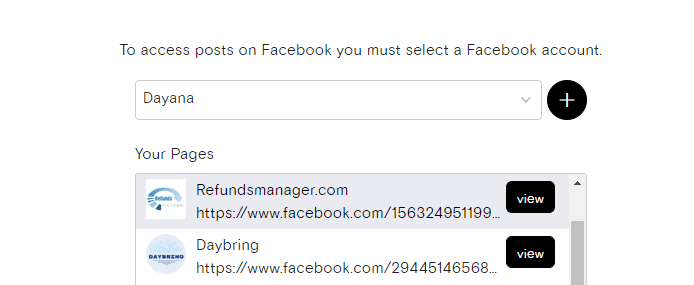
You'll need to then connect your Facebook profile. You'll be able to see all of the Facebook pages that profile manages. Select the correct page.
Step 4. Curate your Facebook feed (approve and deny posts)
When using a social media aggregator tool, you have the option to automatically approve all posts or to manually approve each post. If you choose to automatically approve all posts, any content from your social media accounts will be posted onto your website. However, if you prefer to manually approve each post, you will need to go through the feed and select which ones you want to show up on your website.
It is important to curate the content that is being posted on your website, as this will reflect upon your business. If there are any posts that you do not want associated with your business, it is best to remove them.
Go ahead and approve posts (if you selected "Needs approval") or delete some posts (if you selected "Approved" and you see something you don't want to show up on your Wix site).

Step 5. Customize the look and feel of the Facebook feed
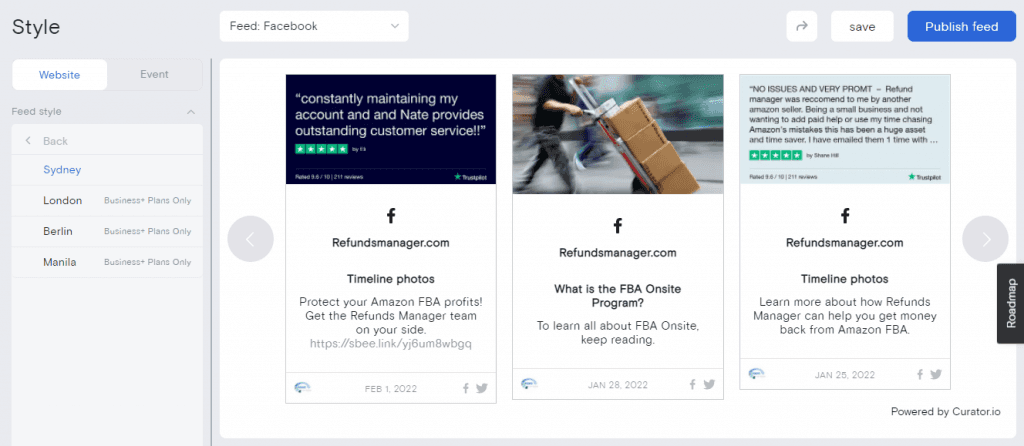
Now it's time to choose the feed template that you like best for your Facebook content and make any other customizations. The feed templates include Waterfall, Grid, Grid Carousel, Carousel, Panel, List, Mosaic, and more. In this example, we've chosen Carousel, which will automatically turn to the next content at a reasonable speed (not too fast and not too slow).
You can also change the font color and Facebook logo color to match your website.
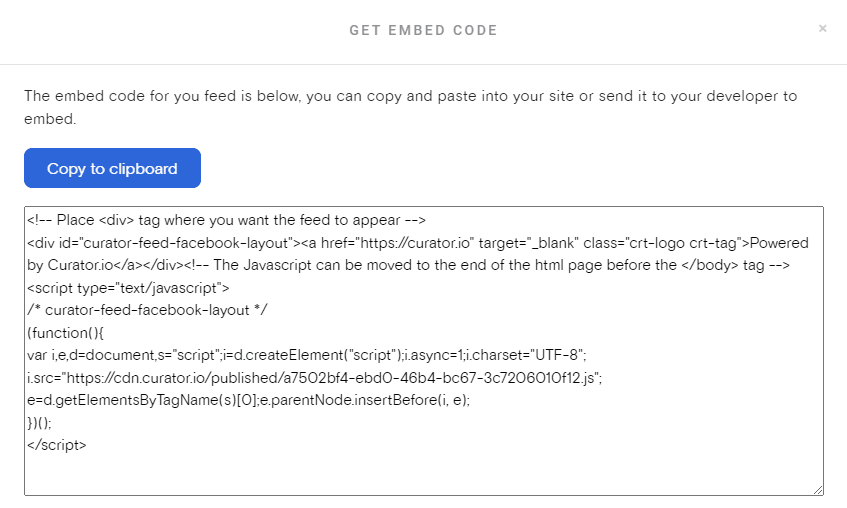
Step 6. Copy the embed code and paste it in your Wix website
The final step is to simply copy and paste the embed code. Hit "Publish feed" and a pop-up will appear showing the code you need to copy and paste. Paste the code wherever you want the Facebook posts to show up it. The most popular places are website footers and blog side-bars, but you can add the code wherever you see fit. You might even create a dedicated page for your Facebook content and add it to your website menu.
Step 7. Login to the social media aggregator to curate new posts on a weekly or monthly basis
It is important to check in on the social media aggregator tool regulary to ensure that only appropriate content is being posted onto the website. Unless you've selected automatic approval in your settings, new content must be approved before it is added to the website.
Approving content from other users (via mentions or hashtags) can be time-consuming, but it is necessary in order to maintain a professional image for your business. If you are unable to commit to regularly checking and approving new content, it might be best to stick with posting your own updates.
By following these steps, you can easily add fresh content to your Wix website using a social media aggregator tool.
8 good reasons to add your Facebook posts to your Wix site
Adding Facebook posts to your Wix website can improve it in several ways, including:
1. Fresh content without extra work
When you embed a Facebook feed, your site automatically updates every time you post. That means your visitors always see the latest content without you lifting a finger. It’s like having a self-refreshing blog running in the background.
2. Social proof that builds trust
People trust what they see from real users. Displaying Facebook posts, including likes, shares, and comments, shows visitors that your brand is active and engaging. This kind of social proof can reassure new visitors that you’re worth following or buying from.
3. Higher engagement
An embedded Facebook feed isn’t just for looks. Visitors can click through to like, comment, or share your posts directly. This encourages more interaction with your brand across platforms and makes your website feel less like a static brochure.
4. Saves you time
Why write a whole new site update when you’ve already crafted the perfect Facebook post? Embedding saves you the trouble of duplicating content. Post once, and it lives both on your social page and your website.
5. Helps with SEO
While embeds themselves aren’t directly indexed, the fresh activity can keep visitors on your site longer. Google notices when people spend more time browsing, which can support your overall search performance.
6. More visual appeal
Text-only websites can look flat. Embedding photos, videos, and other media from Facebook instantly adds life, movement, and color to your pages.
Social media posts containing pictures, videos, and links not only grab more attention but also spark greater emotional engagement compared to plain text posts. In other words, rich media doesn’t just make your site look better. It also makes visitors feel more connected and more likely to interact.
7. Cross-platform growth
Your site visitors discover your Facebook, and your Facebook followers discover your site. Embedding creates a natural bridge between the two, helping you grow both audiences.
8. Authenticity that stands out
Unlike polished marketing copy, Facebook posts show the real voice of your brand. That authenticity can make your site feel more relatable and trustworthy. Keep in mind that 86% of consumers say authenticity matters when deciding which brands to support. Another 82% say they are more likely to trust a brand when it shares authentic customer content.
Tips for optimizing your Facebook feed
Embedding a Facebook feed can improve your site aesthetically and more, but only if you do it correctly. Apply these tips to get the most out of adding Facebook posts to your Wix website:
1. Place the feed strategically
Don’t just drop your Facebook feed anywhere. Place it where it supports your goals, like the homepage to boost brand trust, a testimonials page to highlight happy customers, or a blog sidebar to keep visitors engaged. Think about the journey you want your audience to take: do you want them to discover your social presence right away, or only after they’ve scrolled a bit? Strategic placement makes sure your feed adds to your site’s flow instead of distracting from it.
2. Keep it mobile-friendly
Most visitors will view your Wix site on their phones. Make sure your embedded feed is responsive so it scales down neatly on smaller screens without breaking the layout or slowing things down. Test it on different devices to confirm that posts, images, and buttons are easy to interact with on touchscreens. A mobile-friendly experience is crucial because if it looks or acts clunky on a phone, visitors may bounce before they even see your content.
3. Limit the number of posts displayed
A never-ending feed can overwhelm your site and hurt load times. Display a handful of your best posts instead. This keeps your page lean and ensures visitors see only the highlights of your Facebook activity. Think of it like a storefront window where you show off the most eye-catching items to draw people in, not everything from the stockroom.
4. Match the style to your branding
Customize fonts, colors, and layouts so your Facebook feed blends with your Wix design. A consistent look makes your site feel professional and keeps the focus on your message.
When your social feed looks like a natural extension of your brand, visitors are less likely to see it as a distraction. Cohesive design also reinforces brand recognition, which can help with trust and conversions.
5. Use filters for quality control
Not every Facebook post belongs on your homepage. Use curation tools to filter out less relevant updates and highlight the ones that show your brand at its best. This ensures your feed always looks polished and purposeful instead of cluttered. It also allows you to promote posts that align with campaigns, seasonal promotions, or key messages.
6. Check performance regularly
Test your site speed and functionality at regular intervals, such as monthly. Regular checks ensure you’re not trading aesthetics for performance. If your feed slows things down, switch to lazy loading or trim the number of displayed posts.
7. Track what’s working
Use analytics to see how visitors interact with your embedded feed. If people click through often, that’s a sign it’s boosting engagement. Monitor which types of posts get the most clicks, and adjust your Facebook strategy accordingly. Over time, you’ll know exactly what content resonates with your website visitors, allowing you to refine both your social and web presence.
FAQs
Get answers to frequently asked questions.
Can I add more than Facebook to my Wix website?
Yes, you can embed content from other social platforms. With tools like Curator, you can embed Instagram, TikTok, X (formerly Twitter), LinkedIn, YouTube, Pinterest, and more. This allows you to showcase multiple social feeds in one place, giving visitors a richer picture of your brand’s activity across the web.
Do I need coding skills to add Facebook posts to Wix?
Not at all. Most tools, including Curator, provide a simple copy-and-paste embed code. Wix also supports drag-and-drop embedding, so you don’t need any technical background to make your feed look professional.
Can I choose which Facebook posts appear on my Wix site?
With Curator, you can approve or block posts manually, or set up automatic filters by keyword or type of content. This ensures that your feed shows only your preferred content and stays on-brand and relevant.
Will embedding Facebook slow down my Wix website?
If you embed too many posts, it can impact load time. The best approach is to limit the number of visible posts and use performance-friendly settings like lazy loading. Curator is optimized for speed, so your site stays fast while still displaying fresh content.
Previous post: