How to Add an X (Twitter) Feed to Your WordPress Website
Dayana Mayfield
on
January 14, 2026
Aggregator
Twitter (now rebranded as X) continues to be a valuable marketing tool for businesses, with 561 million global users as of 2025. While it may not match the scale of Facebook or Instagram, its real-time nature and high engagement make it a strategic channel, especially for B2B marketers. In fact, 82% of B2B content marketers use X to distribute content, connect with audiences, and build brand awareness.
In the U.S. alone, over 77 million people actively use the platform, with 76% of users aged between 18 and 49—prime buying demographics for many brands. If your business is targeting this audience, integrating X into your digital strategy isn’t optional—it’s essential.
One of the most effective ways to bring your X presence to life is by embedding your X feed directly on your website. If you're using WordPress, the good news is that integration is now faster, easier, and more customizable than ever.
In this guide, we’ll walk you through how to seamlessly add an X feed to your WordPress website in five simple steps.
Why a social media aggregator to embed your profile
WordPress allows users to add social feeds to websites through the Embed feature. However, this feature only works if you want to add standalone tweets to a post or a section of your website, meaning you'll have to embed each tweet manually.
To do this, you have to navigate to the tweet you'd like to embed, click the tweet menu button and select "Embed Tweet."
In the next window, copy the generated code and paste it into your WordPress post using the designated X block in the post edit field.
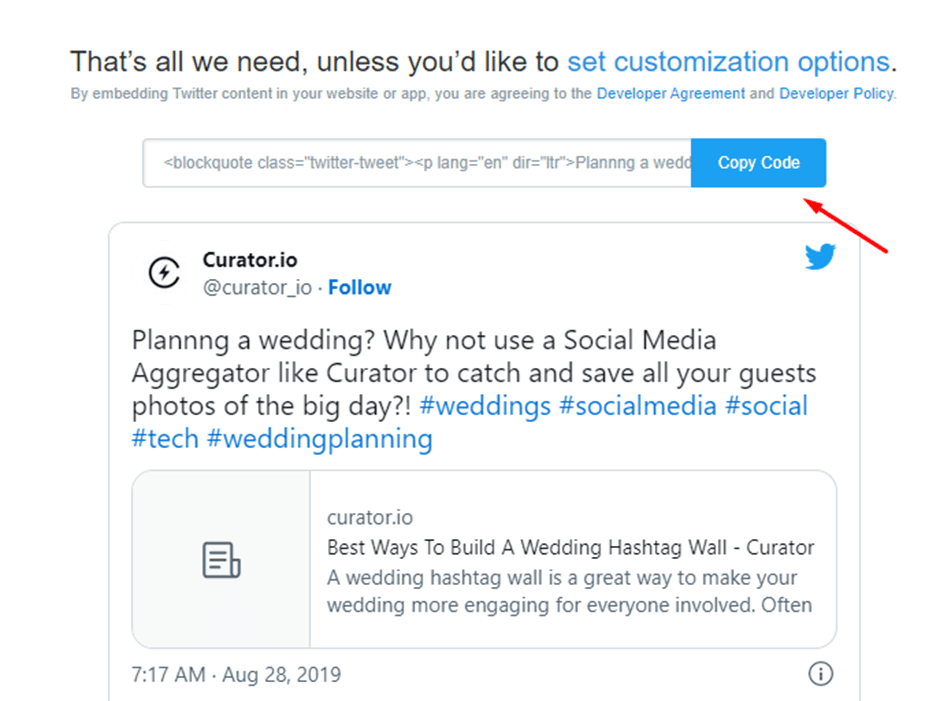
While the above process works, it's tedious if you want to maintain a steady stream of X content on the website.
A better alternative is to use a social media aggregator. A powerful social media aggregator like Curator streamlines the X feed integration process, allowing you to automatically publish different types of X content to your website—not just single tweets.
You can moderate what shows up on your website and tweak the visual appearance to fit nicely with the broader website theme.
Do you need an X (Twitter) WordPress widget?
You need a Twitter WordPress Widget if you're looking to establish a link between your website and your Twitter content. After investing a lot of time and energy into building a Twitter profile, it makes perfect sense to bring your Twitter timeline and the content it contains to as many people as possible.
A Twitter widget allows you to generate more results from your Twitter efforts. With the right widget, your website visitors can see your Twitter timeline at a glance. They can see the conversation on your Twitter profile without leaving your website.
The integration has three distinct advantages:
Increased Session Time
Your website bounce rate is an important website ranking factor. If people leave your website almost immediately after landing, the signal is that they are unhappy with the content.
Over time, Google will translate this to mean a lack of authority in your niche, undermining your SEO efforts. Adding an X widget to display highly engaging content from your feed will keep site visitors engaged, leading to higher on-site time and significantly improving your bounce rates.
Easy Display of Social Proof
What better way to show off your brand's efficacy and reach than to display content showing happy and engaged customers? First-time website visitors will likely become paying clients if they see that you already have thousands of happy, paying customers and followers.
Increased X Following
Your site visitors are unlikely to go on X to find your business account using the search box. With your X feed on your website, you can turn a sizable portion of your website visitors into X followers.
The 2 types of X content for your WordPress website
When embedding an X feed into your WordPress website, choosing the right type of content is key to engaging your visitors and aligning your feed with your brand goals. Two of the most impactful types of X content you can showcase are User content and Hashtag content.
User content pulls tweets directly from a specific X account. This could be your business profile, a personal brand, or even a partner account. Displaying your own tweets is a great way to highlight brand updates, promotions, customer service replies, or behind-the-scenes content. It ensures that your website always features fresh, relevant updates straight from your official X timeline.
Hashtag content, on the other hand, allows you to display tweets that include a specific hashtag. This is especially useful for marketing campaigns, events, product launches, or community engagement. For example, if you're running a campaign with the hashtag #MyBrandStory, your feed can automatically display user-generated content featuring that tag, creating instant social proof.
Both types of feeds serve different purposes: user feeds help with brand authority and consistency, while hashtag feeds promote engagement and community involvement. When used together, they create a well-rounded X integration that boosts visibility and interaction on your site.
5 steps to adding an X (Twitter) feed to your WordPress website
Adding an X (Twitter) feed to your WordPress website is straightforward—especially if you use Curator's powerful social media integration tool. Here's what to do:
Step 1: Create a new feed and setup your approval preferences
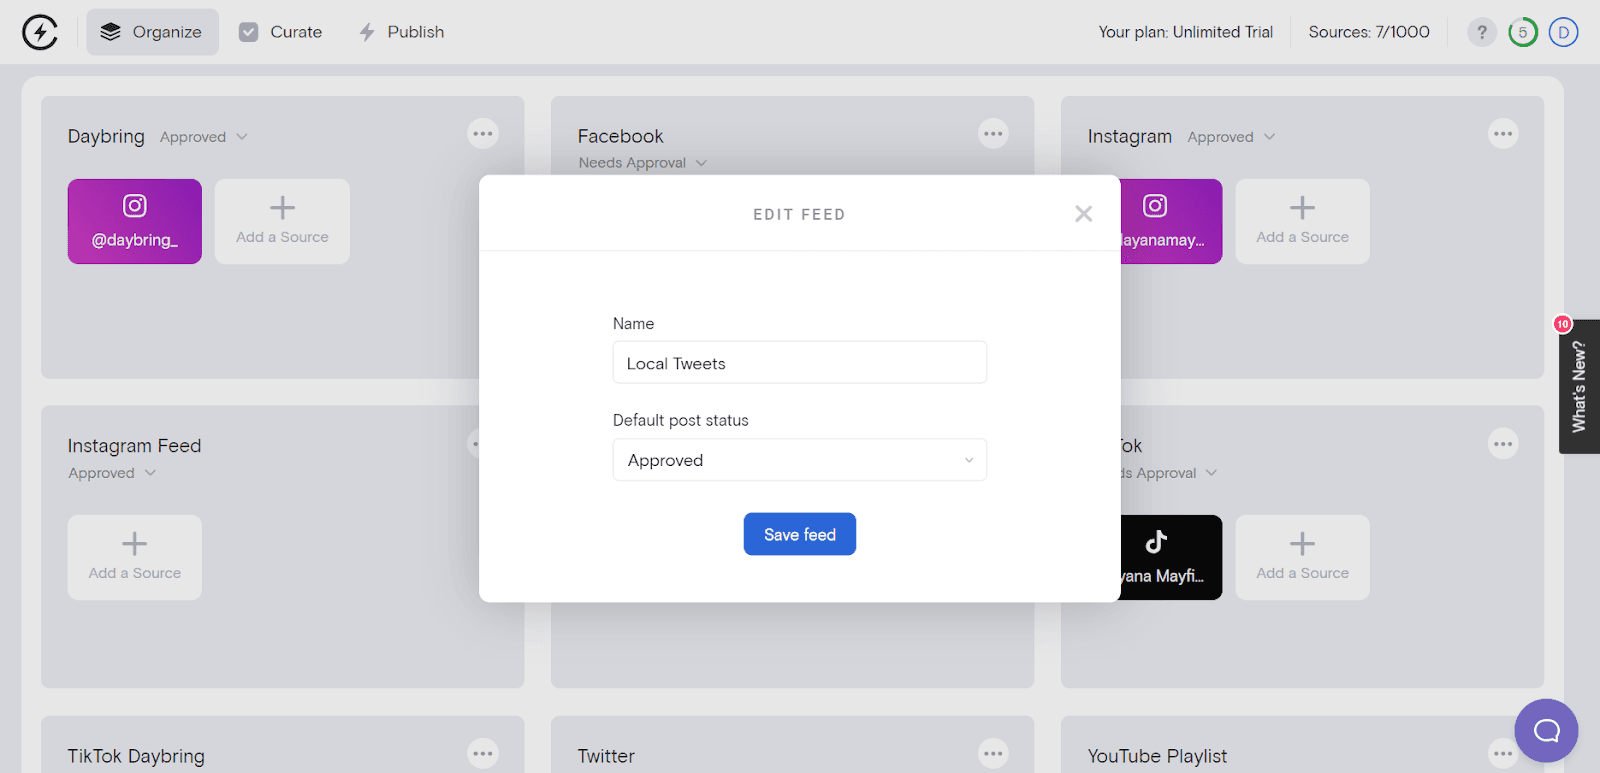
Login to your Curator account and select the "Organize" menu. Choose a relevant name for your new X (Twitter) feed. Some examples include "Latest Tweets," "User Generated Posts," etc.
After naming the feed, the next step is to choose your approval preferences. Curator offers two approval options:
Approved: Choosing this option will add all relevant X (Twitter) posts to your website automatically. You can go into your account later to delete any posts you don't want to showcase on the site.
Needs approval: With this option, the aggregator will not publish any Tweets to your website until you log in to your curator account and approve the posts.
On paper, the first option sounds more convenient. However, if you're showcasing user-generated content on the website, you have to be on your toes to ensure that every published post doesn't break any rules. Thus, it's often better to make posts go through an approval process.
It's better to publish posts a few hours after they were made than to spend time and money on firefighting after a problematic post or negative review is published automatically to your site.
Step 2: Select the post source
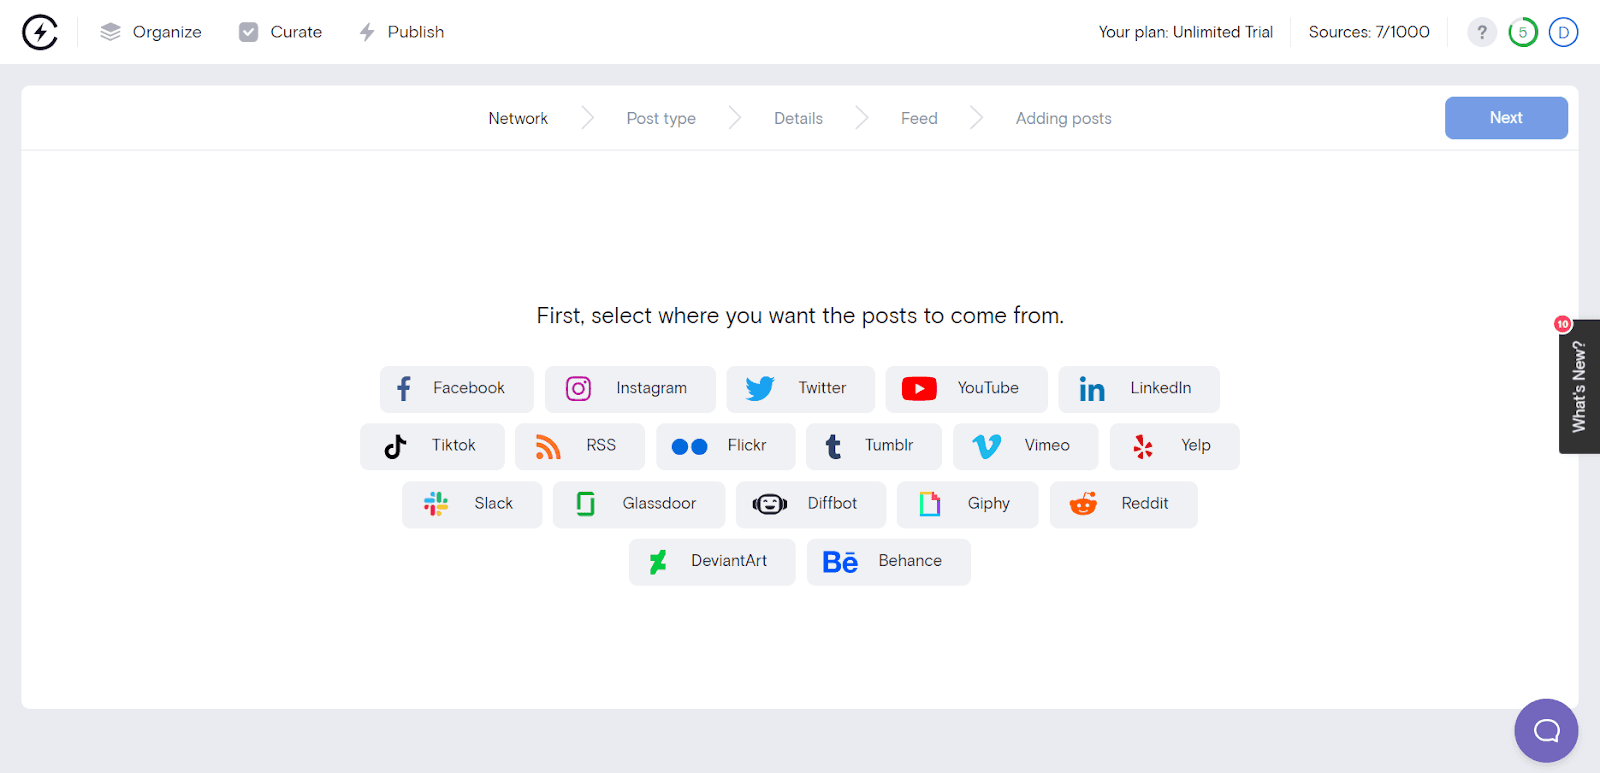
This part of Curator is where you pick where the content will come from. In the first window, you'll choose X from a list of social media platforms. Next, choose the source of your X content.
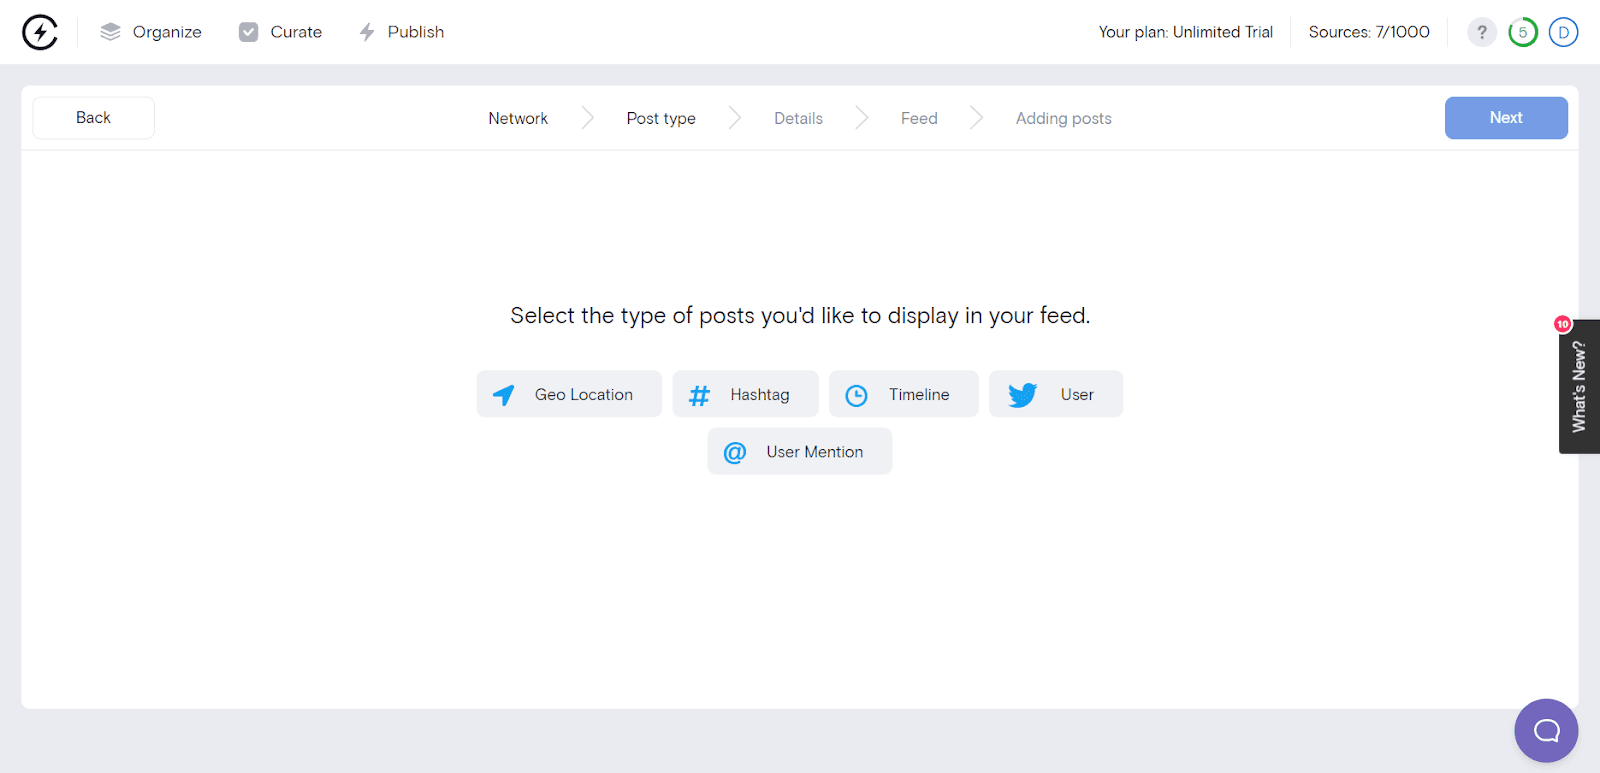
The content options on X include the following:
Timeline
Hashtag
Geolocation
User
User mention
Your choices here should influence your selection in the "Approval" tab. If you only select posts from your Timeline, only Tweets and Retweets from your official page will show up on your website. As you include other content options like Hashtags or User Mentions, staying in control of the content you display becomes imperative.
Step 3: Curate your posts
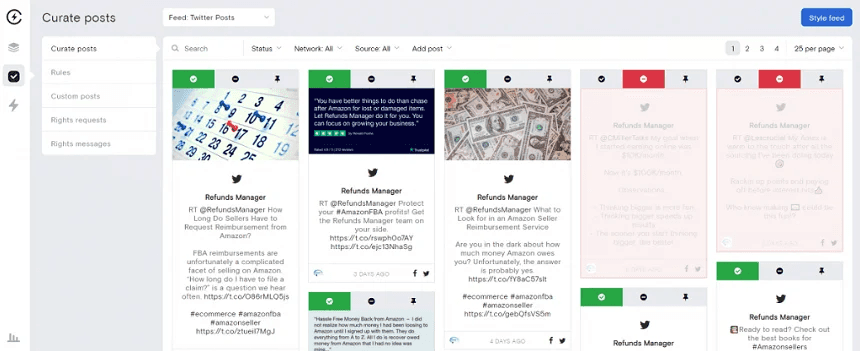
If you choose to approve posts first, you'll need to go through the dashboard and select posts to publish. Alternatively, you could set posts to approve automatically. Setting automatic approvals requires using the dashboard to remove posts you don't want to show up.
Step 4: Customize your X feed
This part of the setup process sets Curator apart from other less flexible feed integration options. The platform allows you to decide your feed's appearance by tweaking the template and layout.

Popular options include:
Panel: The panel is a single column of posts with several rows. It's the perfect choice if you'd like to display a feed on your website sidebar.
Carousel: This option will display X posts and navigation arrows to move back and forth. Site visitors can enjoy the posts as they move automatically or bring back specific posts with arrows.
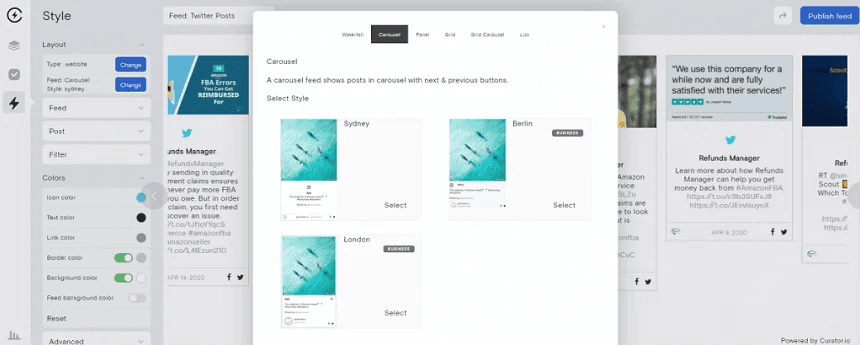
Grid: This option displays the content of the feed, but it won't show any captions until the user hovers over the image to see the caption.
Waterfall: This style gives you a cascading list of posts with multiple columns and rows.
Apart from the template and layout, Curator allows you to customize your borders, colors, backgrounds, and more. The flexibility ensures your X feed will not stick out like a sore thumb on your website. You don't have to complete the customization in one go. You can do the basics and then tweak the style over time.
Step 5: Copy and paste the HTML code

On completing the setup, click "Publish" to copy the generated code to paste into your website. Popular locations to display the feed include the bottom of the home page and the blog sidebar.
You can also create a dedicated news page for the feed or set up different feeds for different website sections. Curator also has a WordPress plugin that allows you to publish the curated feed on any page by simply entering a short code on the page.
X (Twitter) feed examples
Curious what your feed will look like?
Here are some examples of X feeds:

The feed above publishes tweets from the Refund Manager account in a neatly arranged format.

The city of Riverside, California, embeds Tweets on its website to keep site visitors informed.
Frequently asked questions
Can I embed tweets from multiple X (Twitter) accounts into one feed?
Yes, with Curator you can easily embed tweets from multiple X (Twitter) accounts into one unified feed. Just add each account as a separate source within your feed settings. Curator will automatically pull content from all selected accounts and display them together in a single, seamless feed on your website.
What’s the difference between embedding an X feed manually and using a social media aggregator like Curator?
Embedding an X (Twitter) feed manually means copying and pasting code for each tweet one by one, which is time-consuming and limited. With a social media aggregator like Curator, you can automate the process, pull multiple tweets or accounts into one feed, customize the layout, and easily manage or moderate content—all without constant manual updates.
How often does the X feed update on my website?
With Curator, your X (Twitter) feed updates automatically in near real-time. Once new tweets match your selected sources—like accounts, hashtags, or mentions—they're fetched and added to your feed based on your approval settings. You don’t need to refresh or re-embed anything manually. This ensures your website always displays the latest, most relevant content from your chosen X sources.
Will embedding an X feed affect my site’s load speed or SEO?
Embedding an X (Twitter) feed with Curator has minimal impact on your site’s load speed because the feed loads asynchronously, meaning it doesn’t block other page content. In fact, regularly updated content like social feeds can improve SEO by increasing engagement and session time. Just make sure your feed is well-optimized and relevant to your visitors for the best results.
How can I filter out spam or unwanted posts from my embedded feed?
With Curator, you can easily filter out spam or unwanted posts by using the "Needs Approval" setting. This lets you manually review each tweet before it appears on your website. You can also block specific keywords, users, or hashtags to automatically exclude irrelevant content. This keeps your embedded feed clean, on-brand, and safe for your audience.
What’s the best X content strategy for driving engagement from my website visitors?
To drive engagement, share a mix of original tweets, customer testimonials, and content that highlights community involvement or events. Use branded hashtags to encourage user-generated content, and embed hashtag feeds to showcase it. Keep your tweets visual and concise, and respond to mentions or comments to build trust. Featuring this content on your site builds social proof and encourages visitors to follow and interact with your X profile.
Can I display different X feeds on different pages of my WordPress site?
Yes, this is a great idea! With Curator, you can create multiple X (Twitter) feeds and embed them on different pages of your WordPress site. For example, use one feed for behind-the-scenes content, another for customer reviews, and one for campaign hashtags. This keeps each page relevant and engaging for your visitors.
Try Curator for yourself
Curator makes it easier to bring your X (Twitter) content closer to all your website visitors, whether they have an X account or not. Besides X, you can use Curator to collect and display content from other social platforms, including Instagram and Facebook. Sign up today to try Curator for free.
Previous post: