You posted a Reel last month that actually landed. People shared it, saved it, and left comments. Then the algorithm moved on, and the Reel slid quietly down your grid.
Meanwhile, your website looks exactly the same as it did before you filmed it.
I've watched brands post a great Reel, enjoy a week of views, and then never use it again. Putting your best Reels on your website is the easiest way I know to give them a second life.
The quick answer: You can embed Instagram Reels on your website in two ways. Paste Instagram's own embed code to show one specific Reel. Or use a social media aggregator like Curator's Instagram embed tool to run a feed that adds new Reels automatically.
This guide walks you through both methods, step by step. You'll also see what Instagram allows in 2026, because a few settings quietly block embeds. And if a Reel refuses to appear, the troubleshooting section matches what you're seeing to a fix.
Maybe you want one product demo inside a blog post. Maybe you want a living Reels wall on your homepage. Either way, you'll know your route within a couple of minutes, and you can have it live today.
Two ways to embed Instagram Reels, and how to pick one
Before you copy any code, decide how many Reels you actually want to show. That one number points you to the right method.
Question | Instagram's embed code | A Reels feed (aggregator) |
|---|---|---|
How many Reels it shows | One per code snippet | As many as you approve, in one feed |
Do new Reels appear automatically? | No, you paste new code each time | Yes, once the feed is connected |
Can you change the layout? | Very little, Instagram controls the player | Yes, with templates and styling |
Account type needed | Any public account | A Business or Creator account |
Page speed with several Reels | Each embed loads its own player | One embed code loads the whole feed |
Cost | Free | Free plans available, paid plans for more traffic |
Best for | One Reel inside a blog post or landing page | Homepages, footers, and product pages that should stay fresh |
Here's the rule of thumb. One or two hand-picked Reels means Instagram's embed code. A running showcase of your latest Reels means a feed.

Instagram's embed code: best for one or two Reels
Instagram's embed code is free and official. You copy a snippet from the Reel, paste it into your page, and you're done. It's a great fit when you want to showcase a few hand-picked Reels.
The trade-off shows up over time. Every new Reel means repeating the process, which gets burdensome fast. Styling stays limited to what Instagram allows. And every embed loads Instagram's own player and script, so several on one page add real weight.
Best for: One Reel inside a blog post or landing page.
A Reels feed: best when you post often
An aggregator pulls your latest Reels into one feed that you embed once. From then on, you can:
Display a constantly updated feed of Reels
Control the look and feel of your social feed (no CSS required)
Approve content before it goes live, if desired
New Reels appear with one click, and a free plan may cover you completely.
Why keep Reels around? Socialinsider analyzed 140,000 Reels from business pages (2026). Reels earned the highest reach rate of any Instagram format, but only for accounts under 50,000 followers.
Your Reels are great at finding new people. A website feed keeps them working after Instagram moves on.
Best for: High-volume posting, automated updates, branded display, and non-technical users.
What Instagram allows right now (check this first)
You did everything right, and the embed still shows an error. Frustrating, right? The culprit is usually a setting on Instagram, not anything on your website. Run these three quick checks before you pick a method. Each one takes less than a minute, and together they rule out the problems that no amount of code-fiddling can fix.

The Reel has to be public and embeddable
Instagram only lets you embed content from public accounts. Owners can also switch embedding off without going private, which can catch you off guard.
To check your own account, open the Instagram app and go to your profile. Tap the menu in the top right. Under How others can interact with you, tap Sharing and remixes. Then make sure Allow website embeds is switched on.
Two details matter here. Switching your account to private turns embeds off automatically. And if you change the setting, existing embeds may take a while to disappear from other sites.
Embedding your own Reel? Check this toggle first. It's the fastest fix in this whole guide.
Feeds need a Business or Creator account
Instagram's embed code works with any public account. Live feeds play by different rules.
In December 2024, Meta retired the Instagram Basic Display API, the connection personal accounts relied on. Since then, feed tools can only connect Instagram professional accounts, meaning Business or Creator accounts.
Still on a personal account? No need to worry. Switching to a professional account is free and takes a few taps in your Instagram settings. Do it before you connect any feed tool, and you'll skip a frustrating error screen.
Planning to pull in Reels from a hashtag or from people who mention you? Those sources usually need a Business account connected through Facebook. If that's your goal, here's how to set up a hashtag Reels feed on your site.
Other creators' Reels need permission
Instagram's embed button works on any public Reel, including Reels made by creators and customers. Technically, you can embed almost anything. Featuring someone else's Reel on a sales page changes things, though, because now their work is promoting your business.
The safe norm is simple: ask first. Send the creator a quick DM asking if you can feature their Reel on your website. Then screenshot their "yes" and save it with your campaign files.
Collecting customer Reels at scale? Look for a tool that tracks permissions for you. Curator offers a rights management add-on, a Chrome extension that sends rights requests to Instagram users and tracks the replies. It pairs well with a clear process for moderating user-generated content.
How to embed an auto-updating Instagram Reels feed with Curator
Ready for Reels that update themselves? Full disclosure: Curator publishes this blog, and it's the tool I use every day. The setup takes about five minutes and works on any site that accepts HTML.
One yoga studio had embedded six Reels one at a time on its class schedule page. Every new Reel meant a request to their web developer, so the page went stale for months. The studio swapped those six embeds for one Curator feed on manual approval. Now the front desk manager approves new Reels in a couple of clicks, and the page stays current.
Here's the exact process.
Step 1. Get your account ready, then sign up
Before you sign up for anything, check your Instagram account type. Live feeds need a Business or Creator account, as covered in the section on what Instagram allows. If you're still on a personal account, switch it first so the connection works on the first try.
Next, create a free Curator account. The free forever plan supports Reels, includes no-code styling, and doesn't require a credit card.
Curator is beginner-friendly and built for exactly this job. You can connect Instagram, approve Reels, and design the feed without touching code. Once you're in the dashboard, you're ready to build your first Reels feed in Step 2.
Step 2. Create a new feed and choose the moderation style
The next step is to create a new feed. Give it a clear title. We've chosen "Instagram Reels" as the feed title. You also need to choose your moderation style.
Go for "Approved" if you want all of the posts from your Instagram account to be automatically added to your site. Choose "Needs approval" if you'd rather select which ones get added.
If you post mostly Reels, you can select "Approved" and then delete ones you don't want showing up. But if you post Reels infrequently and only want to add Reels to your website, it'll be easier to select "Needs approval" and then select the Reels.

Step 3. Select the source and connect your Instagram account
Now you need to select the source of your new feed. Click the “Add a Source” button within the new feed and select Instagram as the source.

Then choose the type of Instagram content you want to display on your Instagram widget. You can pull Reels from your own professional account, a hashtag, or account mentions. Pulling Reels from your own account is the simplest option, and it's the one I'd start with. Hashtag Reels work well for campaigns and challenges, and you can see how a full Instagram hashtag feed comes together.

When aggregating Instagram Reels from a hashtag, make sure to use manual approval. We strongly recommend watching every Reel made by an outside creator before deciding if it's appropriate enough to add to your website.
Step 4. Pick which Reels make the cut
Next, approve the content you want on your website. You can approve all of your Reels or just your favorite ones.

If you've chosen automated approval, this step is just reversed. Delete any Reels you don’t want showing up.
I generally recommend manual approval for Reels, even from your own account. Trend-driven Reels age fast, and you'll want the freedom to skip the ones that won't make sense in six months.
Want to save time? Set up moderation rules that automatically reject posts with specific words or block duplicates before they reach your queue.
Step 5. Choose a layout that fits vertical video
Now for the best part: designing your feed. Reels are filmed in a vertical 9:16 ratio, so the Waterfall template works best. It shows each Reel in its full, longer format.
Two other templates suit Reels too. Carousel keeps everything in a single tidy row. Grid Carousel adds gentle movement.
Then choose icon, text, background, and border colors or leave things simple with black and white. The point is, explore the options and have fun. Tweak and tailor the look just the way you want it.
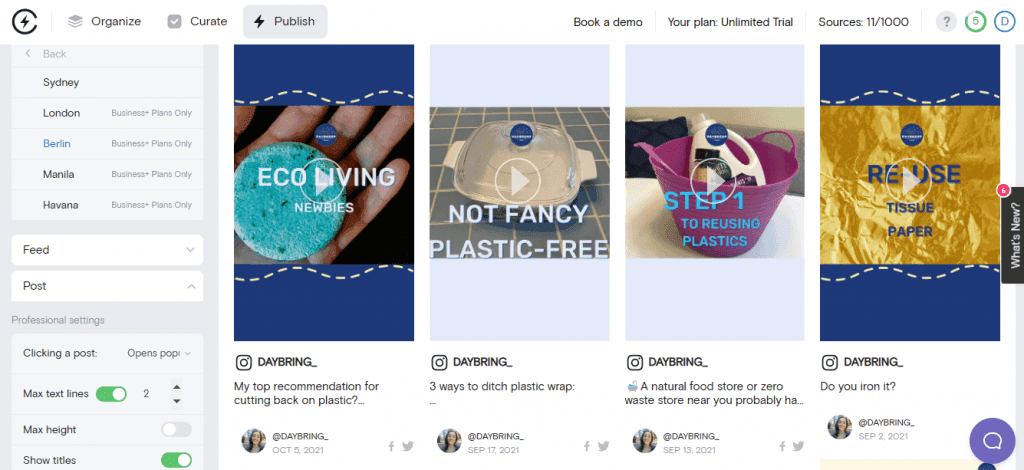
You might also want to remove the captions altogether. Or update the max text lines setting if you don't want super long captions on your site.
One more tip: Curator lets you set separate layouts for mobile and desktop. A carousel on desktop can become a single column on phones.
"Reels are shot vertically, so square templates crop out the on-screen text at the top. That text is usually the hook. Waterfall is a great template because it works for vertical video. Always preview your feed on a phone before you finalize it." - Dave Ganley, Technical Director, Curator
Step 6. Paste the code into your site
Once you have the look the way you want, it’s time to copy the embed code. Simply click on the “Get code” button.
On WordPress, open your page in the block editor and add a Custom HTML block where you want the feed. Paste the code and update the page. Prefer shortcodes? Install the Curator WordPress plugin and paste your feed's shortcode instead.
Want Reels in your footer or sidebar? Depending on your theme, add the same Custom HTML block in the Site Editor or your theme's widget area.

If you're not using WordPress, all you need to do is create a custom HTML box where you want the feed to appear and paste the HTML code in there.
Using Squarespace, Wix, Shopify, or Webflow? The site builder table further down shows the exact element to use. And if you'd like regular posts alongside your Reels, try our Instagram embed tool.
Step 7. Periodically moderate new content
Even with an automatically updating feed, it’s important to review your embedded Instagram Reels from time to time. This helps ensure the content remains fresh, relevant, and aligned with your brand.
Consider:
Removing outdated or off-brand Reels
Highlighting timely or seasonal content
Updating styling to match any changes to your website design
Reviewing hashtag or mention-based sources to filter unrelated posts
A little ongoing maintenance goes a long way in keeping your Reel feed engaging and professional.
How to embed a single Instagram Reel with Instagram's code
Only need one Reel in one spot? Instagram's own embed code is the official, free route, and it takes about two minutes. It works with any public account, so you don't need a Business account. And it stays free no matter how much traffic your site gets, which makes it perfect for a one-off feature.
Step 1. Open the Reel on Instagram in a desktop browser
Open instagram.com on your computer and find the Reel you want to embed. The Embed option lives on the web version, so a desktop browser is the most reliable route.
Click the three dots (…) on the Reel and select Embed. Choose whether to include the caption. Leaving it off gives you a cleaner look on most pages. Then click Copy embed code, and you're ready to paste.
Don't see Embed in the menu? The account is either private or has embeds turned off. Head back to the section on what Instagram allows for the fix.

Step 2. Copy the embed code and paste it into your page
Paste the code where you want the Reel to appear. That might be a blog post, a landing page, your footer, or a sidebar.

The code has two parts. The first is a block of HTML that holds the Reel's details. The second is a reference to Instagram's embed.js script, which turns that block into a working video player. Both parts need to survive the paste.
On WordPress, add a Custom HTML block and paste the code inside it. You can also try the WordPress Embed block, which accepts the Reel's URL. Test it first, because results vary from site to site. Want something more permanent? Here's a guide for WordPress users wanting to add an Instagram plugin.
Using a different builder? The table below covers it.
Step 3. Repeat for the other Reels you want to add
Repeat these steps for every Reel post that you want to add.
Copy and paste each one in order so that they appear in the order you want.
Where to paste the code in popular site builders
Every site builder names its code element a little differently, and the right block makes all the difference. Paste into the wrong one, and you'll see raw code or nothing at all. Here's where the code goes on five popular platforms.
Builder | Where to paste it | Watch out for |
|---|---|---|
WordPress | A Custom HTML block (or the Curator plugin shortcode for feeds) | Some security plugins strip script tags |
Squarespace | A Code block set to HTML | The editor may show "script disabled" until you publish, and code blocks may depend on your plan |
Wix | Embed code, then Embed HTML | Set the element height so the Reel isn't clipped |
Shopify | A Custom Liquid section in the theme editor | Test on a product template before going live |
Webflow | An Embed element | Custom code may require a paid site plan |
Want a feed instead of single Reels? Curator has dedicated guides for adding an Instagram feed to Squarespace and Wix.
Step 4. Tidy up the layout on desktop and mobile
Instagram's embed doesn't come with design tools, so a little tidying goes a long way. Start by placing the embed inside a container with a max width between 400 and 540 pixels. Center it so it sits neatly in your layout.
Leave the caption off for a cleaner look. Without it, the Reel can look great with no extra code at all.
Adding several Reels to the same page? You only need one copy of the embed.js script. Remove the duplicates so the page has less to load.
Finally, open the page on your phone. Instagram's player adapts to its container's width, so a layout that looks perfect on desktop can feel cramped on mobile.
Why your embedded Reel isn't showing, and how to fix it
Your embed is in place, you hit publish, and something looks wrong. Don't start deleting code yet. Bookmark this section. Find the symptom you're seeing below, then follow the fix. Each one names the likely cause first, so you're never guessing. Most fixes take less than five minutes.

You see a plain link or an empty box instead of the video
You pasted the code, but your page shows a plain link or an empty box. The HTML loaded, but Instagram's embed.js script never ran.
Three things usually cause this:
A page builder or security plugin stripped the script tag
You pasted into a visual text block instead of an HTML block
A cookie-consent tool is blocking third-party scripts
Here's the fix. Paste the code into a dedicated HTML or code element. Open the element again and confirm the script line is still there. If you use a consent tool, allow Instagram's script.
One more thing. Some builders only render embeds on the published page, so check the live URL before you start troubleshooting.
Instagram says the post isn't available
This one comes from Instagram's side. The account went private, the owner turned off website embeds, or the Reel was deleted or archived. Nothing on your site can fix it.
Your options are to ask the owner, swap in a different Reel, or remove the embed.
A skincare shop had a creator's Reel embedded on its best-selling product page. Months later, the creator switched to a private account. The embed turned into an error box right next to the "Add to cart" button. The shop now reviews its product-page embeds monthly and asks creators for permission to repost key Reels on its own account.
Your page got slow after adding several Reels
Your page felt fast before. Then you added five Reels, and now it drags on mobile. Visitors on slower connections feel it first, and some leave before the Reels even load.
Here's how to lighten the load:
Keep single embeds to one or two per page
Lazy-load embeds below the fold, if your builder supports it
Replace a stack of single embeds with one feed
That last option is where a feed earns its keep, because the whole showcase loads together. Curator's embed code is about 13 lines of lightweight JavaScript, and it renders your feed without iframes.
"Every single Instagram embed loads its own player. If you want more than a few Reels in one spot, one feed script is usually lighter." - Thomas Garrood, Co-founder, Engineering, Curator
The Reel looks cropped, tiny, or too wide on mobile
An Instagram embed sizes itself to whatever container it sits in. When a Reel looks cramped or oversized, the fix lives in that container.
Set a max width so the Reel can't stretch across wide screens
Skip narrow sidebars, where the player shrinks to a sliver
In Wix and Squarespace, give fixed-height elements enough room for vertical video
Using a feed? Pick a template that keeps the 9:16 ratio and set a separate mobile layout, as covered in Step 5 of the Curator walkthrough.
Then do the one check that matters most. Open the live page on a real phone.
Tools for embedding Instagram Reels, compared
You've decided a feed makes sense. Now which tool? Here's what to look for when you compare options:
Keeps Reels vertical, so videos aren't cropped into squares
Has moderation, so you approve what appears
Offers a free plan or free trial you can test on your own site
Shows minimal branding on free plans
Installs on any site with a simple embed code
Watch the limits as closely as the price. A free plan with 300 or 500 views a month can run out in a few days on a busy homepage. When views run out, some tools pause your feed until next month.
All five tools below support Instagram Reels. Their pricing and limits differ a lot, though, so here's a quick side-by-side. Use it to shortlist two, then test both on a real page before you commit.
Tool | Free plan | Lowest paid plan | Best for |
|---|---|---|---|
Curator | Yes (3 sources, 2,000 views/month) | Pro, $25/month | A free, low-branding Reels feed on small to midsize sites |
Walls.io | No (14-day trial) | Professional, from about $250/month | Enterprise and event walls |
Flockler | No (14-day trial) | Basic, $129/month | Teams with budget for shoppable UGC |
EmbedSocial | Yes (1 source, 500 views/month) | Pro, $29/month | Teams that also want review widgets |
Juicer | Yes (1 source, 300 views/month) | Lite, $15/month | Simple, low-cost feeds |
Prices checked October 2026. Monthly billing, in USD.
1. Curator.io

Curator is a social media aggregator for businesses of all sizes. Full transparency: it's our tool, and this is our blog. Beyond Instagram, Curator works with Facebook, X, YouTube, TikTok, Slack, RSS feeds, Behance, and a dozen other platforms.
I personally prefer Curator's Waterfall template for Reels because it keeps the vertical format intact. The free plan's 24-hour refresh is fine if you post a few Reels a week.
Pricing:
The free forever plan includes 3 sources, 2,000 views a month, and updates every 24 hours. A small "Powered by Curator" link sits at the bottom of your feed. Pro costs $25 per month ($23 billed annually), with 5 sources, 15,000 views, hourly updates, and no Curator link. Business is $59 per month ($54 billed annually) for unlimited views, 15 sources, and API access. See the full pricing breakdown.
Want a plugin built purely for WordPress? A WordPress-first tool may suit you better.
2. Walls.io

Walls.io is another way to add Instagram Reels to your site automatically. It keeps your latest posts on your website, so you don't copy them manually, and it handles Reels and standard posts.
Pricing:
Walls.io no longer offers a free plan. You get a 14-day free trial, and the Professional plan for websites starts at about $250 per month. It's a strong pick for enterprise and event walls. If you only need a Reels feed on a website, it's a big jump in cost.
3. Flockler

With Flockler, you can embed a variety of social media content on your website. You can also create shoppable UGC galleries, so customers can shop the looks shared on your site.
Pricing:
Flockler doesn't offer a free plan, but it has a 14-day free trial. The entry plan is Basic at $129 per month ($110 billed annually), with 8 feeds and no Flockler branding. For Reels specifically, note that video autoplay only arrives on the Pro plan at $379 per month. Choose Flockler if you have the budget and want commerce features.
4. EmbedSocial

EmbedSocial supports Instagram Reels alongside Facebook, TikTok, YouTube, and other platforms. Its biggest strength is breadth: social feeds and review widgets live in one account.
Pricing:
The free plan covers 1 source and 500 views a month, with updates every 24 hours. Those views run out quickly on a busy page. Pro costs $29 per month for 3 sources and 5,000 views. UGC rights management comes with the Premium plan at $99 per month. Pick EmbedSocial over Curator if you want reviews and social feeds in one tool.
5. Juicer.io

Juicer is a straightforward social media aggregator that supports Instagram Reels. You can build a feed from your own accounts or branded hashtags.
Pricing:
Juicer's free plan allows 1 source and 300 feed views a month, with Juicer branding on your feed. Hashtag sources are only a one-week trial on the free plan. Lite costs $15 per month for 3 sources with no branding. The popular Starter plan costs $25 per month for 5 sources, plus call-to-action buttons. Extra sources are $10 each. Compared to Curator's small link, that free-plan branding is the trade-off to weigh.
Embedding Instagram Reels FAQs
Can I embed an Instagram Reel without a business account?
Yes, for single Reels. Instagram's embed code works with any public account, including personal accounts. Live feeds follow different rules. Since Meta retired the Basic Display API in December 2024, feed tools can only connect Business or Creator accounts. Switching to a professional account is free and takes a few taps in your Instagram settings.
Is it free to embed Instagram Reels on a website?
Yes. Instagram's embed code is always free, no matter how much traffic your site gets. Feeds can be free too. Curator's free forever plan includes 3 sources and 2,000 views a month. Once your traffic grows, or you want the "Powered by Curator" link removed, paid plans start at $25 per month.
Can I embed someone else's Instagram Reel on my website?
Technically, yes. Instagram lets you embed any public Reel unless the owner has turned embeds off. On a business website, ask the creator first. A quick DM requesting permission, plus a screenshot of their reply, keeps you on the safe side. Check those pages from time to time, because the embed breaks if the creator later goes private.
How do I stop other websites from embedding my Reels?
Open your Instagram profile and tap the menu in the top right. Under How others can interact with you, tap Sharing and remixes. Then switch off Allow website embeds. Your account can stay public while embeds are off. Making your account private also turns embeds off, and existing embeds may take time to disappear.
Can I embed Instagram Reels on Squarespace, Wix, or Shopify?
Yes. All three accept Instagram's embed code and aggregator embed codes. Use a Code block on Squarespace, an Embed HTML element on Wix, and a Custom Liquid section on Shopify. Plan limits can apply, so check your builder's requirements. The site builder table above covers each platform, plus WordPress and Webflow.
Getting your Reels onto your website comes down to one choice. Want a single Reel in a specific spot? Paste Instagram's embed code and you're done in two minutes. Want your latest Reels showing up on their own? Set up a feed once and let it run.
Either way, run the three Instagram checks first. They'll spare you most of the troubleshooting.
Adding other short-form video too? Here's how to grab a TikTok embed code for single videos.
Ready to embed Instagram Reels on your site? Try our free forever feed.
Curator.io is an easy-to-customize aggregator that lets you pull from over a dozen sources. If you'd like to give Curator.io's free forever plan a spin sign up today.
Previous post: