With approximately 600 monthly active users, your target audience is probably on X.
X is a very popular platform with B2B users, fintech companies, and other types of startups. Whether you run a marketing agency, software company, or content creator business, there are many reasons to sustain an active presence on X.
Informative X threads have the chance to go viral. X users love seeing content with a hook, an eye-catching photo, and follow-up threads that explain the details. Other types of posts that can perform well are comedic text posts, memes, and short-form videos. X is also great for keeping your audience up to date on the latest company news, content, and resources.
If you have a well-maintained presence on X, we highly recommend making the most of your content by embedding it in your website. This way, you can get more eyeballs on your content while encouraging website visitors to follow you on social media.
In this guide to X feed embedding, we got the simplest step-by-step process so you can get the job done in under 5 minutes.
Benefits of embedding your X feed in your website
Social media feed widgets are one of the simplest yet most engaging elements you can add to your website. These little power-house widgets can completely change the look and feel of your site—for the better.
Embedding your X feed on your website offers three main benefits:
Add fresh content to your website - Want to keep your website looking lively without the hassle of constant updates? Embedding your X feed brings fresh, real-time content right to your homepage. Every new post you make on X shows up on your site, giving visitors something new to see every time they drop by. It’s like an instant content refresh, without you lifting a finger.
Automatically include new posts - Automation is all the rage. An embedded feed automatically adds new posts to your site according to your automation rules. With an embedded X feed, new posts appear on your site automatically, no extra work needed. Set it up once, and you’re golden—every post you share updates on your website automatically. (Or, if you'd rather approve posts manually, you can change that in your settings.)
Encourage site visitors to follow you on X - Got great content on X? Show it off! Embedding your feed on your website is a subtle way to nudge visitors to check you out on social media. When they see your latest posts right there on your site, it’s an easy win to turn them into followers without even asking directly. You can even include a follow button so you can collect new X followers from your website in a single click.
The best feed templates for X content (with examples)
Before we jump into the tutorial, I want to show you a few different feed styles you can create with Curator's templates. Grid and Waterfall are easily our most popular templates because they work well for almost any use case. My personal favorite, though, is Mosaic. It gives featured posts more visual impact and creates a feed that feels much more dynamic without overwhelming the page.
1. Grid
If you want a clean, familiar design, like an Instagram aesthetic, Grid is usually the safest choice. It displays every post at the same size, creating a balanced layout that works well for business websites, ecommerce stores, portfolios, and landing pages. It's one of the templates we recommend most often because it keeps the focus on your content while blending naturally with almost any website design.

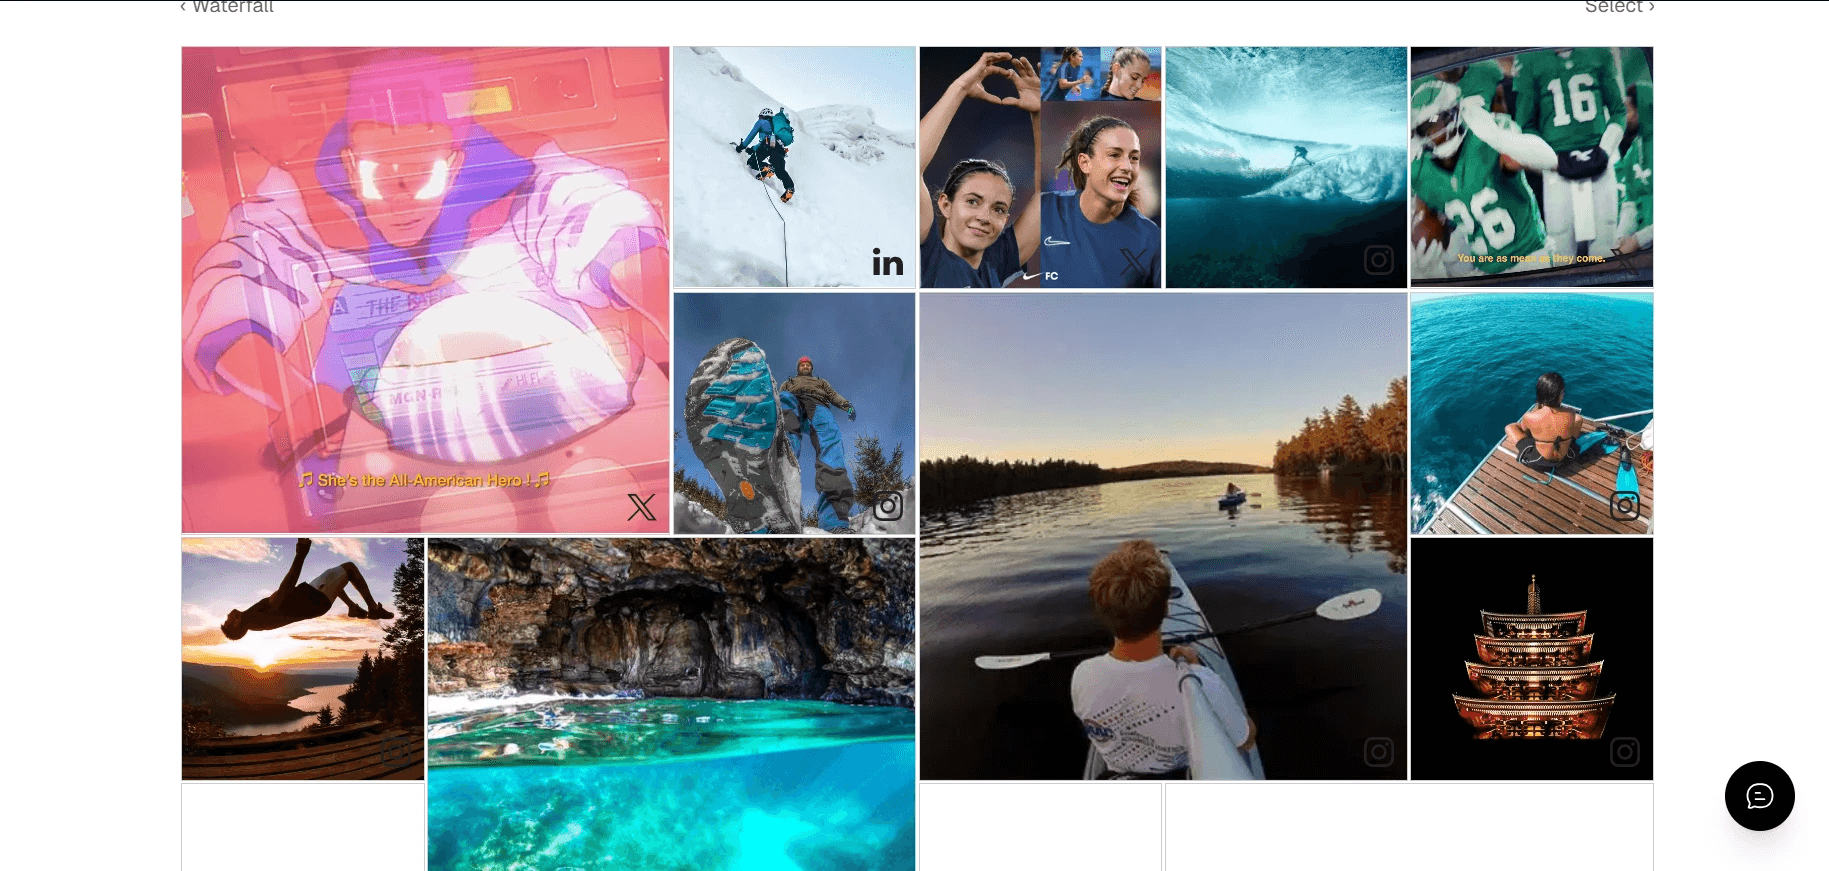
2. Waterfall
Waterfall gives each post the space it naturally needs, making it an excellent choice when your X feed contains a mix of text, images, videos, and longer discussions. Instead of forcing every post into identical boxes, the layout feels more natural and improves readability. That's why it's one of the most popular templates for blogs, news sites, and community-focused websites.
3. Waterfall (Text Only)
If your X strategy focuses primarily on conversations, announcements, or thought leadership, the text-only Waterfall layout works particularly well. By removing visual distractions, visitors can quickly scan posts and read longer updates. I've found this layout is especially effective for founders, journalists, SaaS companies, and brands that publish valuable insights more often than images.

4. Mosaic
Mosaic is my favorite layout because it naturally draws attention to your strongest content. Instead of giving every post equal emphasis, larger featured tiles create a more engaging visual rhythm while smaller posts fill the surrounding space. It works especially well for brands publishing a mix of product photos, videos, customer content, and promotional posts that deserve extra visibility.
5. Select
Select is ideal when you only want to showcase a handful of carefully chosen X posts instead of an automatically updating feed. We often recommend it for testimonials, product launches, event announcements, or customer success stories where every post has a specific purpose. Rather than displaying everything you publish, you stay in complete control of the content visitors see.

Next, I'll walk you through exactly how we created these examples so you can build your own X feed in just a few minutes.
How to embed a fully customizable X feed (social aggregator method)
Follow these simple steps to embed an X feed anywhere on your website and match your site's design perfectly.
Step 1. Choose a free or affordable social media aggregator
We recommend using a social media aggregator like Curator to embed your X feed because it gives you...
Design customization - With a social media aggregator, you get full control over the design of your embedded feed without custom coding. There are ready-to-use templates and easy-to-adjust design settings for colors, backgrounds, columns, icons, and more. Without this type of software, you're stuck with the basic embeddable feed that X gives you, or you have to do some heavy coding to get the look you want.
Moderation control - This type of software also lets you moderate content how you want. You can opt to have posts automatically sent to your website or you can review each post manually. You can also enable automated moderation, so that content with curse words or certain words are filtered out. You can change the moderation rule based on the feed source. For instance, if you're aggregating X content from other users besides your own account, you might want to implement more strict moderation.
Pinned posts - Social media aggregators also allow you to pin posts so you can hold onto a top-performing post or important piece of content without letting it fall to the bottom of your feed. There are so many uses for this, particularly when it comes to company announcements and timely promotions.
Free and affordable plans - Most social media aggregators offer free plans. Their paid plans are generally low cost, at around $30 to $100 a month. You can get all of the features you need without breaking the bank.
Step 2. Connect to your X account
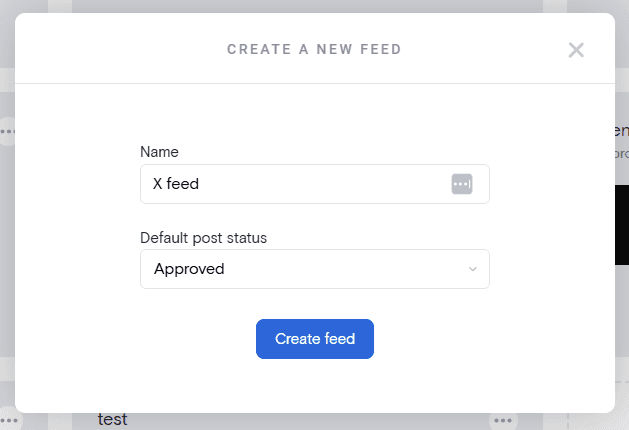
The next step is to create a new feed and connect your X account. Start by navigating to the dashboard of your social media aggregator. Click on the plus sign to create a new feed. Select "approved" as the default post status if you want posts to automatically be added to your website daily. Select "needs approval" if you'd rather login to the aggregator platform and manually approve each post.
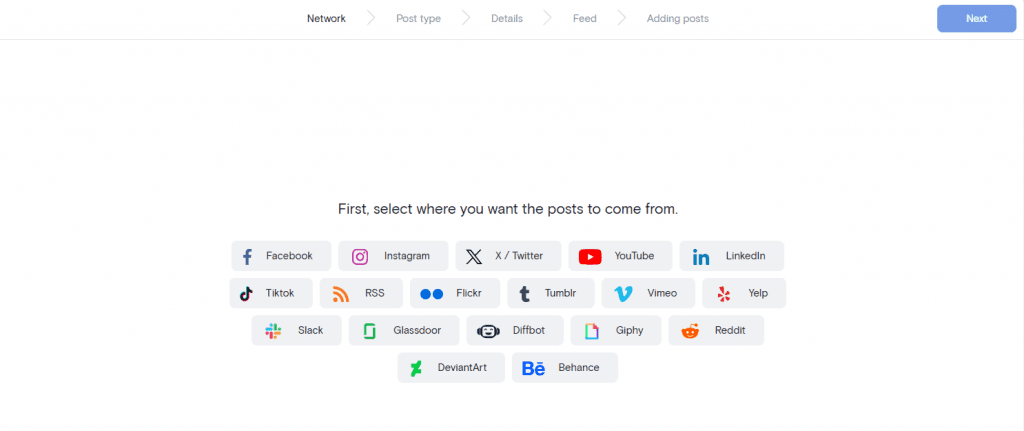
Then, you'll need to connect to your X account. Find the new feed you created in your dashboard and click on "add source." Next, select "X / Twitter" as the source.
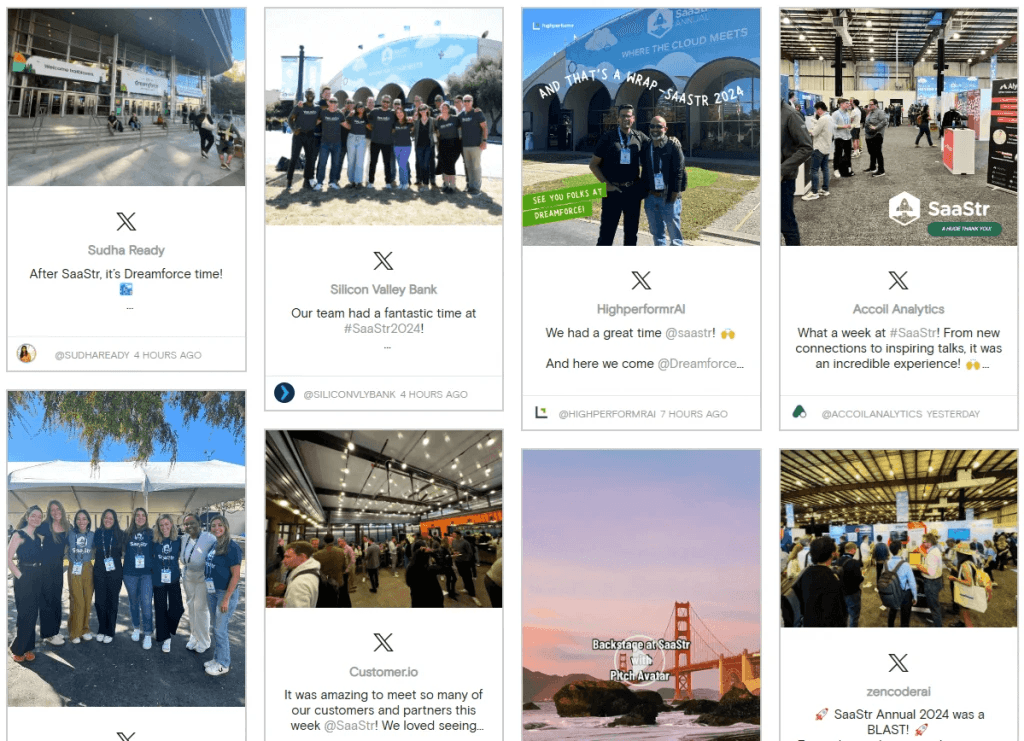
You'll then be given two options. You can aggregate content from an X user, or from a hashtag. For our example, we're choosing the #SaaStr hashtag to wrangle content from this popular software industry event.
Choose user if you want to pull content from a single account, such as your personal profile or business profile. Select hashtag if you want to pull content from a hashtag that a variety of people can use, like your event hashtag, branded hashtag, review hashtag, etc.
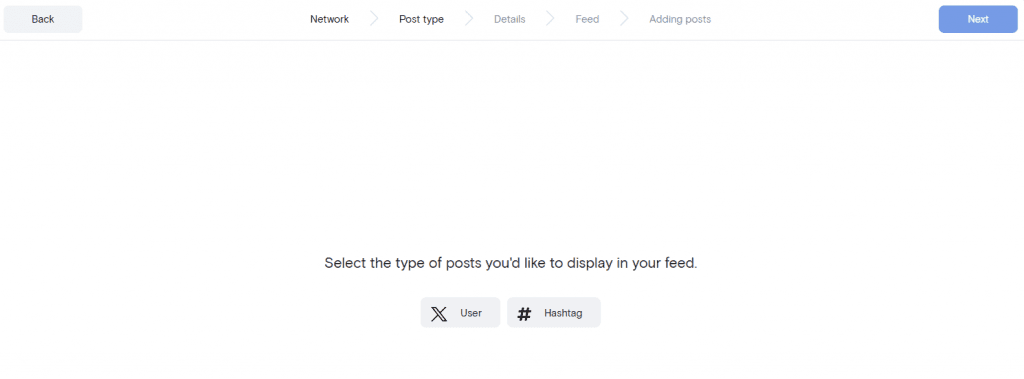
If you select a user, you'll be prompted to connect to that account. If you select hashtag, you'll need to connect an account and then type in the hashtag. Make sure to double check that you've entered it accurately.
Once you've connect to your desired source, you'll see content coming in.
Step 3. Moderate the feed content
Now it's time to moderate the content so only the right posts will appear in the feed on your website. If you've selected for posts to be automatically approved, you'll need to delete anything you don't want. If you've selected for posts to require approval, then you'll instead need to click on the green check sign for any post that you do want to display.

For our event hashtag, we're removing posts with graphic designs and food images to create a feed that only features real people who attended the event. Depending on the purpose of your feed, you might remove posts based on the image design, text, user, or some other factor.
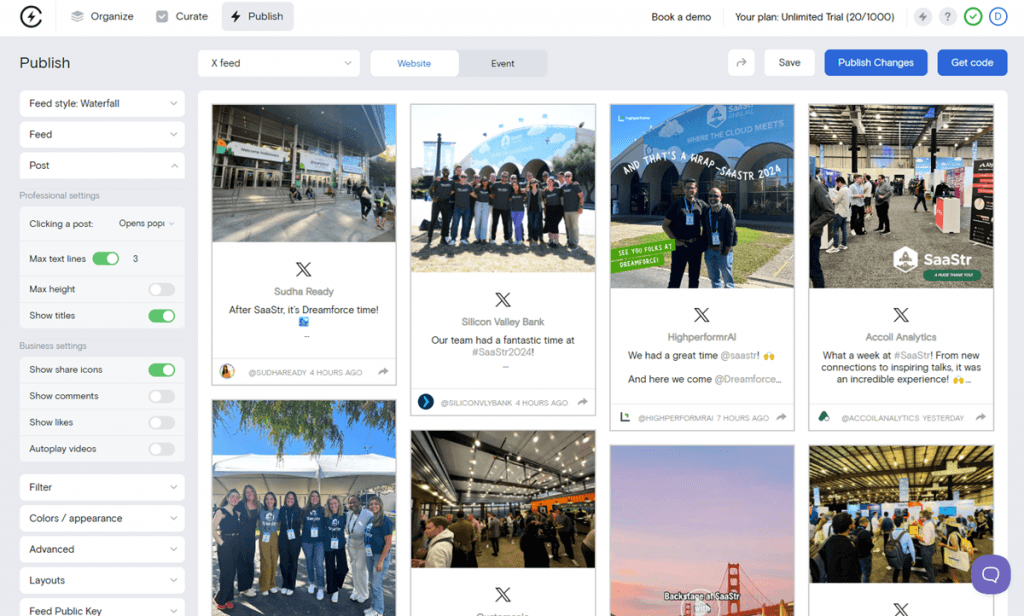
Step 4. Customize the design of your feed
Next click on the "style feed" button to customize the look of your feed. The easiest way to update the style is to first choose a template. You can then alter the template as needed.
Curator offers tons of templates including Waterfall, Grid, Carousel, Mosaic, Tetris, Cover Flow, Panel, and Stagger.
Waterfall is a great option if you want to include text captions in your feed. Grid or Cover Flow are good choices for image-only feeds.
The good news is you have to guess which one is your favorite. Just select different template styles and preview them right inside the platform before choosing.
We're going to go for Waterfall because it showcases captions within the post. However, we're going to adjust the feed slightly. To keep the text from running on too long, we've changed the max text lines from the default of 5 to 3. This setting can be found under the "Post" settings in the right hand side.
Feel free to play around with different settings until you get the perfect style for your website. You can always come back and adjust the setting and re-paste the code if you need to.
Some of the most useful settings include:
Post text lines
Post minimum width
Posts per page
Horizontal spacing
Show share icons
Text color
Icon color
Step 5. Paste the embed code in your website
Once you've customized the X feed to your liking, click on the "Publish changes" button. Then hit "Get code."
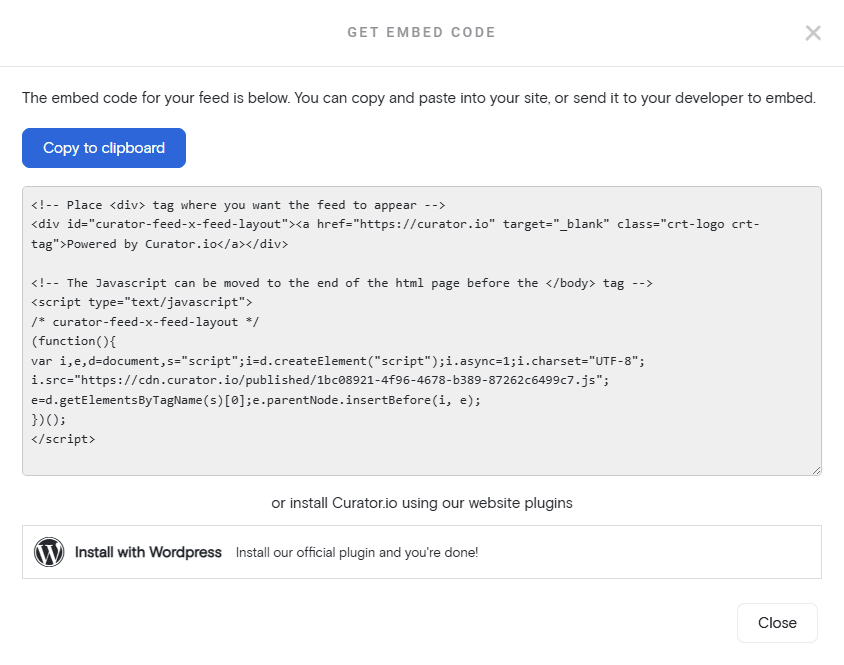
You'll be shown the feed code that you need to copy and paste in your website. Click the "Copy to clipboard" button. Then, head over to your website's dashboard and log in.
Here are some tips on where to paste the code, depending on your website builder:
WordPress - If you're using WordPress, you can add a new widget in the Appearance section of the dashboard. Add the widget to your website's footer or sidebar to make global changes. If you want to add it to a specific page, open up that page's editor and add a new single-column section to your website. Select custom HTML as the section type and paste the code there. You can also use Curator's WordPress plugin, which allows you to paste short code instead of long code. The method for adding the sections is the same.
Wix - To add your X feed on a Wix site, go to the Settings area and select Advanced. Click on +Custom Code and paste the feed’s HTML code into the provided text box. Name your code (e.g., “My X Feed”), then choose whether you want the feed to appear on all pages or select specific ones. Finally, decide where the code should appear (Head, Body-start, or Body-end) and click Apply.
SquareSpace - On SquareSpace, you’ll need to add a custom HTML block to display your X feed. Head to the page where you want the feed to appear, then add a block for custom code. Paste the X feed code into the block, and you’re all set! This method allows you to embed the feed on any page without modifying the global layout, keeping things simple and clean.
Shopify - Shopify sites often add their X feed to their website’s footer, because this is common practice amongst ecommerce companies. To do this, navigate to Online Store > Themes > Actions > Edit Code > Sections > Footer.liquid. Paste the embed code in this section to ensure it appears on every page of your site. If you prefer to add different feeds for specific products, you can also place the code on individual product pages.
Webflow - Embedding your X feed in Webflow is easy with the Embed element. From the Elements panel, go to Components and select Embed. Drag and drop it into the right section of your site, and paste your feed code there. Once published, the feed will automatically update whenever you post on X without the need for manual updates.
Drupal - In Drupal, start by navigating to the page where you want to add your feed, then click Edit. Switch to Full HTML mode by selecting Text Format, which will let you paste the feed code into the page. Place the code where you want the feed to display, save the page, and your X feed will go live.
HubSpot - To add your X feed on HubSpot, log in and navigate to Marketing > Website > Website Pages. Choose the page you want to edit and go to the Settings tab. Scroll down to Advanced options, and paste the feed code in Additional code snippets, then click Publish. For a global footer, navigate to your domain’s settings, override the footer settings, and add the code in the Site Footer HTML section.
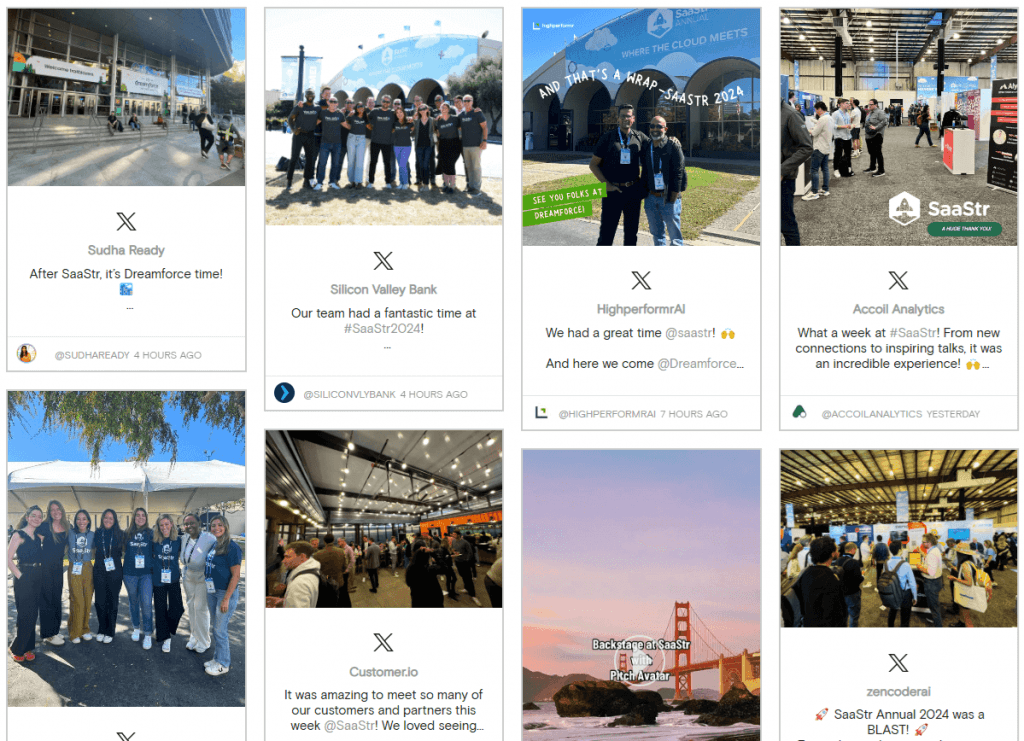
Once published, your feed should look something like this:
How to embed your X timeline (no extra software required)
You can also embed your X feed in your website without the use of a social media aggregator. This is a good option if you don't need the advanced customization and moderation features described in the method above.
Here's the style of the timeline, so you can preview what it would look like on your website:

To use this method, just head over to publish.twitter.com. Enter the profile URL that you want to pull content from. Choose if you want a light or dark background. Then copy and paste the embed code.
Keep in mind that if you want to delete certain posts and keep them from showing up on your website, you'll need to use the social media aggregator method outlined above.
Where to embed your X feed
As you can see, embedding your X feed is as simple as copying and pasting the embed code. But that leaves one important question remaining...where should you embed your feed?
Let's take a look at the most popular options:
The footer of your entire website
Use case - This is a great option if you want the content of your X feed to be visible across every page and blog post of your website.
Pros - It ensures your feed is always visible, no matter where a visitor navigates on your site. It’s subtle and non-intrusive, blending well with the overall design.
Cons - Footers don’t always get a lot of attention, so your feed might not get noticed as much as you’d like.
The sidebar of your blog
Use case - Add your X feed in a vertical orientation in the sidebar of your blog to encourage blog reads to follow you on X and to make your site more engaging.
Pros - It’s a prime spot for visibility as readers scroll through your content. This placement gives readers an easy opportunity to engage with your X feed without leaving the blog.
Cons - It can make the sidebar look a bit crowded if you already have other widgets or ads in place.
A section of the home page
Use case - Choose this option if you want to showcase your feed in a horizontal section of your website without cluttering other pages and posts.
Pros - It grabs attention right on your homepage, the most visited part of your site, making it easy for new visitors to see your updates.
Cons - It takes up valuable real estate on your homepage, so it might push down other important content.
A designated website page just for your feed
Use cases - You can use this option if you want to share your updated X feed on a single URL of your website. This is great for creating a wall of love or testimonial page where you include mentions and reviews. You could also use this to create examples of your content for a portfolio page.
Pros - It’s a focused space where your feed can shine without any distractions. Perfect for showing off customer testimonials or curated content.
Cons - Visitors have to intentionally click to view it, so it may not get as much traffic as a feed embedded elsewhere on your site. You'll need to actively promote this page.
Choosing and moderating the right X content
When you embed an X feed on your website, it's tempting to display every post automatically. In my experience, the best feeds are curated, not simply embedded. Your website has a specific purpose, whether that's generating leads, selling products, or building trust. The content in your X feed should support that goal instead of distracting from it.
Match your feed to the page's purpose
Think about where visitors will see your X feed. A homepage might feature company updates, industry insights, and customer conversations. A product page is better suited to reviews, product launches, or posts from satisfied customers. We've seen businesses create multiple curated feeds for different pages, making the content feel much more relevant to each audience.
Choose quality over quantity
Not every post belongs on your website. Skip time-sensitive promotions, support conversations, and off-topic discussions that lose value quickly. Instead, highlight posts that demonstrate expertise, showcase customer success, answer common questions, or reinforce your brand. When you embed an X feed on your website, a carefully selected collection of posts often creates a stronger impression than a constantly changing timeline.
Moderate to tell the right story
Moderation is about more than filtering inappropriate content. It's about shaping the experience visitors have with your brand. Before approving a post, ask whether it helps someone understand your business or encourages them to take the next step. With Curator, you can manually approve posts or create moderation rules, giving you complete control over the story your embedded X feed tells.
Frequently asked questions
Can I embed an X feed on any website?
Yes. You can embed an X feed on almost any website, including WordPress, Shopify, Wix, Squarespace, Webflow, and custom HTML sites. Most embedding tools generate a simple code snippet that you paste into your page, making setup quick even if you don't have coding experience.
Can I customize the appearance of my embedded X feed?
Yes. While X's native widget offers limited customization, third-party tools like Curator let you change layouts, colors, spacing, fonts, and card styles. You can also choose how many posts to display, helping your embedded X feed match your website's branding and design.
Can I display posts from multiple X accounts in one feed?
Yes. Many third-party tools let you combine posts from multiple X accounts, hashtags, or search terms into a single feed. This is useful for businesses with multiple brands, regional accounts, event campaigns, or teams that want to showcase content in one place.
Can I moderate posts before they appear on my website?
Yes. Platforms like Curator allow you to manually approve posts or create moderation rules before content appears on your website. This gives you more control over your brand and helps prevent outdated, irrelevant, or inappropriate posts from being displayed to visitors.
Will an embedded X feed update automatically?
Yes. Most embedded X feeds update automatically whenever new posts match your selected account, hashtag, or search criteria. With a third-party platform, you can also choose whether new posts appear immediately or require manual approval before they are published.
Does embedding an X feed improve my website?
An embedded X feed can make your website feel more active by showcasing fresh content, customer conversations, and company updates. While it isn't a direct SEO ranking factor, regularly updated social content can increase visitor engagement, build trust, and encourage people to spend more time on your website.
Is it better to use X's native widget or a third-party tool?
If you only need to display a basic timeline, X's native widget is a good free option. However, if you want to customize the layout, moderate content, combine multiple social platforms, or match your website's branding, a third-party tool like Curator offers much greater flexibility.
Can I embed an X feed using a hashtag instead of a profile?
Yes, you can embed an X feed using a hashtag. By using a social media aggregator like Curator, you can easily set up a feed that pulls content based on a specific hashtag. This is great for event hashtags, branded campaigns, or user-generated content that you want to display on your site. Simply connect your X account, choose the hashtag option, and then type in the desired hashtag to start pulling content. This method allows for real-time updates from a variety of users, making it a versatile tool for showcasing relevant conversations or content. Make sure to choose "needs approval" as your moderation option so you can manually approve all content.
Looking for the easiest way to embed your X feed and customize the style? We offer beautiful feed templates and easy moderation features on our free plan, which has the most minimal Curator branding. To remove our branding, you can sign up for a paid plan.
Previous post: