How to Embed Your Social Media Feed on a Webflow Website
Dayana Mayfield
on
Jan 14, 2026
Website Design
Webflow has emerged as one of the most popular no-code website builders on the market, offering professional design flexibility without requiring a single line of code. Webflow powers over 493,000 active websites, representing 0.8% of all websites globally and 1.2% of those using a CMS. That growth is no fluke: the platform has seen a 10% compound annual growth rate in CMS market share since 2022.
Why the surge in popularity? Webflow’s visual editor, responsive design tools, and built-in CMS make it a top choice for designers, developers, and marketing teams who need creative control with less technical overhead. It’s trusted by companies like Upwork, Zendesk, and Discord—and it’s become especially popular with design agencies and startups.
If you’re using Webflow, embedding a live social media feed is a smart way to make your site more dynamic, engaging, and up-to-date, all without logging in to update content manually.
In this post, we’ll show you exactly how to embed a social feed in Webflow using Curator.io—no coding required.
We've previously covered how to embed your social media feed in a WordPress website, and today we're diving into Webflow.
It's super easy. Let's get into it!
Benefits of embedding a social media feed on your Webflow website
Embedding your social media feed is a simple way to make your website more dynamic, up-to-date, and engaging. Here are some of the biggest benefits:
Get more social media followers
When people can see your content in action—right on your site—they’re more likely to hit that follow button. It’s much more effective than just having tiny icons in the footer. A live feed builds interest and makes it easy for visitors to connect with you on other platforms.
Add rich, visual content
Let’s face it, text-only websites can feel flat. A social media feed adds color, movement, and personality. Instead of manually uploading new photos and videos, you can pull in your best content automatically.
Keep your website feeling fresh
Posting regularly on social media? Great, now your website can reflect that without any extra work. Every new post adds something fresh to your site, keeping things current without you having to log into Webflow and update it every week.
Share news and updates in real time
Promotions, events, and schedule changes are the perfect content. If it’s important, it’s probably on your social media first. Embedding your feed makes sure your audience sees it, even if they’re not following you.
Show off your brand’s personality
Your social feed says a lot about your brand voice and style. Whether you’re funny, helpful, bold, or all of the above, bringing that energy onto your site helps people connect with who you are.
Build trust with social proof
Real posts. Real people. Whether it’s reviews, tagged photos, or user-generated content, your feed can help show that people love your brand, and that builds credibility fast.
You can work with a Webflow development agency to add your social media feed or follow the easy steps below.
Step for embedding any social media feed on Webflow
Now that we know all of the benefits for embedding a social media feed, let's get into how to do it.
The good news: it's incredibly easy to embed your social media account's content in your Webflow site. All you need is a social media aggregator app. Curator is 100% free forever.
Step 1. Select your social media network
The first step is to choose which social media network or content resource you want to connect with. You can add more than one network to a feed on your website, but most Curator users choose to embed their favorite network only, to avoid the need for removing duplicate content. When you choose one network, it's easier to feel comfortable with an automated approval process (we'll talk more about approvals in the next step).
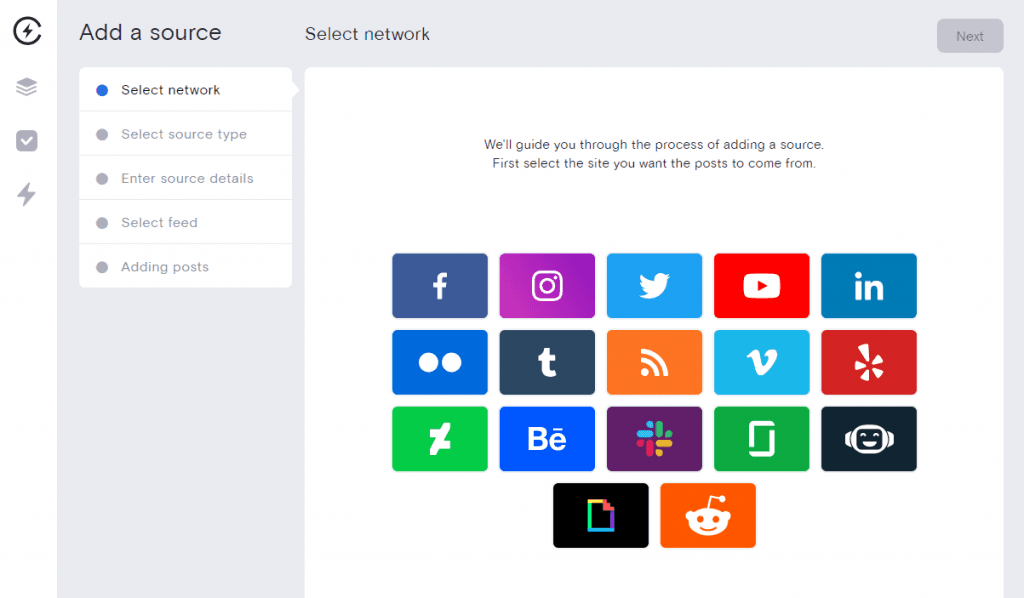
With Curator, you can choose from any of the following:
Facebook
Instagram
Twitter
YouTube
LinkedIn
Flickr
Tumblr
RSS
Vimeo
Yelp
DeviantArt
Behance
Slack
Glassdoor
Diffbot
Giphy
TikTok
Once you've chosen your source, you'll need to select the source type. For example, for Twitter you can pick geo location, hashtag, timeline, user, or user mention.

And for Instagram, you can integrate a business account, business account IGTV, business hashtag, business mention, private account, or stories.
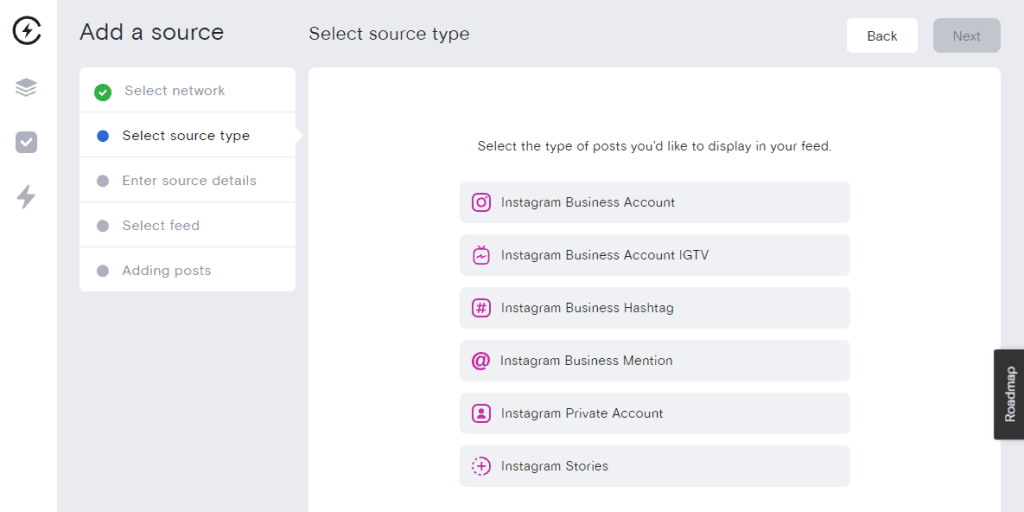
When you choose mentions as your source type, this means that it will pull content that tags your business, as opposed to content your business has published under your own account.
The type of source you choose should dictate your approval process.
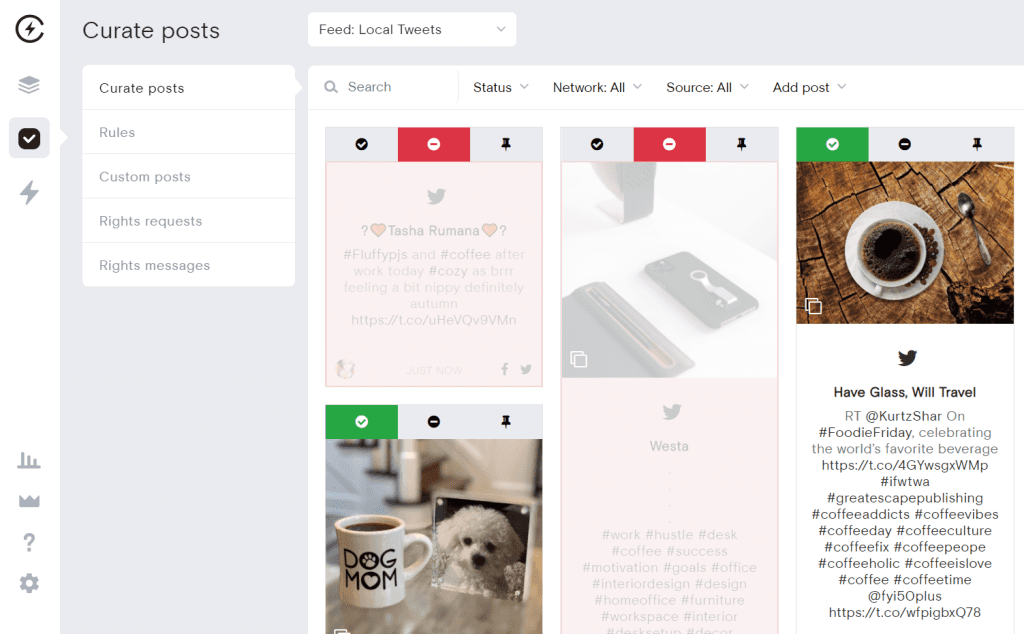
Step 2. Choose your approval process
In the "Curate" section, you'll find multiple features to help you curate the content. For each feed you create, you can set posts to be automatically approved or to require manual approval.
When you first create a feed, you'll be prompted to select an option, but you can later change this at any time.
Then, when you login, you can select the status to filter the posts and find the ones that need your approval. You can also check which ones have been rejected, if you accidentally rejected one or want to review someone else's work.

When to automatically approve - If you run a small company or organization and you have a tight handle on everything that gets posted to social media, then you know that anything that gets added to your Instagram or Twitter account, for example, is suitable for your website. You can set your posts to be automatically approved, then a couple times a month check your site and make sure there's nothing you want to remove. You can reject a post at any time by logging in to Curator. Plus, you can set up rules to not post duplicate content, making it even less likely that any manual work will be required from you.
When to manually approve - If you work at a larger brand that posts lots of social media content each day, you might want to be a little more selective about what goes on your website. It's also important to manually approve content when you're using a more open source type. For example, when you're aggregating mentions or hashtags, you don't have control over how these are used, so you need to manually review everything. Once you've approved the content, it will be automatically added to your website.
Step 3. Approve or disapprove posts as needed
Once you've chosen your approval style, you'll need to keep pace with it. If you've chosen automatic approvals, you might want to login to Curator once a week or once a month to remove content you don't want on your website.
On the other hand, if you've chosen to manually approve content, then you might want to login 1-2 times per week to make sure that approved social media content is getting added to your website regularly.
Step 4. Choose your layout and customize the design
Next, it's time to stylize your social media feed to match the branding of your Webflow website. With Curator, you get lots of different layout options to choose from.
These are all of the feed styles you can choose:
Waterfall
Grid
Grid carousel
Carousel
Panel
List
Mosaic
Tetris
Select
Stack
Cover flow
Stagger
Layers
And for each feed styles, there are further style options you can select. This way, you can make the feed look exactly how you want with just a few clicks.
Here's an example of a waterfall feed for Twitter:
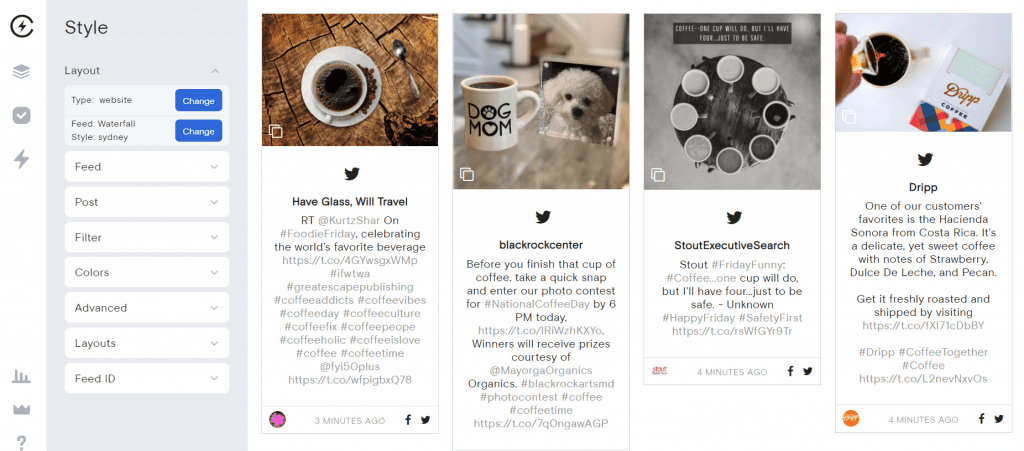
And here's a grid style feed for an Instagram account:
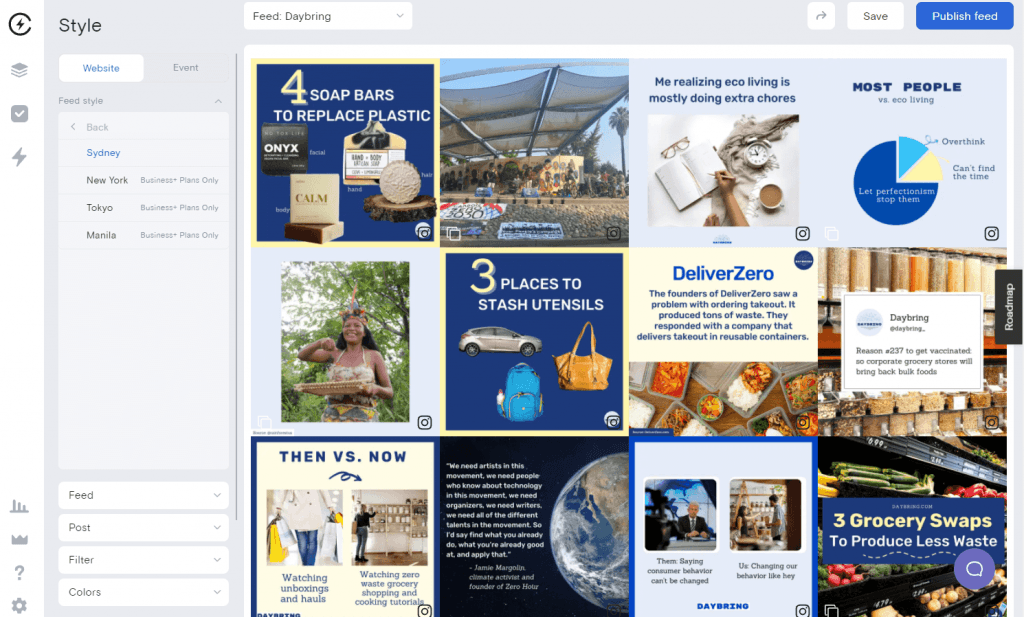
You can also customize the borders, backgrounds, logo colors, font colors, etc. to match your Webflow website perfectly.
Step 5. Copy and embed the HTML code
The last part sounds technical, but it's really not. All you have to do is hit the "Publish feed" button. This will produce some HTML code for you to copy and paste into your website.
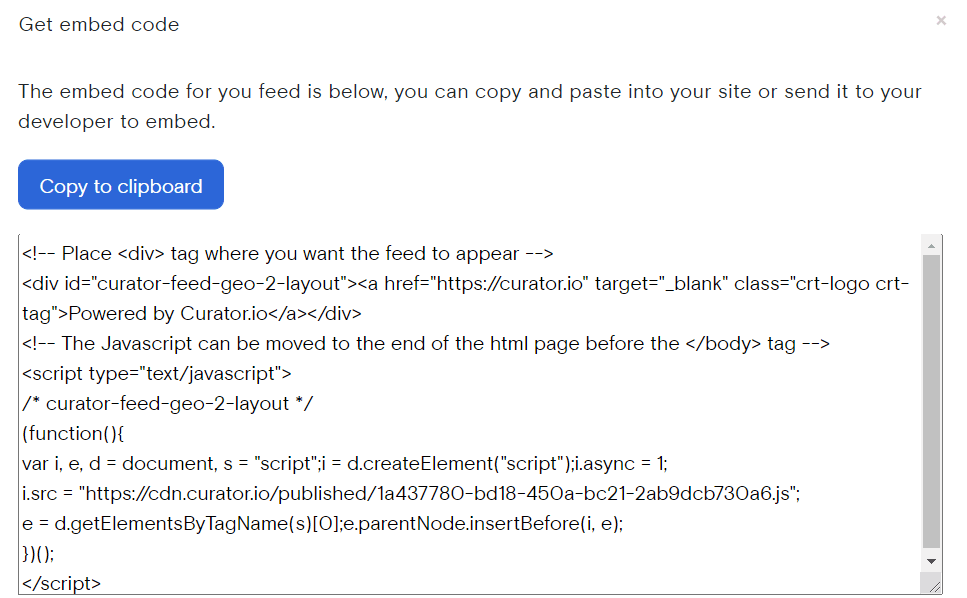
Where should you put the code? Add it wherever you want the feed to go.
Here are the most common places to embed a social media feed on a Webflow website:
Above the footer on the home page
Inside of the footer on every website page
On a dedicated landing page for user-generated content
In the blog side bar
Examples of embedded social media feeds
Want some more inspiration? Check out how these Curator users easily add their social media content to their websites:
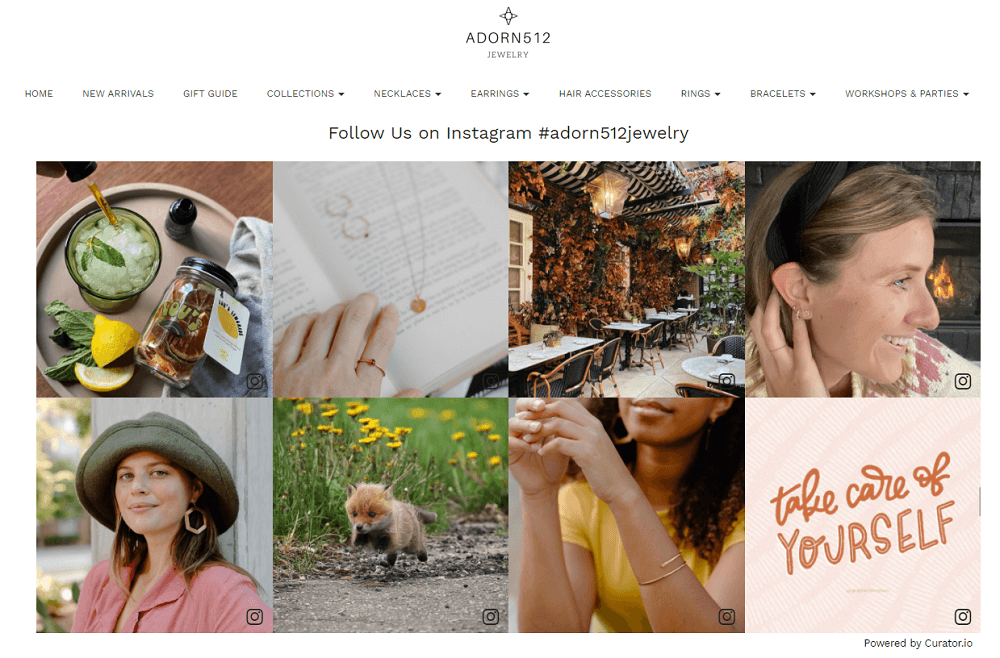
Adorn512
In this example, we see a variety of on-brand lifestyle content and product shots.
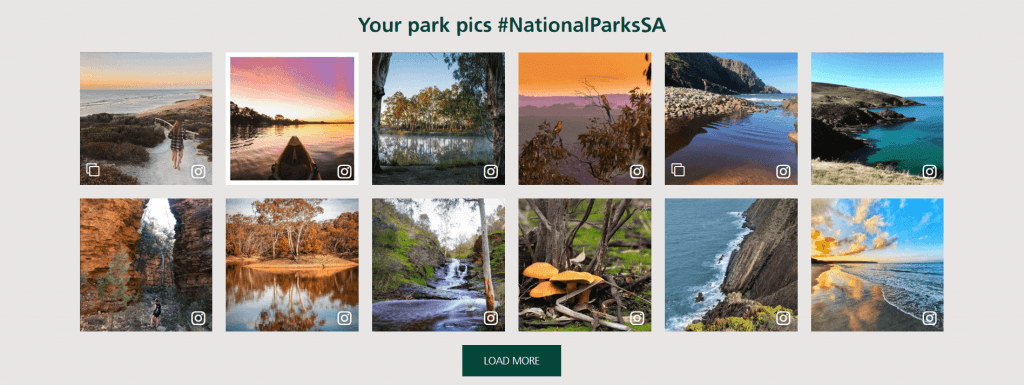
National Parks and Wildlife Service of Southern Australia
This example is part of a tourism department website. The user-generated content helps encourage people to come and see these beautiful areas.
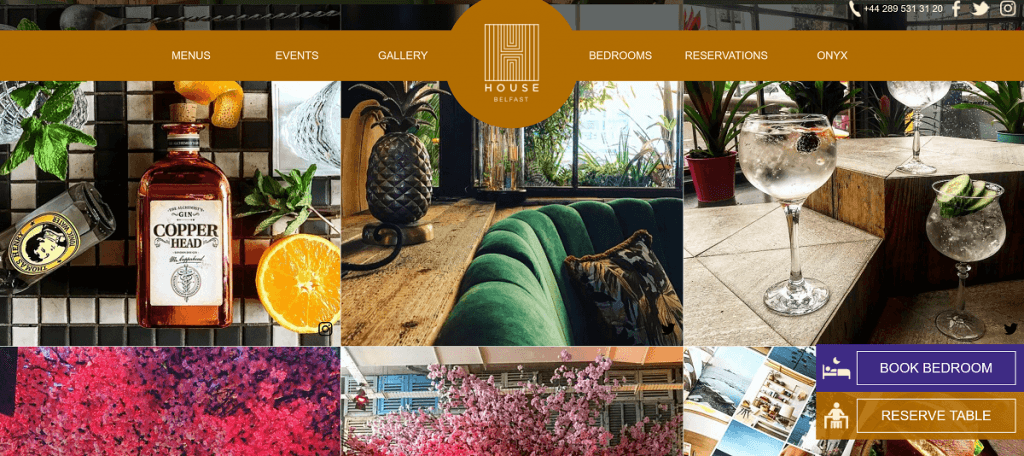
House Belfast Hotel and Restaurant
In this example, we see the beautiful hotel bar's ambience and decor, enticing visitors to book a room and get a drink.
Use cases: 8 creative ways to use embedded social feeds
When you add your social media feed to your website, you tell your website visitors exactly who you are. What's the feeling of your brand? What do you want people to experience? Use your social media content to easily add more style and personality to your website.
1. User-generated content
Showcase real customer photos, testimonials, or tagged posts from platforms like Instagram, TikTok, or Twitter. It’s a powerful way to build trust and authenticity—plus, it keeps your site fresh with content your audience is already creating for you.
2. Behind-the-scenes content
Give your audience a peek behind the curtain by sharing day-in-the-life stories, team highlights, or snippets of your creative process. This kind of content adds personality to your brand, builds deeper connections with your visitors, and helps show the real people and passion behind your business.
3. Event highlights
Embed live event coverage or post-event recaps by pulling in content from branded hashtags or mentions. It’s a great way to capture the energy of the moment, showcase attendee engagement, and keep the excitement going even after the event ends.
4. Product or portfolio showcases
Highlight product launches, new arrivals, or recent creative work by streaming social posts directly to your site. Whether you’re a brand or a creative professional, it’s an easy way to keep your portfolio or product section updated without extra effort.
5. Promotions and announcements
Keep your audience in the loop by automatically displaying sales, limited-time offers, or important updates from your social channels. Instead of editing your website every time something changes, your feed will reflect the latest posts, saving time and ensuring your visitors always see current, relevant information.
6. Community engagement
Showcase real interactions with your audience by highlighting comments, shoutouts, or mentions from your followers. Featuring this kind of content helps demonstrate how active and connected your brand is, while encouraging even more engagement from your online community.
7. Recruitment or culture content
Give potential candidates a feel for what it’s like to work with your team by sharing behind-the-scenes moments, team events, and day-to-day culture. You can also highlight open roles and employee spotlights, making your brand more relatable and helping attract the right talent through authentic, visual storytelling.
8. Social proof and reviews
Display positive feedback, customer reviews, or influencer mentions directly on your site to build trust with new visitors. Seeing real people talk about your brand adds credibility and can influence buying decisions more effectively than traditional marketing messages.
Frequently asked questions
Can I embed a social media feed on Webflow without coding?
Yes! Tools like Curator.io make it incredibly simple to embed a feed on your Webflow site with no coding required. Once you’ve created and customized your feed in Curator, you just copy the HTML embed code and paste it into your Webflow project using an Embed element.
What social media platforms can I include in my feed?
Curator.io supports a wide range of platforms including Instagram, Facebook, TikTok, Twitter, LinkedIn, YouTube, and more. You can also pull in content from RSS feeds and hashtags. Whether you want to display your own posts or content mentioning your brand, there’s a lot of flexibility.
Will embedding a social media feed slow down my site?
Not if done properly. Curator’s feed is lightweight and optimized for performance. Plus, since the content is loaded asynchronously, it won’t block or delay the rest of your page from loading. This ensures a smooth experience for your site visitors.
Should I curate my social feed manually or use auto-approval?
It depends on your content strategy. Auto-approval works well if you’re pulling in posts from your own account and trust the content. Manual approval is a better option when aggregating hashtags or mentions where outside users might post content you don’t want displayed on your site.
Where should I place the feed on my Webflow site?
Common placements include the homepage footer, an About page, a blog sidebar, or a dedicated page for user-generated content. Think about what content your audience will find most engaging and place it where it supports your goals—whether that’s trust, conversions, or community.
How often does the feed update?
Feeds update automatically, usually within 15–30 minutes depending on your plan and platform rate limits. That means your website can stay fresh with the latest posts from your social channels—without you having to lift a finger.
Previous post: