There are over 3.8 billion people who are on social media. So, naturally, you’ll put all your resources into creating content that engages your audience, builds relationships, and hopefully gets shared.
But what about your website?
While you might not have billions of people visiting it, that doesn’t mean you can’t give them access to the same high-quality content. And with curated social media content, you can.
In this post, we’ll discuss why you should curate social media content and tell you step-by-step how to do it.
Curator.io is an easy-to-customize aggregator that lets you pull from over a dozen sources. If you'd like to give Curator.io's free forever plan a spin sign up today.
Why you should curate your social media posts and add them to your website
Before we jump into walking you through how to curate social media, let’s talk about why you should (besides the fact that it’s super fast and easy).
Other reasons you should curate your social media is because you can…
Improve your SEO rankings
Use images to make your website more visually captivating
Keep your website fresh with less effort
Give your website more personality
While that’s not nearly all the benefits you can get from curating content, it gives you a good idea of what’s possible.
How to curate your social media posts
Before you can curate your social media content, there are a few steps you need to take. Or if you want to dive straight in, just watch the video linked above!
Curator.io is an easy-to-customize aggregator that lets you pull from over a dozen sources. If you'd like to give Curator.io's free forever plan a spin sign up today.
Step 1: Name a feed
The first thing you’ll need to do is to name your feed. While you have total control over what you name it, you still want it to be easy to understand.
If you’re curating social media content from Instagram, then name it, “Instagram posts.”
After choosing a name, you’ll need to decide on what your default post status will be. Your options are:
Approved - All content that your source will be automatically added to your website. You can delete any posts you don’t want later if needed.
Needs approval - You can manually approve content before it’s published.
Step 2: Add a source
Next, you’ll need to pick a source. A source is a social media platform that you’ll pull content from to curate on your site. Once you have your source, you’ll need to decide on a source type and their corresponding details.
For this example, we’ll use Instagram. You’ll notice that Instagram has four source types. They allow you to pull posts, hashtags, and mentions from a business account. On the other hand, if you have a private account, you can only access posts from that account.

So, if you want to have access to more content to curate, then make sure you have an Instagram business account.
Step 3: Curate social media
Now that we’ve covered those steps let’s dive into how to curate social media content!
Earlier, we mentioned how you could set your feed to “Approved” content, which means all posts you source will go live. Or you can set it to “Needs approval,” which would require you to approve content manually.
This is known as curating.
If you’re not sure what content to automatically approve and what to remove, then here are some examples:
What posts to approve
On brand images and videos - Any content you curate on your site will need to represent who you are as a brand.
UGC - User-generated content that you post on your site can lead to more people sharing their images and tagging you on social, which can help you increase your reach.
Campaign-related - If you’re running a campaign (or plan to), you’ll only want to approve content that’ll help you promote your campaign.
Posts related to news and updates - If there are important updates related to your business that you shared on social media, then you can get this information in front of more of your audience by adding it to your site.
What posts to remove
Repeat posts - Sometimes, when you curate social media content, you’ll see the same post again. Most likely it was retweeted by someone else. But your curated content is essential to help you represent your brand on your site, so two identical posts won’t help you.
Too many promotional posts in a row - Too much self-promotion will give off the impression that you care more about selling your product or service than helping and connecting with your audience.
Inappropriate images - You’ll also want the images you curate to be relevant to what you offer. And some images you’ll find won’t be, even if the text is.
Content related to your competitor - Some content might be directly related to your competitors. So, for obvious reasons, you wouldn’t want any content that mentions or hashtags them to be included on your site.
For this tutorial, we’re allowing all content we source to go live on the website without needing our approval.
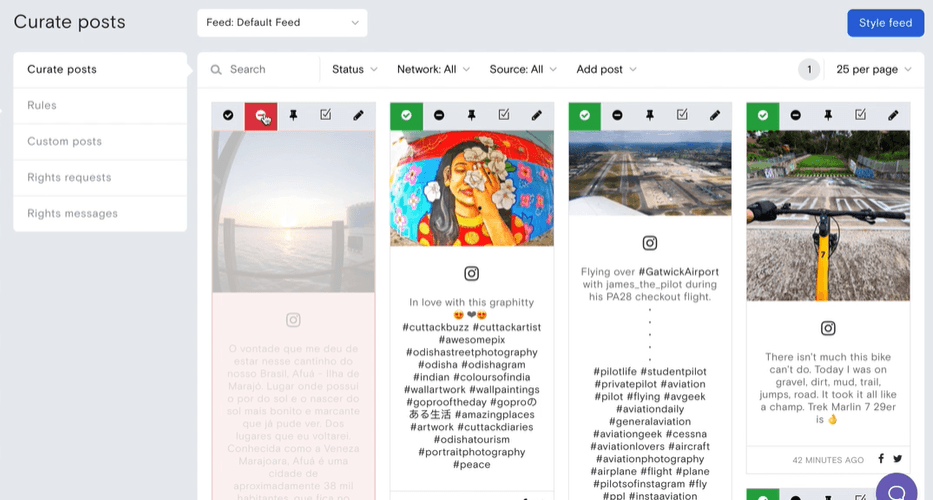
But, if we see a post that we’re not excited about showcasing on our site, we can easily reject it. So, we’ll go ahead and reject a post below.

And for photos we love, we can pin them to the top so they’re the first posts visitors will see.
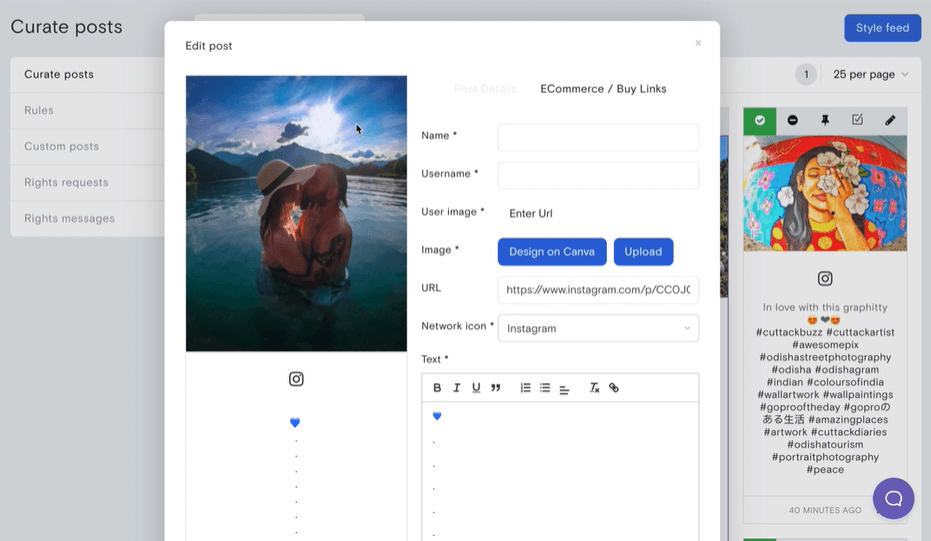
What about posts you love, but what to tweak?
You can edit each post to add links, customize the image in Canva, upload your own, edit the text, etc.
But one thing to keep in mind is that if you’re making noticeable changes to user-generated content, make sure you get their permission first.

You can also filter posts to see ones that were approved, rejected, or need approval, view content from different networks or sources, and add posts directly from sites.
If you’re allowing your content to be automatically added to your site, then it’s crucial to have rules in place. A default rule we have is to reject posts with profanity. But if you want posts that include this language, then that’s totally fine, just edit the rule to fit your needs.
Or if you only want content that does—or doesn’t—contain particular words, images, or actions, then you can also set rules for that.
As you can see, curating your social media content is simple, and once it’s setup will keep your audience engaged with interesting content even if they don’t follow you on social (yet).
Curator.io is an easy-to-customize aggregator that lets you pull from over a dozen sources. If you'd like to give Curator.io's free forever plan a spin sign up today.
Previous post: