How to Add a Twitter Widget to Your Website [2025 Updated Guide]
Dayana Mayfield
on
November 23, 2024
Twitter is a powerful platform for sharing updates, engaging with your audience, and showcasing your brand’s personality.
Are you taking full advantage of the platform?
If your Twitter content only resides on Twitter, then you are not.
By embedding tweets on your website, you can amplify your reach, provide real-time updates, and add social proof—all while keeping your site fresh and engaging.
In this guide, we’ll explore everything you need to know about Twitter widgets: what they are, how to add them, the best free and affordable tools, and the different ways you can embed tweets to maximize their impact on your website.
Curator.io is an easy-to-customize aggregator that lets you pull from over a dozen sources. If you'd like to give Curator.io's free forever plan a spin sign up today.
What is a Twitter widget?
If you want to embed your Twitter feed in your website or blog, you need a Twitter widget.
A Twitter widget is a tool that allows you to embed tweets or Twitter feeds directly on your website. It automatically pulls content from Twitter based on your chosen criteria, such as user accounts, hashtags, mentions, or even location.
Integrating a Twitter feed widget allows you to display real-time updates, engage visitors with dynamic content, and provide social proof through customer testimonials—all on your website. And selecting the right X widget allows you to moderate the content and customize the look so you can reap the benefits while staying on brand.
The 7-step process for adding a Twitter widget to your site
A Twitter widget is no-code technology that allows anyone to add their Twitter content to their website with no coding required.
Curator's WordPress plugin works for Twitter, Facebook, YouTube, Instagram, TikTok.
However, if you don't have a WordPress website that's fine too. Instead of using the plugin, you can simply add a custom HTML widget anywhere on your website and copy and paste the code.
Here's an example of a Twitter widget showing recent tweets on the City of Riverside's website.

Here are 7 easy steps for adding and maintaining a Twitter widget:
Step 1. Select an easy-to-use widget
The first step is to choose a social media widget, also known as a social media aggregator, which will pull in your social posts according to the rules that you set.
The software should:
Offer free or affordable plans that fit your needs
Work for the social media platforms you want to aggregate (especially Twitter!)
Allow you to add content from different platforms if you want
Provide templates and easy styling options to help you match the widget to your website's design
Once you've selected the right app, everything else should be super easy.
Curator.io is an easy-to-customize aggregator that lets you pull from over a dozen sources. If you'd like to give Curator.io's free forever plan a spin sign up today.
Step 2. Create a new feed and set the moderation style
The next step is to create your first feed in your account.
All you have to do is hit "Create New Feed."
Then you will give your feed a name. You could call it something simple like "Twitter Posts."

You also need to set the default post status, meaning the moderation style.
You have two options:
Approved - Tweets from your selected feed destination will automatically be added to your website.
Needs approval - Tweets will not be added to your website until you login to the social media aggregator and manually approve them individually.
The right selection depends entirely on you, but as a general rule we recommend choosing the “Needs approval” option so that you can make sure you know what content will appear.
Step 3. Select Twitter as the social media source and choose what types of tweets to display
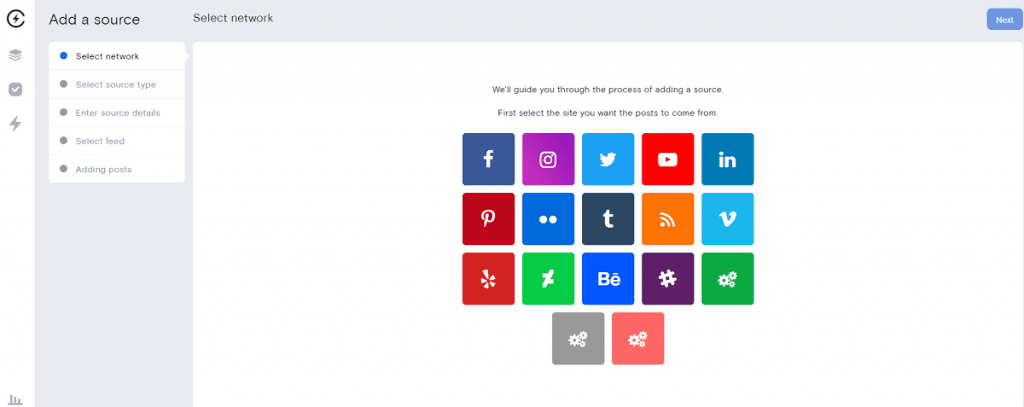
After you've named your feed and set the moderation style, the next step is to choose what types of content to display.
As you can see, Curator offers a lot of options. Go ahead and select Twitter by clicking on the Twitter logo.
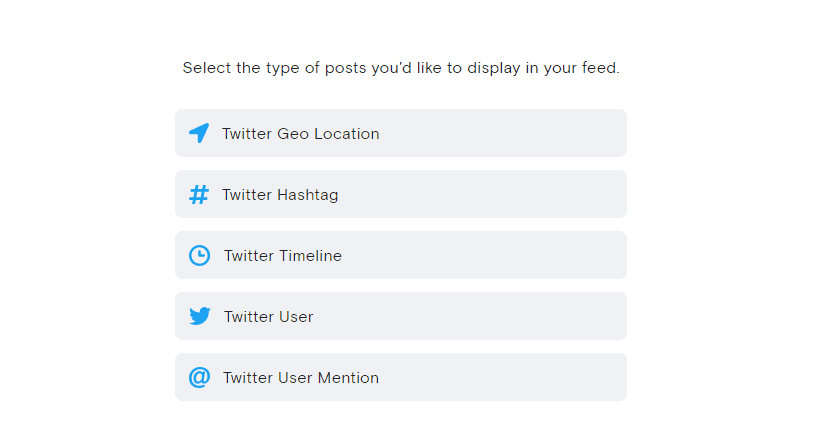
Now, you'll be presented with a list of different types of Twitter sources.
Note that "Twitter User" is the most popular option because it pulls tweets from one specific account.
The Twitter source options include:
Twitter Geo Location
Twitter Hashtag
Twitter Timeline
Twitter User
Twitter User Mention
If you chose a tweet source that pulls content from other Twitter users, make sure that your moderation setting is set to "Needs approval" so you don't end up adding inaccurate or offensive content to your website.
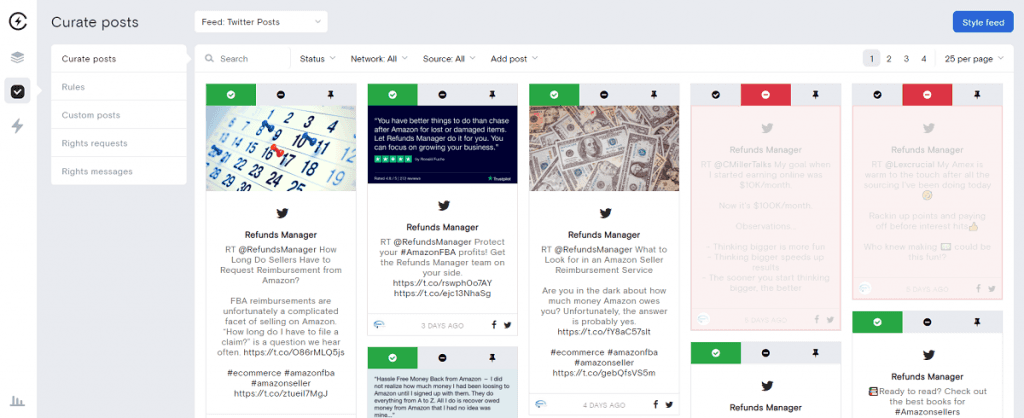
Step 4. Delete any tweets that you don't want showing up in your widget
The Twitter aggregator you choose should make it easy for you to approve and delete tweets as needed.
If your moderation style is set to "Approved" then you will need to delete any tweets that you don't want showing up on your website.
But if your moderation style is set to "Needs approval" then you need to do the opposite. Approve tweets that you want. If you don't approve any tweets, then none will show up on your site.
Step 5. Select a widget template and customize the style
Now for the fun part!
It's time to select a widget template (also known as a layout). You can choose carousel, grid, mosaic, or a dozen other options.
You can keep things simple with a white background and black text, or add borders and colors.
With Curator, you can change the colors of the background, fonts, borders, icons, and more.

Here's an example of a X feed widget using the Waterfall template and removing the borders:

Go ahead and select some basic customizations for now. You can always go back and update the template and style later.
Step 6. Add the widget to your website
The last step in the installation process is to add the widget to your website.
You can do this by simply hitting "Publish Feed" and then copying the code and pasting it where you want it to go. You can add a custom HTML widget to your homepage, footer, blog sidebar, designated web page, or anywhere else. Then just paste the code into text form.
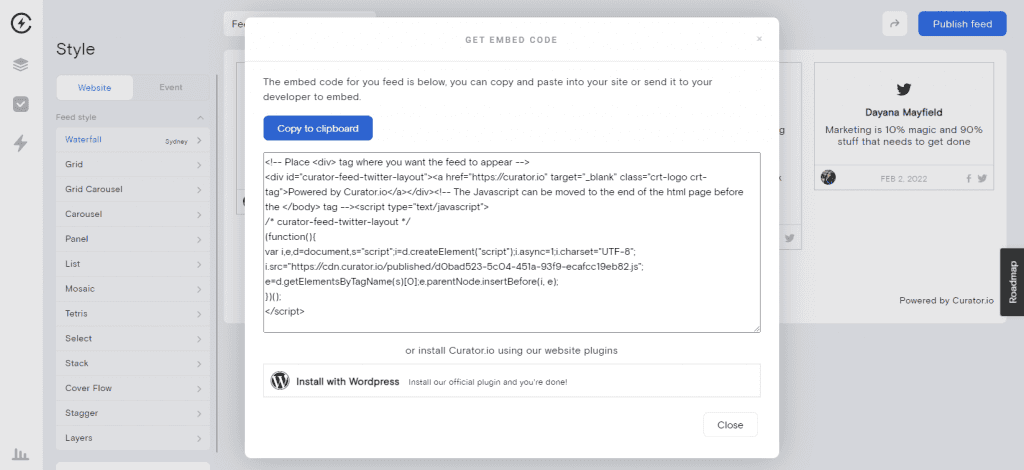
You can also install Curator's WordPress plugin and then you'll only have to copy over some short code.
Step 7. Approve or remove tweets as needed
The installation is done!
This step is simply a reminder to login to your social media aggregator platform from time to time in order to either approve or delete new posts, depending on if your posts are set to be automatically approved or manually approved.
5 free and affordable Twitter widget tools
These free Twitter widgets (and their affordable options) work for WordPress, Wix, Squarespace, Webflow, and any other website builder that lets you add your own custom HTML:
1. Curator

Curator is a versatile social media aggregator that makes it easy to embed Twitter feeds and other social media content on your website. With support for multiple platforms like Instagram, Facebook, and TikTok, Curator helps you keep your site dynamic and engaging.
This is the perfect option for businesses and individuals looking to create beautifully styled, engaging social media feeds with minimal effort.
Key Features:
Multi-platform support
Customization options
Moderation controls
User-friendly interface
Pricing:
Free Plan: Free forever for up to 3 sources and includes moderation controls.
Paid Plans: Starting at $25 per month, offering more sources, real-time updates, and advanced customization.
2. Twitter Widget by Twitter
The official Twitter Widget allows you to embed Twitter content directly on your website without any third-party tools. While it offers a simple way to display tweets, it lacks the customization and moderation capabilities that Curator provides.
Key Features:
Direct integration with Twitter
Multiple feed types (timeline, likes, mentions)
Light and dark theme options
Real-time updates
Pricing:
Free Plan: Fully free to use, but with very limited design and moderation options.
3. Juicer

Juicer aggregates content from multiple social media platforms, including Twitter, and displays it in a customizable feed on your website. It’s a straightforward tool for those looking for basic social media feeds, but if you're seeking more advanced customization and moderation features, Curator is the better choice.
Key Features:
Multi-platform support
Pre-designed templates
Basic moderation tools
Simple integration
Pricing:
Free Plan: Includes two sources with no moderation or custom designs, and displays Juicer branding prominently.
Paid Plans: Start at $25 per month, offering more sources and removing branding.
4. Walls.io

Walls.io is a social media aggregator designed for embedding feeds from multiple platforms, including Twitter. It offers a variety of templates and live event features, but lacks the deeper customization and seamless moderation options available with Curator.
Key Features:
Multi-platform support
Event-specific features (live social walls, polls)
Pre-designed templates
Basic content moderation
Pricing:
Free Plan: There is a 14 day free trial offered
Paid Plans: Start at $250 per month.
5. Onstipe

Onstipe allows users to aggregate and display social media content from platforms like Twitter. While it offers useful features for live events and social media walls, its customization and moderation tools are more limited compared to Curator.
Key Features:
Multi-platform aggregation
Social media wall templates
Basic moderation options
Real-time content updates
Pricing:
Free Plan: Supports two sources with Onstipe branding—tweets not included in the free plan.
Paid Plans: Plans that include tweets start at $25 per month.
6 ways of adding tweets to your website
Now that you know the process of adding a X widget to your website and have had a chance to review the various widget tools to choose from, let’s dive into the different ways you can add tweets.
1. Adding a single tweet
If you want to add just one tweet, you can simply select the three dots above any tweet and then select "Embed Tweet."
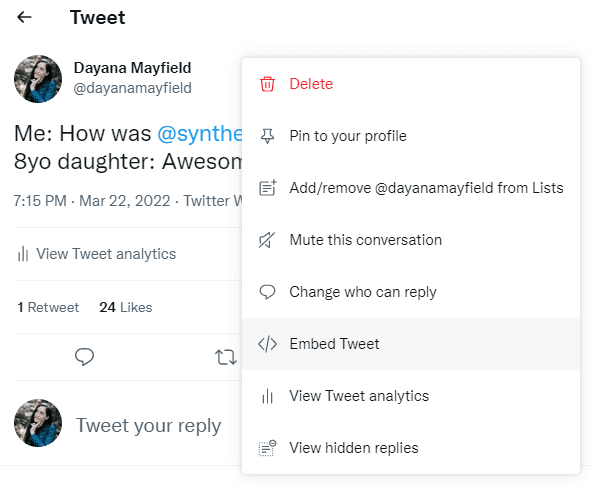
You will then be able to copy the embed code and place it anywhere you'd like on your website.
2. Displaying tweets from a specific account
To add tweets from a specific account, review our 7-step process above and make sure to choose "Twitter User" as your feed source. You will then be prompted to connect your Twitter account to the aggregator.

3. Featuring customer testimonials from Twitter
If you want to display customer testimonials from Twitter on your website, then make sure that you set the approval setting to "Needs approval." Then you can pull in all of your account mentions into the aggregator and approve the best ones.
You don't need to constantly check and approve new ones. You can login monthly or quarterly to add more testimonials or replace old ones with new ones to freshen up your website.
Here's an example from Synthesis:

4. Adding tweets from a hashtag
Similarly as with adding testimonials, when you want to add tweets from a specific hashtag, make sure to manually approve them. You can find the top 5-10 tweets and just leave them there on your website, or check continuously to add new ones.
5. Aggregating tweets from a geo-location
Follow steps 1 through 3 from our 7-step process above. At this point, select “Twitter Geo Location” as your source type.
Enter the latitude and longitude of your target area, along with a radius to define the coverage. Alternatively, you can type in a location and adjust the waypoint to pinpoint the precise area.
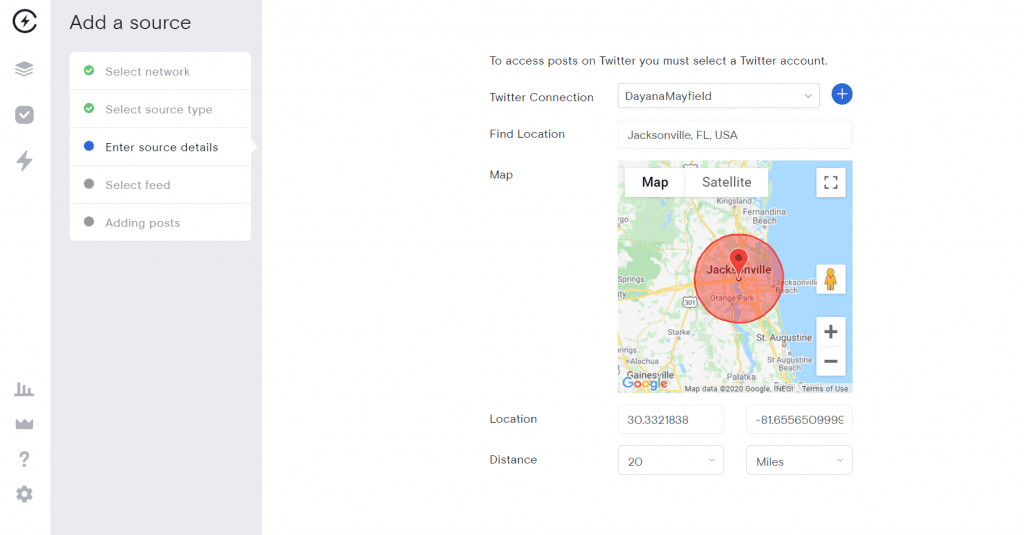
Your feed will then aggregate tweets from users within the specified geographical location.
Next, proceed with steps 5 and 6 to customize the design of your feed and embed it on your website. Be sure to set the approval setting to “Needs approval” to filter out content that may not align with your site’s goals.
Geo-location feeds are perfect for showcasing live event updates, promoting local businesses, or highlighting community discussions, adding localized, real-time content to your site.
6. Displaying tweets from a curated timeline
A Twitter timeline widget lets you aggregate tweets from select accounts you follow on a dedicated Twitter profile. This is a great way to showcase specific content, such as industry updates, partner news, or influencer insights.
Like with the geo-location, step 3 in the 7-step process is where you deviate. Go ahead and select “Twitter Timeline” as your feed source.
After configuring the timeline, continue with steps 5 and 6 to customize the feed’s design and embed it on your website.
Regardless of the types of tweets you want to add to your site, it's easy when you use a Twitter plugin.
Try our free forever widget.
Curator.io is an easy-to-customize aggregator that lets you pull from over a dozen sources. If you'd like to give Curator.io's free forever plan a spin sign up today.
Previous post: