Your Google reviews do something your own marketing can't. They let real customers vouch for you, in their own words. The catch is where those reviews live. They sit on Google, while your customers often make their final decision on your own website.
That gap is bigger than it looks. BrightLocal's Local Consumer Review Survey (2026) found that 54% of consumers visit a business's website after reading positive reviews. They arrive curious and halfway convinced. Then your site shows them services, prices, and a contact form, with no customer voices anywhere.
The fix starts with separating two jobs. Linking to your Google reviews grows your review count. Showing them, curated and placed on the right pages, turns those reviews into trust. A dentist might need a review link on every appointment confirmation. A contractor might need three recent reviews right beside the quote form.
After watching thousands of businesses set up review feeds, I've found the hard part usually isn't the code. It's deciding which reviews belong on which page.
Below, you'll learn how to add Google reviews to website pages both ways, and how to pick the method that fits your setup.
The top 4 methods for adding Google Reviews to a website
Before you copy a single line of code, decide what you need your reviews to do. Do you want more of them? A quick trust signal near your phone number? Or a steady stream of praise beside your quote form?
Your answer matters, because each goal points to a different method. Pick the wrong one and you'll either overpay for a simple button or underdeliver on a page that needs real proof. Two methods come free from Google. One needs a developer. One uses a review tool that does the heavy lifting for you. Here's how the four compare, followed by a closer look at each one.
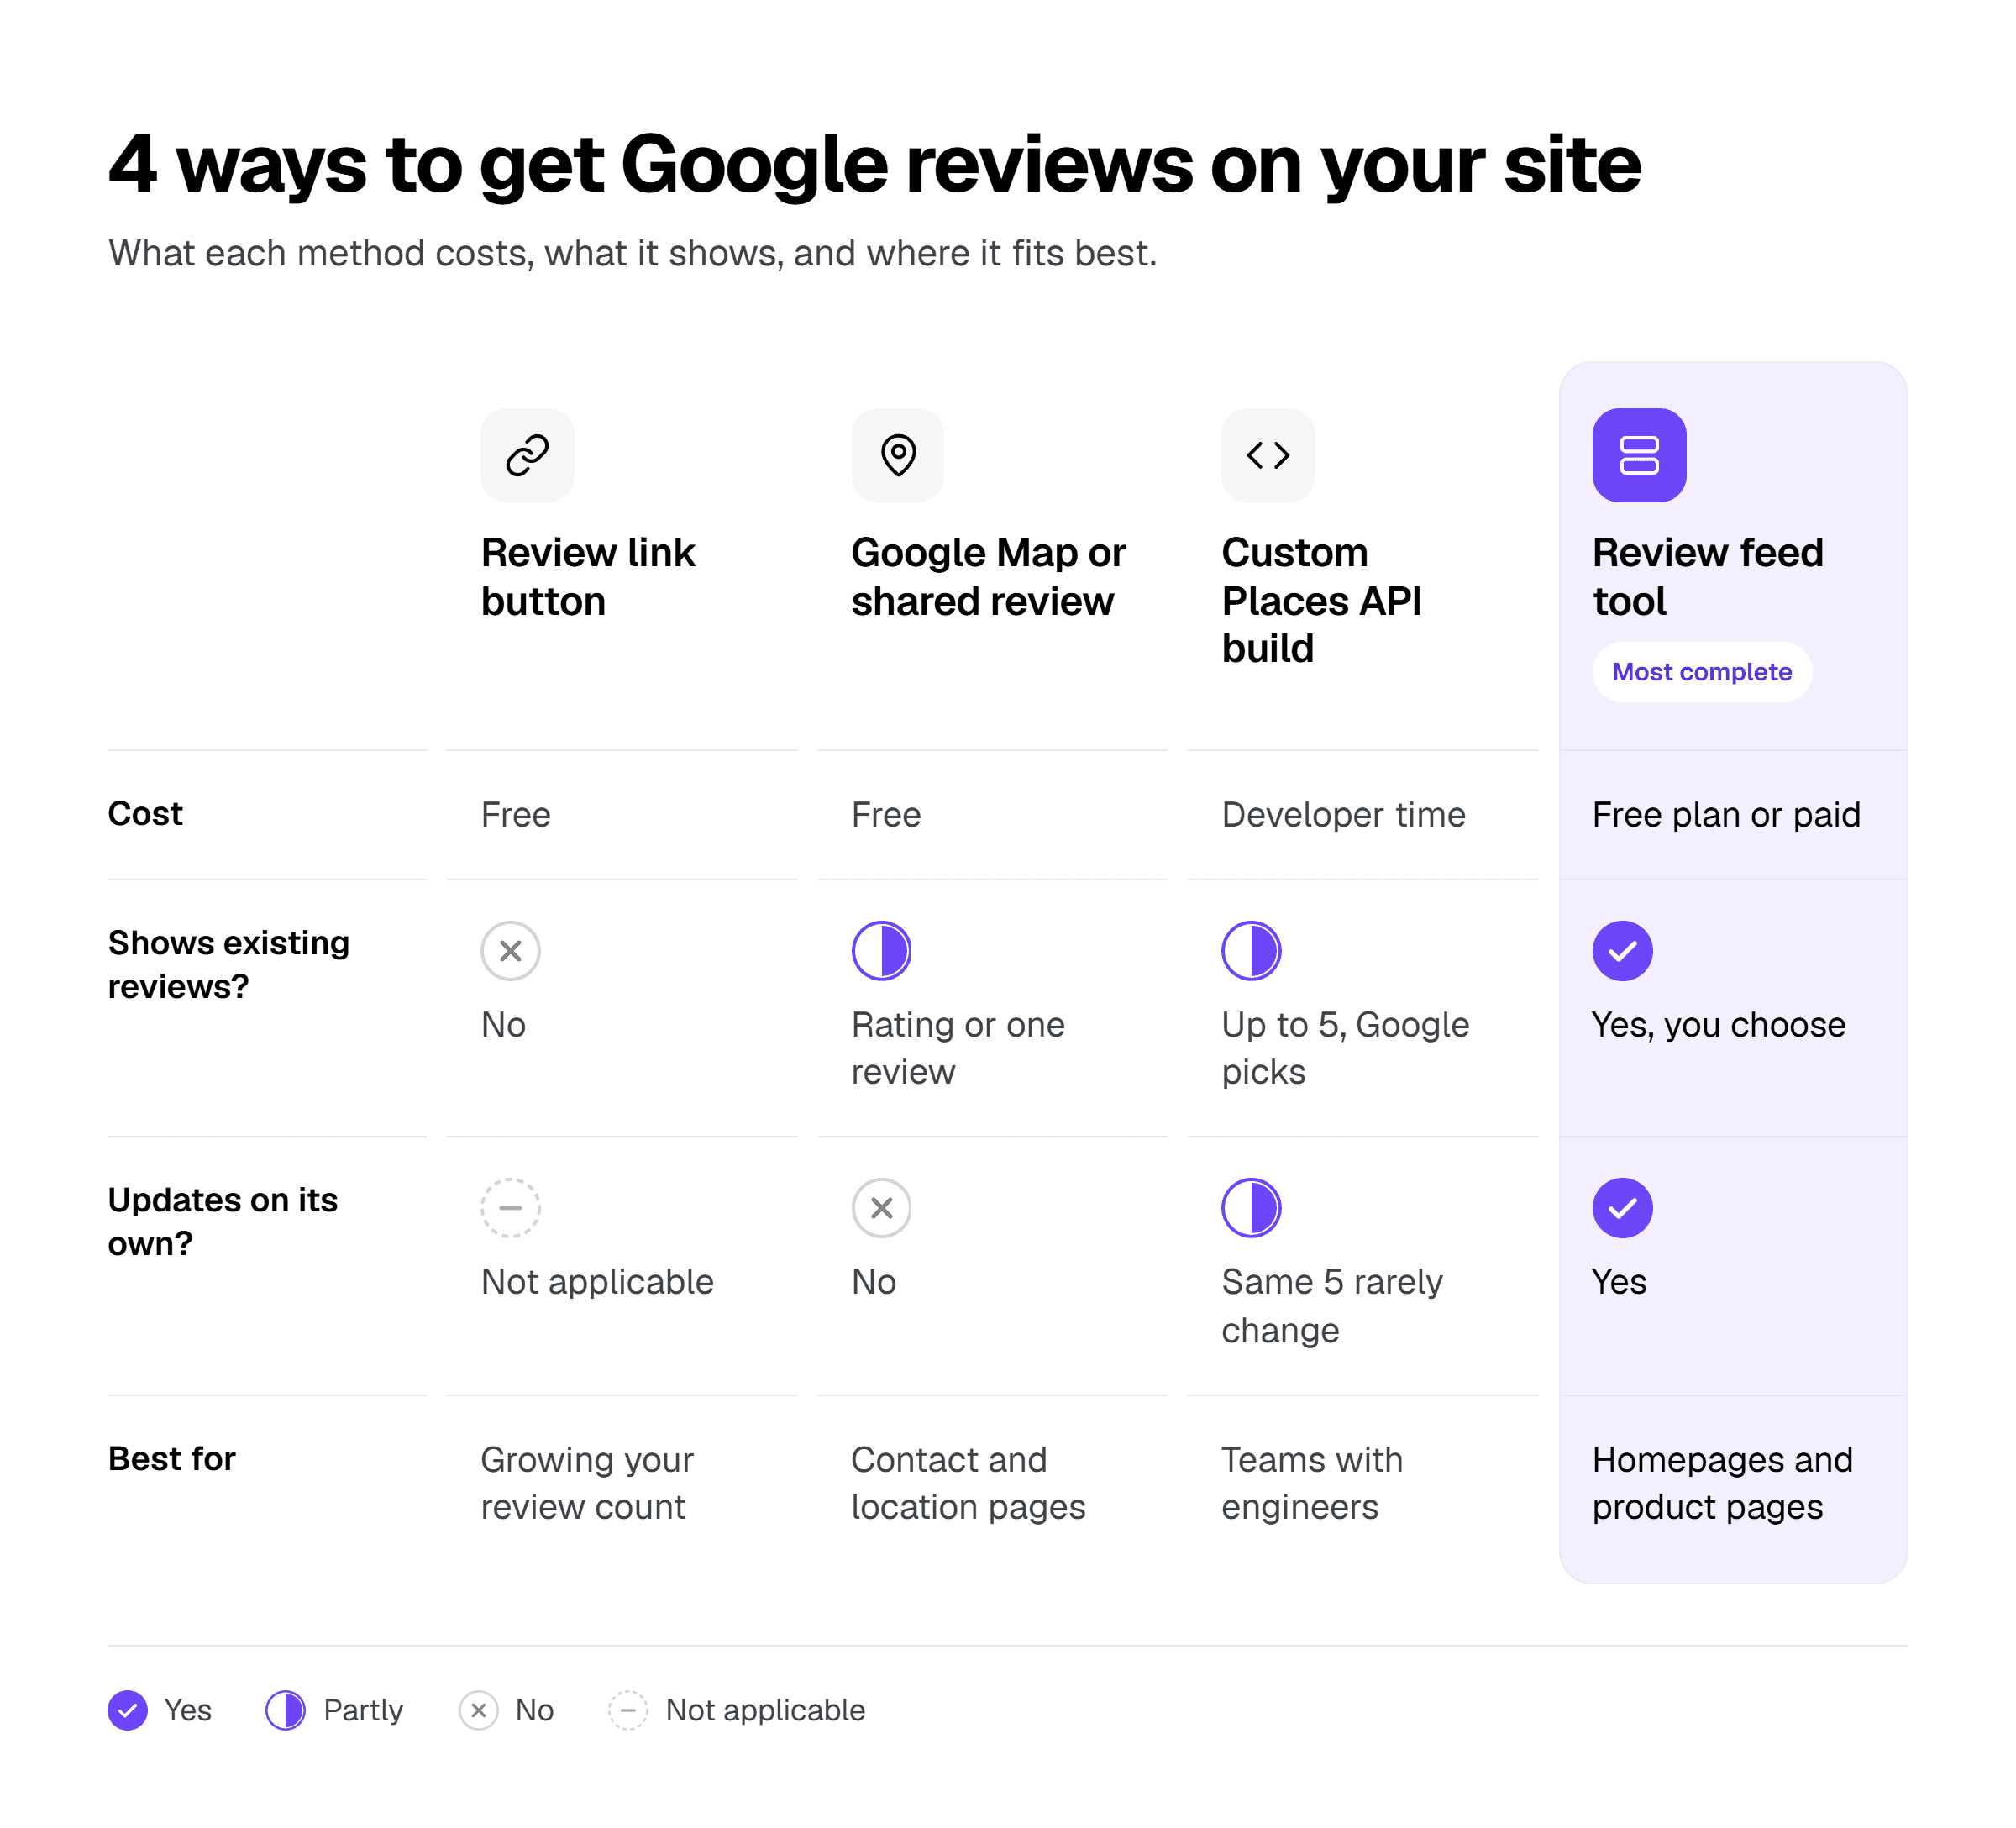
Method 1. A review link button (free, grows your review count)
Every Google Business Profile has a share link that opens Google's review form. Put it on your site, and visitors can leave a review in a couple of taps. No account hunting, no searching for your listing.
Be clear on what this link does. It asks for new reviews. It shows nobody the reviews you already have.
That makes it a great fit for your footer, your thank-you page, and your post-purchase emails. Those are the moments when a happy customer is most likely to say yes. You'll find the exact steps for grabbing your link in the next section.
Method 2. A Google Map or a shared review (free, static)
Google gives you two more free options inside its own tools. First, you can copy a link to any single review using the Share review option in your Business Profile. Second, you can add a Google Map of your location to a page.
Both are handy, and both have limits. A shared review is still a link, so visitors leave your site to read it. A map shows your location and star rating, with no scrollable reviews.
Use these on a contact or locations page, where visitors mainly want directions and a quick sense of your rating. Your homepage needs something with more pull, because that's where first impressions form.
Method 3. A custom Places API build (developer time, capped results)
Have a developer on staff? You might be tempted to build your own integration with Google's Places API. Go in with clear eyes about what you'll get. The API returns a maximum of five reviews per place, and Google picks them by relevance rather than date.
You can't choose which five appear, and the set rarely changes. Google's Maps Platform terms also restrict storing that content. So your developer spends real hours building something you can't steer.
A multi-location dental group came to us after building exactly this. Their homepage showed the same five reviews for months, with a three-star review stuck in the top spot. They moved to a moderated feed with one feed per location page. Within a week, every office page showed recent reviews from that office's own patients.
Method 4. A review feed tool that syncs on its own
The fourth option is a review tool. It connects to your Business Profile, pulls reviews in automatically, and hands you one code snippet to paste. Curator's Google reviews widget works this way, and so do several other tools on the market.
You also get control the other methods lack. You decide which reviews appear, how they look, and which pages they live on.
Why does automatic matter so much? Freshness. BrightLocal's 2026 survey found that 74% of consumers only care about reviews written in the last three months. A list of reviews you pasted in by hand last spring is already losing its punch.
I'll be straight with you: if you only want a "Review us on Google" button in your footer, you don't need a paid tool. A feed earns its place when you want fresh reviews in front of buyers.
How to link Google reviews to your website
Want more Google reviews without adding anything visual to your site? Start here. Learning how to link Google reviews to your website takes about two minutes, start to finish.
Google's Business Profile Help explains where to find your link:
Sign in to the Google account that manages your Business Profile.
In Google Search, find your business and select Ask for reviews. In Google Maps, open Customer reviews and select Get more reviews.
Copy the link that appears. Google also offers a QR code for printed materials.
Now put that link to work in three places:
Your site footer. A simple "Review us on Google" button works on every page.
Your thank-you or order confirmation page. Your customer just finished buying, so the timing is right.
Your email signature. Every reply to a customer becomes a gentle reminder.
One rule to remember: Google's guidelines prohibit offering incentives, like discounts, in exchange for reviews. Ask warmly, and leave it there. Keep the request short, too. A one-line ask with a link beats a paragraph of explanation every time.
Set up a review feed that updates itself
Ready to put real reviews on your site and let them refresh on their own? Here's the setup in Curator, step by step. Other review tools follow a similar pattern, so these steps travel well. Expect to have a live feed within minutes of signing up. Want the code-level walkthrough? Our page on how to embed Google reviews covers it in detail.
Create a feed and choose your approval setting
Sign up for Curator, click Create a new feed, and give it a clear name like "Google Reviews." Before any reviews come in, Curator asks how new content should be handled. "Approved" publishes new reviews automatically. "Needs approval" holds each review until you give it the nod.

Start with "Needs approval" for your first month. You'll get a feel for what comes in, from glowing praise to the odd spam post. Once you trust the flow, switch to auto-approval and add keyword filters to catch anything off-topic.
Connect your Business Profile and find the right location
Inside your new feed, click Add a Source and choose Google Reviews from the list.

You'll then see over a dozen source options, including several popular social media platforms. Pick Google Reviews.

Then search for your business by name and full street address. Select the matching location and click Next.

Slow down on that search if you have more than one location or an old duplicate listing. Picking the wrong one is the most common setup snag we see.
"Most review feeds that look broken aren't broken at all. The business has two Google listings for one address, and the feed is connected to the empty one." Dave Ganley, Technical Director, Curator
Decide which reviews go live
Once your profile is connected, Curator pulls in your reviews. Click Curate to see them. If you chose "Needs approval," approve the ones you want on your site. If everything is auto-approved, remove anything that doesn't belong.

Spot a review you love? Pin it so it stays at the top of your feed. Use this step to screen out spam and noise. The section on honest curation below covers what to do with criticism. When you're done, click Style/Publish Feed.
Pick a layout that suits the page
Next, choose a layout from Curator's layout templates. Each one suits a different spot on the page:
A carousel fits a slim band on your homepage.
A grid gives a dedicated reviews section room to breathe.
A list slides neatly into a sidebar or narrow column.
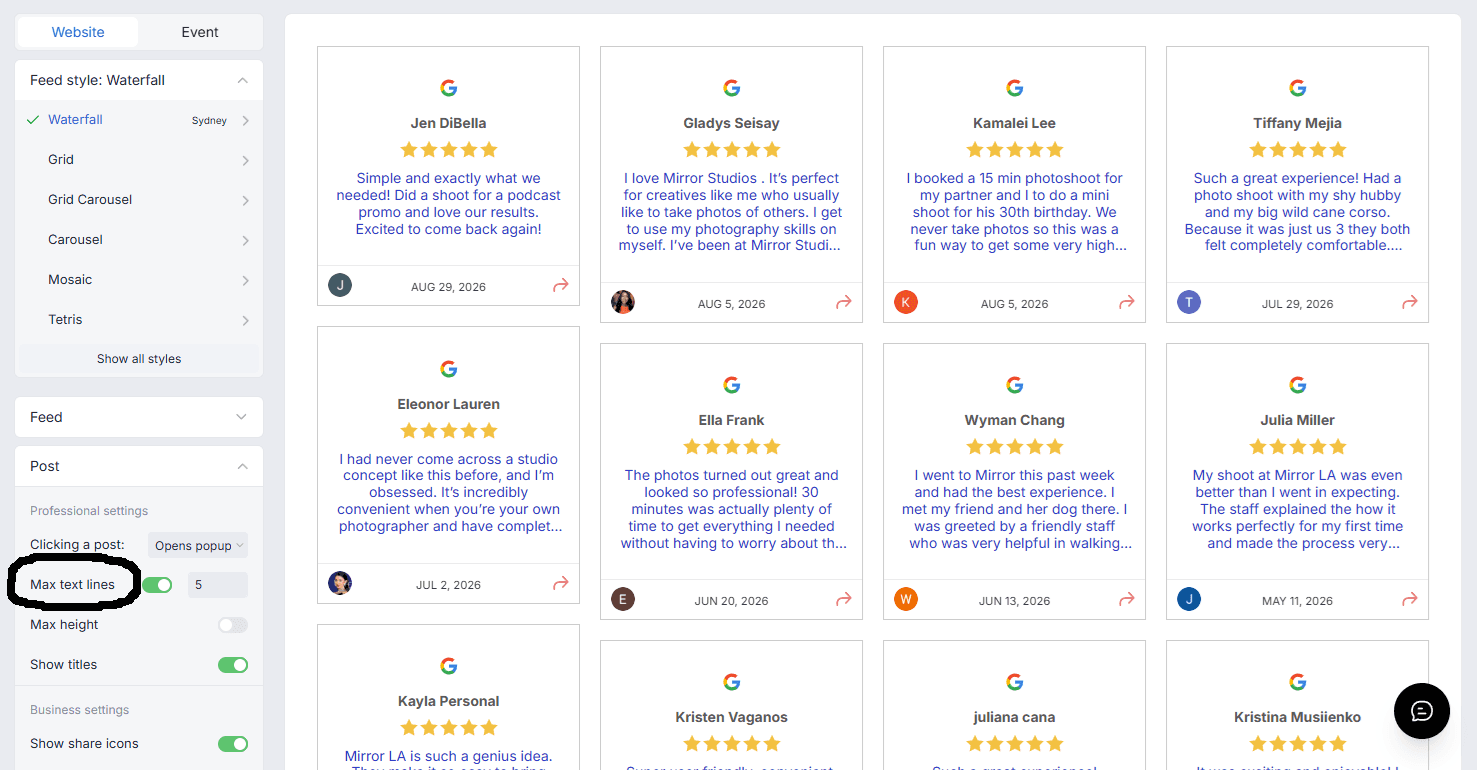
Because Google Reviews can vary in length, you should also click on the Post setting and choose either the max pixel height or the max lines per review. We selected 5 max lines to keep reviews from running on too long on the website.
Paste the code where people make decisions
Last step: click Get Code and copy the snippet. Paste it into an HTML or code block on the page you choose. Every major site builder has one, and the platform section below shows exactly where to find yours.
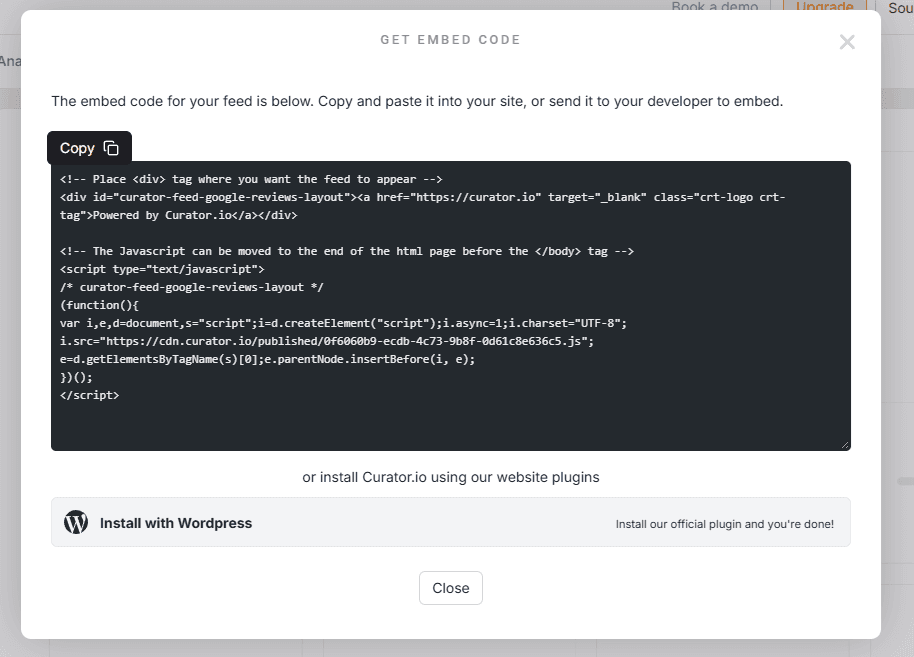
Here's the part that matters more than any design setting. Where you paste that code decides whether anyone reads your reviews. A beautiful feed on a forgotten page does nothing for you. So before you hit publish, think about where your visitors actually make decisions.
Where to display Google reviews so people actually read them
Quick question: when did you last click through to a "Reviews" page on someone else's site? Probably never. Your visitors don't either.
Reviews work hardest right beside the moment of decision. A visitor reading your pricing page has a specific worry. A review that answers it, right there, beats a whole page of praise they'll never see. Here's where to display Google reviews so they actually get read:
Beside your quote or contact form. This is your highest-impact spot, because reviews meet visitors right as they hesitate.
On service or product pages. Match reviews to the offer, so a roofing review sits on your roofing page.
Near pricing or checkout. A few recent reviews answer last-minute doubts.
In your footer. A slim carousel adds site-wide trust with almost no effort.

One of our customers in the home services industry had its review feed on a standalone "Testimonials" page that almost nobody visited. We suggested moving a short carousel next to their free quote form. Form submissions on that page rose by about 12% over the next month, with no other changes.
Showing Google reviews on Squarespace, WordPress, and Wix
Good news: the code you copied works the same everywhere, on any site builder. Only the paste location changes from one site builder to the next. Here's where to put it on the most popular platforms, with links to our full step-by-step guides.
Squarespace: add a Code block
Open the page editor, click Add Block, and choose Code. Paste your snippet, save, and preview the page on both desktop and mobile. Squarespace has no built-in reviews feature, so a code block is the cleanest and most reliable route.

For screenshots of every step, see our guide on how to add Google reviews to Squarespace. Comparing features first? Our Google reviews widget for Squarespace page covers layouts and moderation.
WordPress: a Custom HTML block or a plugin
You have two routes in WordPress. The quick one is a Custom HTML block. Add it to any page or post in the block editor and paste your snippet.

The second route is Curator's WordPress plugin, a good fit if you'd rather manage feeds from your dashboard. Either way, your reviews update on their own once the feed is connected. Our full guide on how to add Google reviews to WordPress walks through both, including how the plugin options compare.
Wix: paste the code into a custom element
In Wix, open the Add menu and choose the custom code element (Wix lists it under Embed in the left-hand menu). Paste your snippet, then drag the element into place and resize it so the reviews have room on mobile.

For a full setup walkthrough, see our page on how to embed Google reviews on Wix. Weighing features like layouts and moderation? Our Wix Google reviews widget page breaks them down.
Shopify, Webflow, and hand-coded sites
Any platform that accepts custom HTML can run the same code. In Shopify, use a custom Liquid or HTML section. In Webflow, drop in a custom code element. On a hand-coded site, paste it straight into your template. If a developer handles your site, pass along this advice from our engineering team.
"Let the page load first and the reviews second. Nobody should wait on a review feed to see your prices or your booking button." Thomas Garrood, Co-founder, Engineering, Curator
Curate honestly: which reviews to show and which to keep
You'll be tempted to hide every review below five stars. Resist that urge.
Approval settings exist to keep spam, off-topic rants, and personal details off your site. Use them for exactly that job. Google's own Business Profile guidance makes the case plainly: customers find a mix of positive and negative reviews more trustworthy. A wall of flawless praise can make visitors wonder what's missing. A thoughtful reply to a three-star review, on the other hand, shows exactly how you treat people when things go sideways.
There's a regulatory side, too. The FTC's 2024 rule on consumer reviews includes a section on review suppression (16 CFR 465.7). The safest habit is simple. Label a curated feed honestly, and never present it as every review you've received.
My rule: filter out spam and anything off-topic, but keep fair criticism visible. A well-answered critical review often sells better than another five stars.
These 3 habits keep your feed honest:
Never edit a reviewer's words. Show each review exactly as written.
Label the section accurately. "Recent reviews" or "Selected reviews" works. "All our reviews" doesn't, unless it's true.
Reply to critical reviews on Google. Visitors who click through will see how you handle problems.
Start with the job, then pick the tool
So where should you start? Pick the job first, then the tool.
If you're starting from zero, try a simple combo. Put your Google review link in your footer to keep new reviews coming. Then add one curated feed beside your main conversion point, whether that's a quote form, a booking button, or checkout.
That pairing covers both jobs from this guide: growing your reviews and turning them into trust. Curator's free plan lets you set up your first feed today and see how it looks on your own site.
Want to mix Google reviews with social posts and other praise? Here's how to add customer testimonials to your website.
How to add Google reviews to website FAQs
Can I hide a negative Google review on my site?
Yes. On your own website, you choose which reviews appear in your feed. You can't delete a review from Google itself, but you can request removal if it breaks Google's posting guidelines. On your site, use moderation for spam and off-topic posts. Keep fair criticism visible when you've replied well, and label the feed as selected reviews so visitors know what they're seeing.
Is there a free way to show Google reviews on my site?
Yes. Google's review link, shared review links, and map are all free, though none of them show a live set of reviews. For an auto-updating feed, Curator offers a free plan. You can connect your Business Profile, moderate reviews, and paste the code on your site without paying anything to start. Upgrade later only if you need more feeds.
Will new Google reviews appear on my site automatically?
With a review tool, yes. Once your feed is connected, new reviews sync in as your business receives them. If you've chosen "Needs approval," they'll wait in your queue until you approve them. A custom API build works differently, since it tends to show the same five Google-selected reviews for months at a time.
Can I show reviews from more than one business location?
Yes. Curator lets you manage multiple Google Business locations from one account, with a separate feed for each. That way, every location page shows reviews from its own customers. It's the same setup the dental group mentioned earlier used for its office pages. You can also combine Google reviews with other sources in one feed.
Previous post: