Instagram is one of the best platforms for visual storytelling.
And, if you're using Webflow for your website, integrating your Instagram feed can elevate your site's aesthetics, engagement, and trustworthiness.
Are you a brand showcasing user-generated content, a designer displaying your latest work, or an influencer looking to keep your audience engaged?
If so, embedding your Instagram feed into Webflow is a smart move.
In this guide, we'll walk you through the process of adding your Instagram feed to Webflow, step by step.
Why add your Instagram feed to your Webflow website?
Integrating your Instagram feed into your Webflow site offers several benefits:
Boost engagement: Visitors can interact with your content without leaving your website.
Showcase fresh content: Your site stays visually appealing with automatically updated Instagram posts.
Increase trust and social proof: Seeing real-time Instagram activity makes your brand more credible.
Enhance design aesthetics: Instagram is inherently visual, making your website more dynamic and appealing.
Drive traffic to Instagram: If you want more Instagram followers, displaying your latest posts on your Webflow site is a great way to encourage visitors to follow you.
What type of Instagram posts should you consider adding to your Webflow website?
The embed Webflow Instagram feed can handle several types of posts. The posts you choose will ultimately depend on what your objectives are. For instance, if you're focused on building brand authority and trust then user-generated content is a great way to showcase what you have to offer from real people.
Consider these types of posts when deciding what will best serve your website visitors:
User-generated content (UGC): Build trust by showcasing customer testimonials, reviews, or tagged posts.
Product showcases: Highlight your latest products or services directly from your Instagram account.
Behind-the-scenes content: Give visitors a peek into your brand’s process, culture, or events.
Instagram Stories: Embed Instagram Stories to keep your audience engaged with disappearing, time-sensitive content.
Reels and videos: Add Instagram Reels to showcase dynamic content that captures attention.
How to add an Instagram feed to a Webflow website (step by step)
Embedding an Instagram feed in Webflow requires a social media aggregator to pull posts from Instagram and display them on your site. Follow these steps to set up your Webflow Instagram integration.
Step 1. Choose a free or affordable social media aggregator
To embed Instagram feed into Webflow, you'll need a social media aggregator. Curator is a great option because it:
Offers free and reasonably priced plans to suit different needs.
Lets you set moderation rules to control which Instagram posts appear on your website.
Allows you to manually approve or remove posts if needed.
Provides easy design tools to customize the feed's appearance in just a few clicks.
Supports custom CSS for professional designers who want more control.
Removes branding on paid plans and keeps it minimal on free accounts.
Is responsive and automatically optimized for desktops, tablets, and mobile devices.
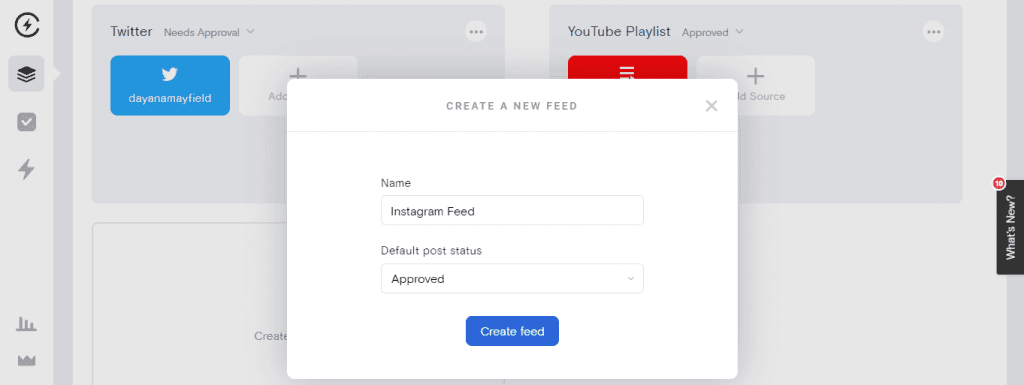
Step 2. Create a new feed and set the approval status
Once you've chosen a social media aggregator to embed social, sign up and create a new Instagram feed. During setup, you'll have the option to:
Automatically approve all posts (if you trust all your Instagram content).
Manually approve posts before they appear on your Webflow site (recommended for UGC or curated feeds).
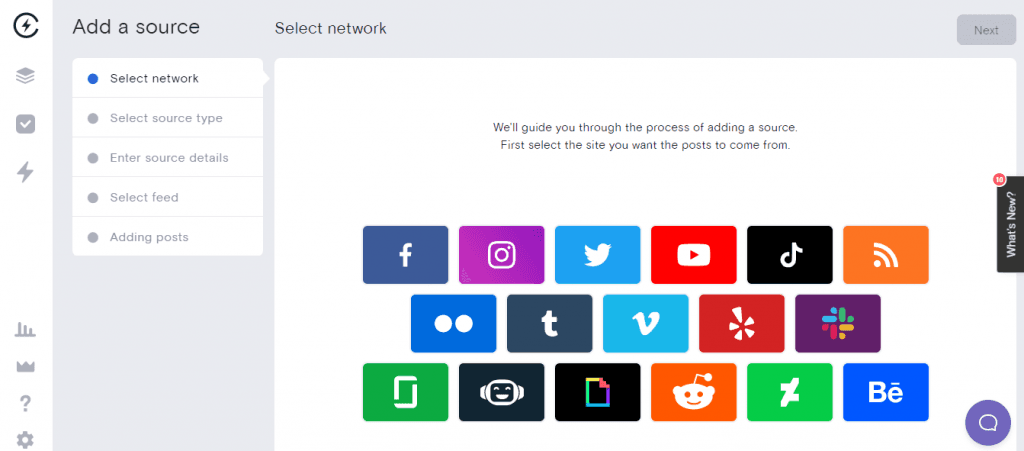
Step 3. Chose Instagram as your content source
Most social media aggregators support multiple platforms. Select Instagram as your content source so that only Instagram posts are pulled into your Webflow feed.
Step 4. Select the type of posts and connect your Instagram account
You'll be prompted to choose the types of Instagram posts you want to display:
Your own posts, reels or stories from your business or personal Instagram account.
Posts of reels from a specific hashtag (great for UGC campaigns).
Posts that mention or tag your account.
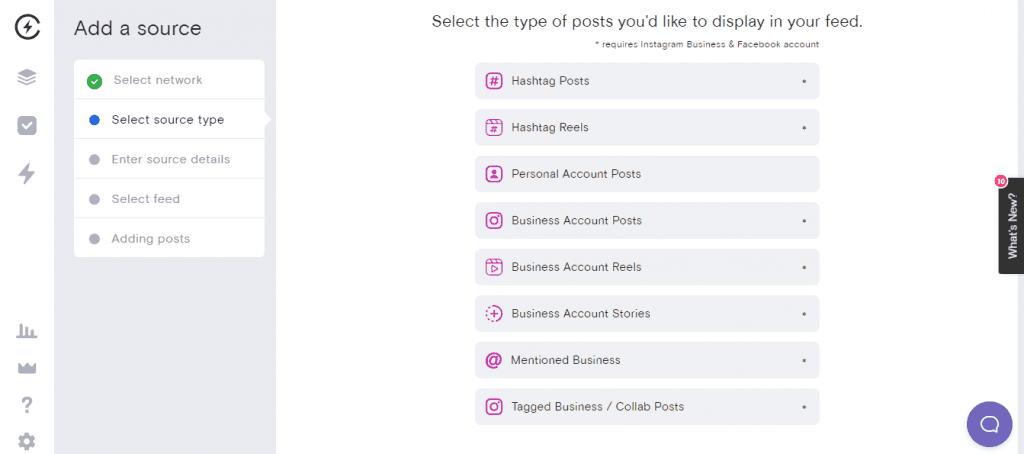
Once you've made your selection, connect your Instagram account to allow the aggregator to fetch your posts. You may need to grant permissions for access.
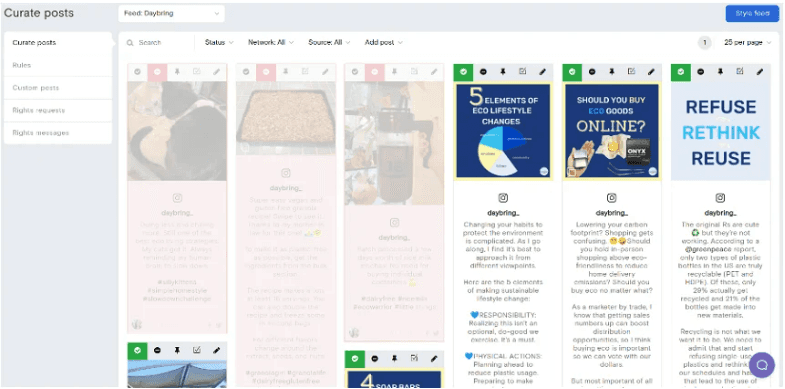
Step 5. Review the content and remove (or add) posts
After connecting your Instagram account, preview the imported content. Depending on your moderation settings, you can:
Approve or remove posts to ensure only relevant content appears.
Pin important posts to keep them visible at the top.
Filter posts based on hashtags, captions, or other criteria.
This step is crucial if you're embedding user-generated content or running social media campaigns.
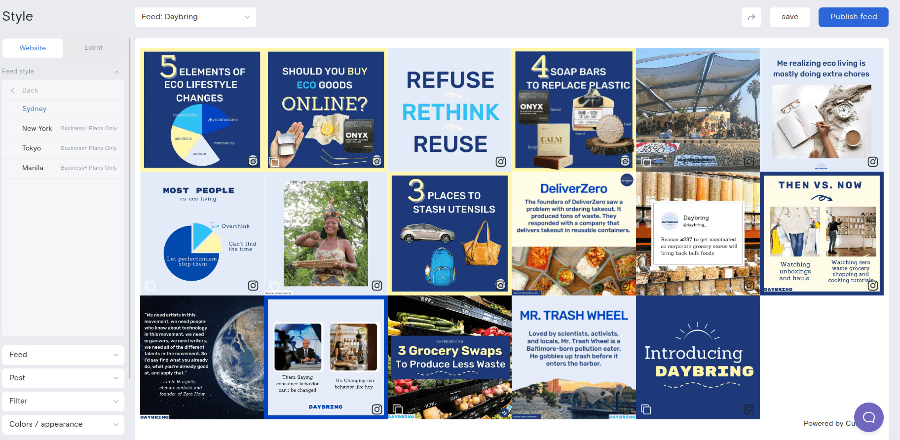
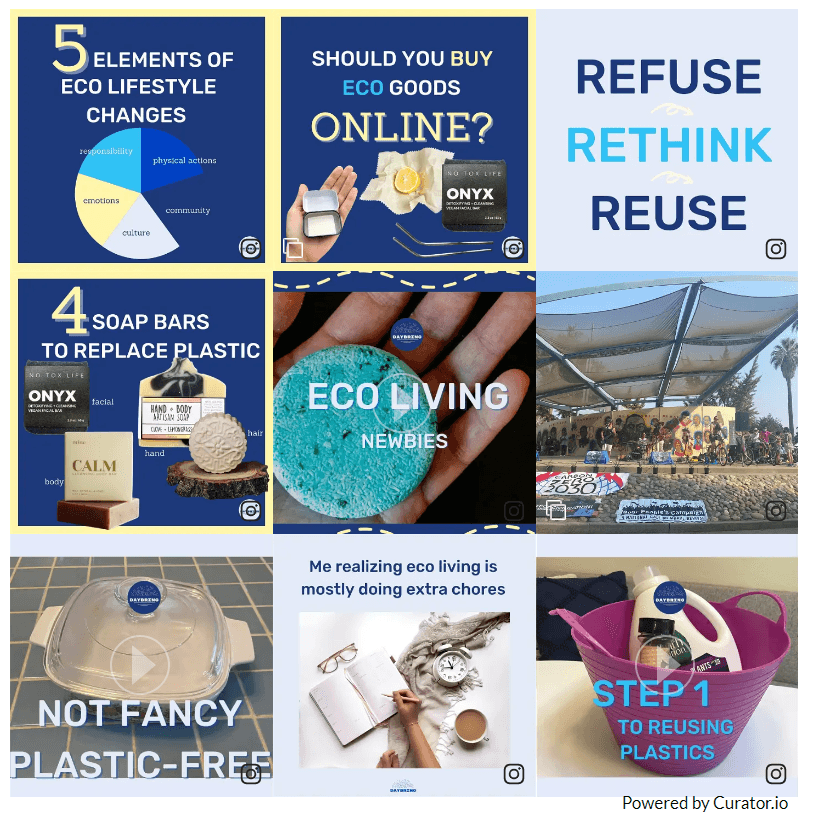
Step 6. Select a template style and customize it to your liking
Now it's time to customize your Webflow Instagram feed to match your brand's style. Curator offers:
Pre-designed templates that look great out of the box.
Customization options such as layout styles.
The ability to adjust fonts, colors, and spacing to align with your website’s design.
Advanced options like custom CSS for professional designers.
For inspiration, check out our guide on improving your embedded Instagram feeds by changing the layout.
Step 7. Embed the generated feed code into your Webflow website
Once your feed is set up and customized, it's time to embed your Instagram feed into Webflow. Click on get code to generate the code snippet that you can place in Webflow.
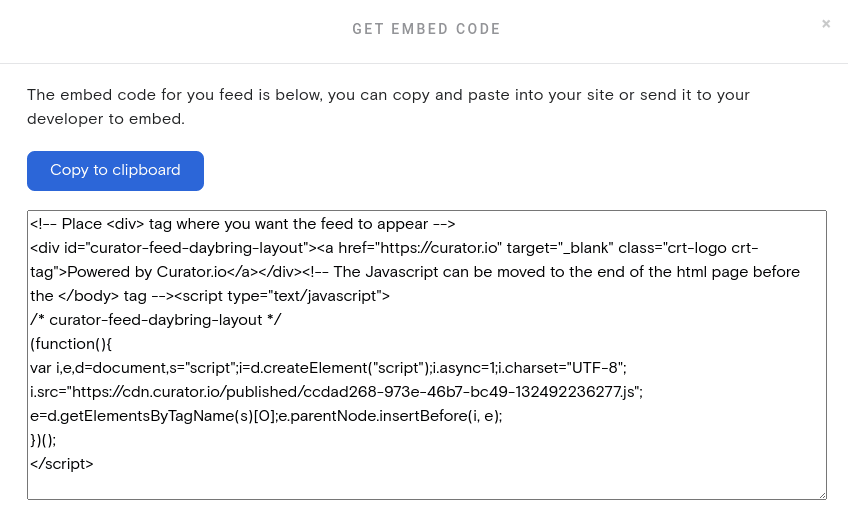
To embed the Instagram feed in Webflow:
Copy the provided embed code from your social media aggregator.
Open your Webflow Designer and navigate to the page where you want to add the Instagram feed.
Drag and drop an "Embed" element from Webflow’s elements panel.
Paste the copied embed code into the element.
Save and publish your Webflow site to see the Instagram feed live.
If you're looking for more ways to enhance your Webflow site, check out our guides on website widgets and website plugins.
Step 8. Login to the aggregator to approve or deny new posts occasionally
After embedding your Instagram feed, your work isn't over! Regularly log into your social media aggregator to:
Approve new posts (if using manual moderation).
Remove outdated or irrelevant content that no longer fits your brand.
Refresh your layout or make design tweaks as needed.
We recommend incorporating a time slot into your calendar so you don’t forget and let your feed become dated.
For additional customization ideas, explore our guide on how to embed your Instagram stories on your website.
Examples of Instagram feeds on Webflow websites getting results
These examples offer plenty of Inspiration.
1. Feather & Black

Feather & Black uses an Instagram feed on its Webflow site to showcase bedroom inspiration, customer photos, and styled interiors directly within its Inspiration section. Instead of relying on static images, the live Instagram feed keeps the page visually fresh and engaging. This approach helps the brand highlight real-life product styling, build social proof, and encourage visitors to explore ideas from its Instagram community.
2. Wake Forest University
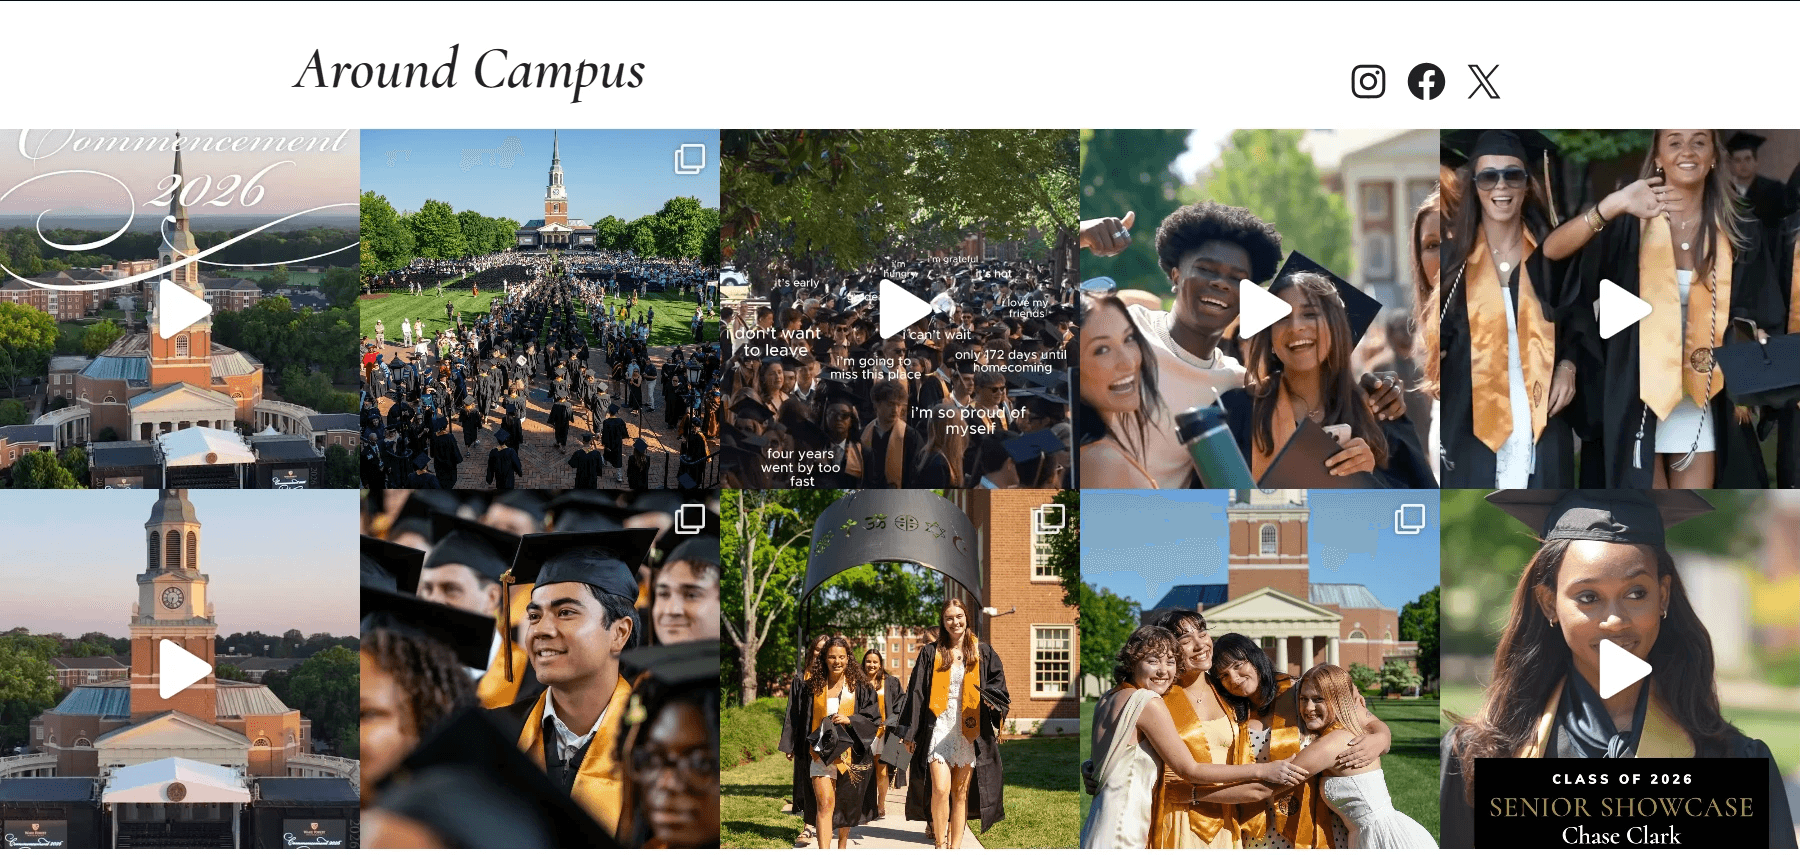
Wake Forest University integrates Instagram feeds across several sections of its web presence to keep content dynamic and community-driven. Pages like the LGBTQ+ Center, Campus Life, and academic department sites embed live Instagram posts featuring student activities, campus events, and announcements.
This makes the site feel more active and relatable while encouraging visitors to interact with current content and follow WFU on social platforms. The Instagram integration also strengthens engagement by showcasing authentic student experiences, increasing social proof, and helping prospective students connect with campus culture in a more visual, real-time way.
3. Fenty Beauty
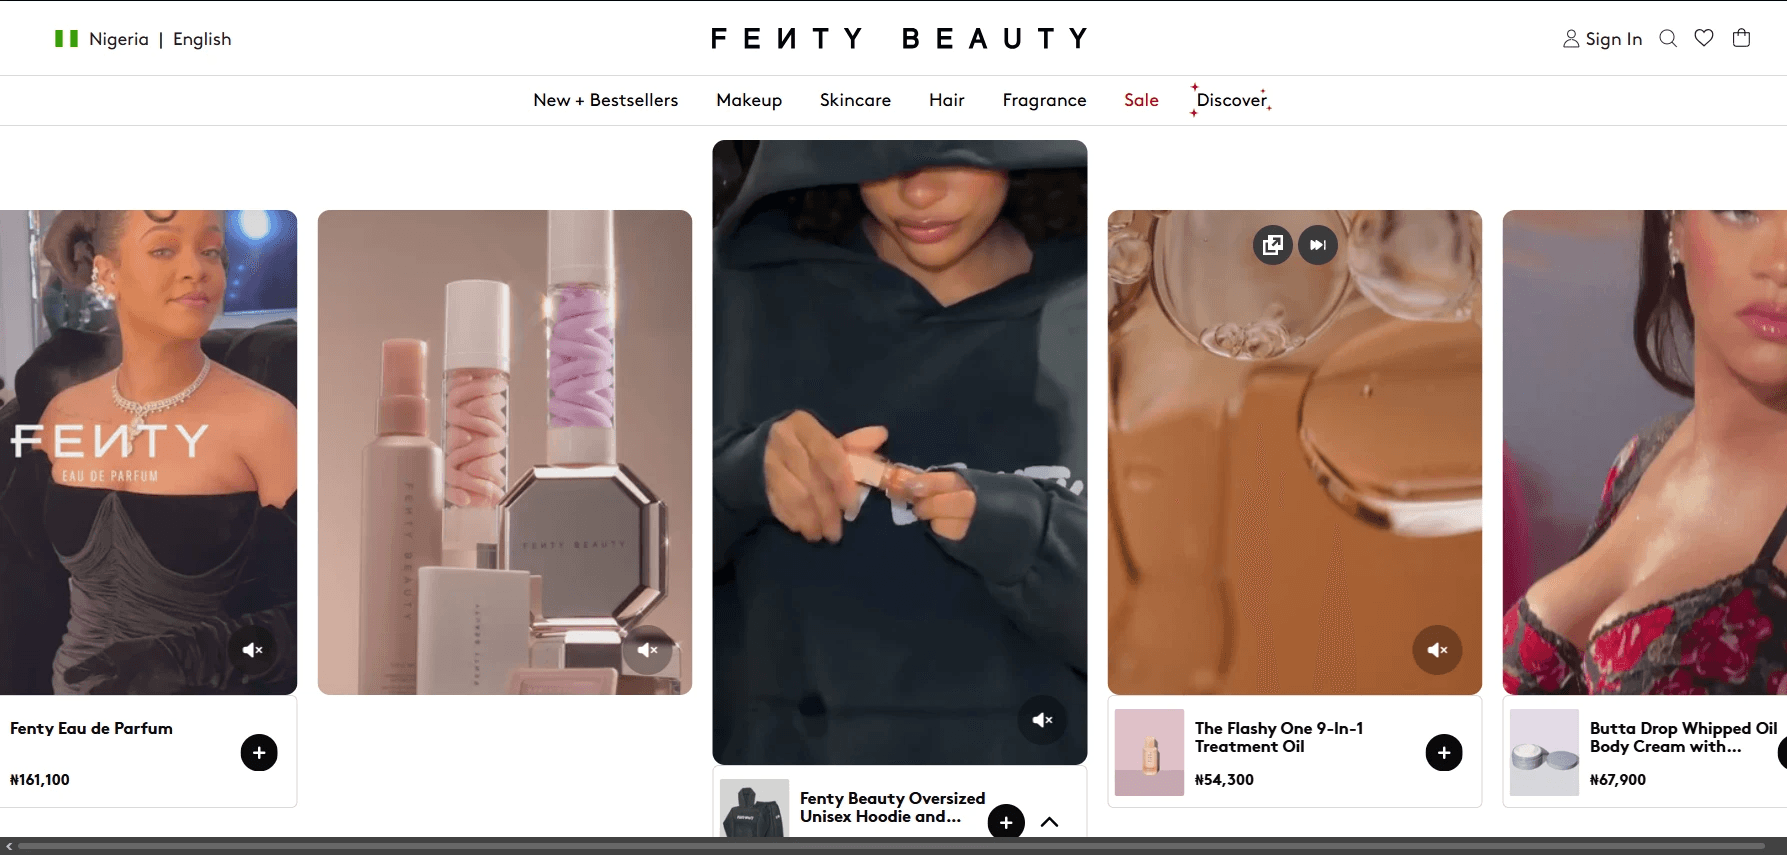
Fenty Beauty uses Instagram-driven content on its homepage to showcase makeup looks, creator tutorials, and customer-generated beauty inspiration. By featuring real people using its products, the brand keeps pages visually engaging and constantly updated. This social-first approach helps build trust, encourages visitors to explore trending products, and strengthens community engagement by connecting the website directly with Fenty Beauty’s highly active Instagram audience.
4. International Greeter Association
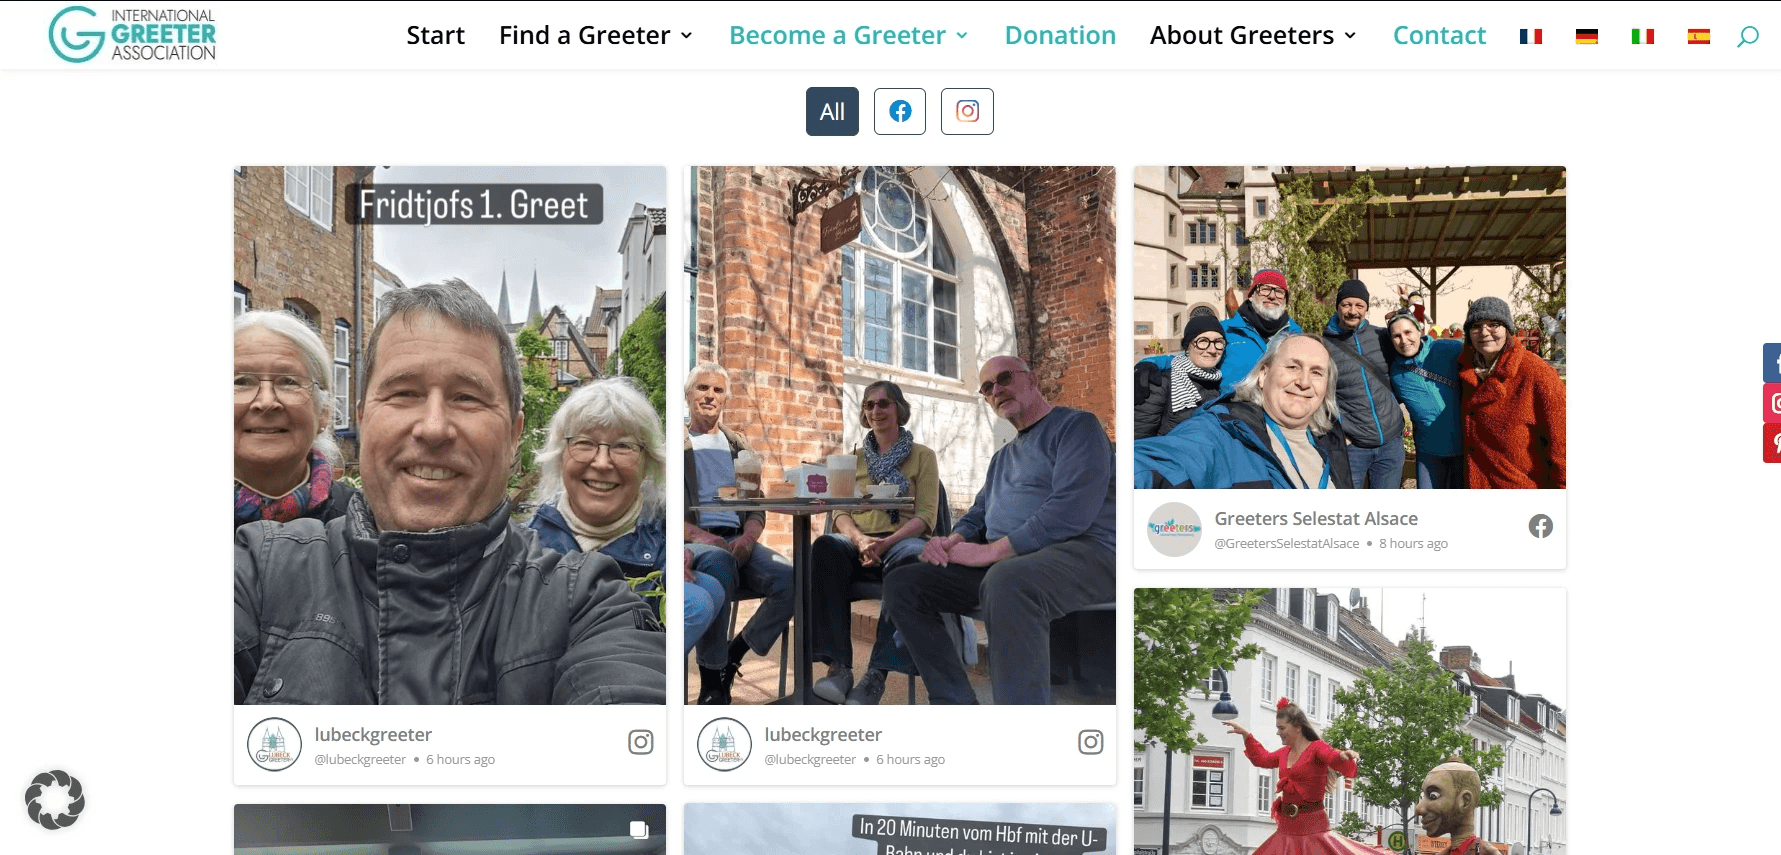
International Greeter Association uses an Instagram feed to bring its global community to life directly on its Webflow website. Visitors can see real photos from volunteer tours, local experiences, and traveler meetups happening around the world. This makes the site feel more personal, active, and welcoming while helping people connect with the organization through authentic, community-driven content instead of static images alone.
5. FC Zurich
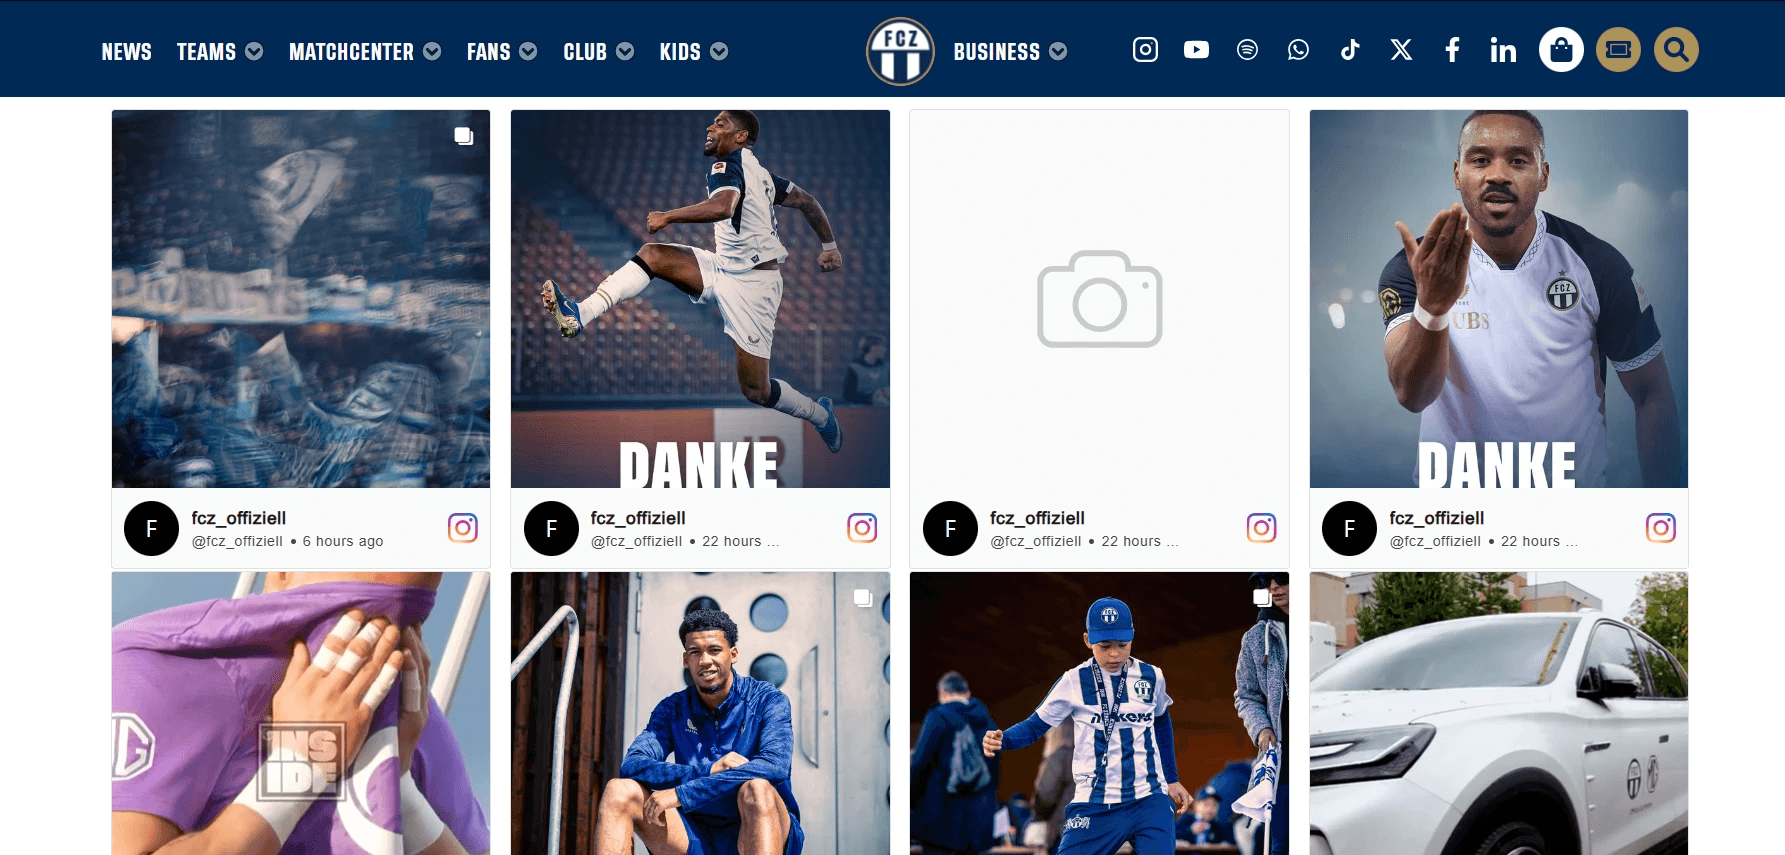
FC Zürich uses an Instagram feed to keep its website fresh with real-time match moments, training highlights, and fan content. This builds stronger engagement, social proof, and a sense of community around the club. It also encourages visitors to follow their social channels. If you add Instagram feed to Webflow, you can achieve similar dynamic updates and audience connection naturally here.
6. Sockeloen

Sockeloen embeds Instagram on its homepage to showcase real riders wearing its products in everyday and race settings. This adds social proof, keeps the site visually fresh, and builds trust through authentic user content instead of staged product shots. It also encourages visitors to engage with the brand on Instagram, strengthening community connection and helping convert casual browsers into followers and customers.
7. Eureka Furniture

People visiting furniture and interior decor websites need to see real-life styling to imagine products in their own spaces. Eureka Furniture achieves this with an Instagram feed that showcases customer homes, styled rooms, and product setups in authentic environments.
This keeps the homepage visually fresh, builds trust through social proof, and inspires purchase decisions. It also encourages visitors to explore more ideas and engage with the brand’s Instagram community for ongoing inspiration.
8. Hello Bello
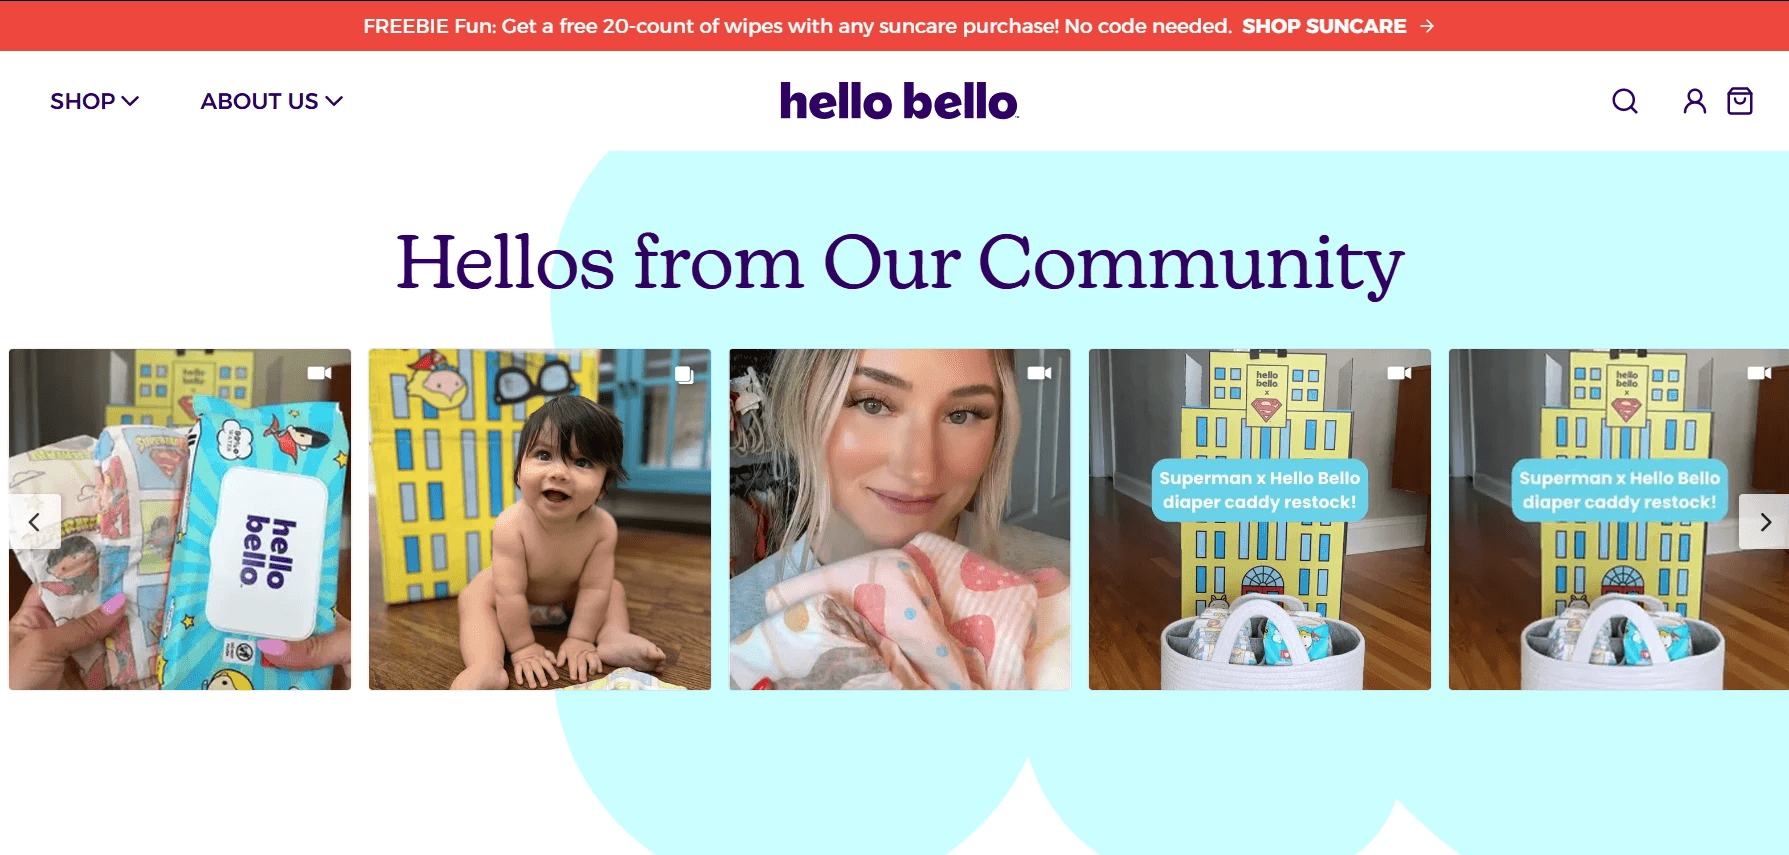
On Hello Bello, the Instagram feed brings everyday parenting moments to life on the homepage. It shows real families using the products in messy, joyful, and relatable situations. This creates an emotional connection, making the brand feel supportive and human rather than corporate.
It reassures parents they’re not alone and turns simple product browsing into a shared community experience. If you want the same effect, adding an Instagram feed to Webflow helps replicate this dynamic, community-driven engagement.
What’s a Webflow Instagram widget and what features should it have?
A Webflow Instagram widget is a tool that lets you display your Instagram content directly on your Webflow site, automatically turning posts into a live, updating feed. If you want to add Instagram feed to Webflow, the right widget should be simple to set up, flexible, and performance-friendly.
Key features to look for include:
Easy setup with quick Instagram account connection and no coding required
Customizable layouts such as grid, carousel, or masonry to match your design
Responsive design that adapts smoothly across desktop, tablet, and mobile
Content moderation controls to filter and approve posts before they appear
Fast loading performance to avoid slowing down your site
Auto-sync updates so new Instagram posts appear instantly
Hashtag feed support to showcase curated or campaign-based content
Branding options to match fonts, colors, and overall site style
Analytics or engagement tracking to measure performance
Using an Instagram feed Webflow solution like this helps you keep your site dynamic and aligned with your social presence. In most Instagram Webflow tutorial guides, the process shows how quickly you can embed and customize the feed for a more engaging user experience.
FAQs
How do I add an Instagram feed to Webflow without coding?
You can add an Instagram feed to Webflow by using a third-party widget. Connect your Instagram account, customize the feed layout, then copy and paste the embed code into a Webflow Embed element. It updates automatically.
Why should I add an Instagram feed to Webflow?
Adding an Instagram feed to Webflow keeps your site visually fresh with real-time posts. It boosts engagement, builds trust through social proof, and helps visitors connect with your brand through authentic, regularly updated social content.
What is a Webflow Instagram widget?
A Webflow Instagram widget is a tool that pulls posts from your Instagram account and displays them on your Webflow site as a live feed. It helps automate content updates and enhances visual storytelling.
What features should a Webflow Instagram widget have?
A good Webflow Instagram widget should offer responsive layouts, easy integration, content moderation, fast loading speed, and customization options so the feed matches your website’s branding and overall design style.
How do I embed Instagram in Webflow?
To embed Instagram in Webflow, use an Instagram feed tool to generate an embed code. Then add a Webflow Embed element, paste the code, and publish your site. The feed will display automatically.
Can I embed multiple Instagram feeds in Webflow?
Yes, you can embed multiple Instagram feeds in Webflow by creating separate widgets. Each can display different accounts, hashtags, or campaigns, allowing you to showcase varied content across different sections of your website.
What does an Instagram Webflow tutorial usually cover?
An Instagram Webflow tutorial typically explains how to connect your Instagram account, generate a feed using a widget, and embed it into Webflow. It also shows how to customize layout, styling, and display settings.
Previous post: